Creating a Basic Flow
This tutorial includes the requirements for a basic flow that can be used for any type of interaction on CxEngage. Your flow can include additional functions, however must include these at a minimum. This is also the suggested flow design for any basic non voice interaction.
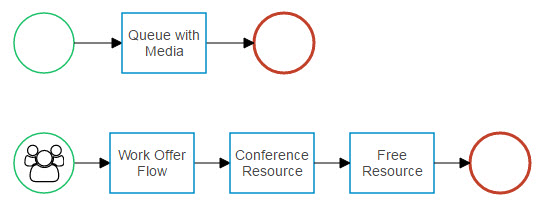
Here is what the completed flow will look like:
Create the Flow
- Go to Flows > Flows.
- For the new flow details, enter:
- Name: The name you want for the flow, for example Support Email Flow
- Type: Customer
- Click Submit
- Design your flow. A tutorial is available below that includes the design requirements. Your flow can include additional functions, however must include these at a minimum.
- Design the customer portion of the flow:
- Add an Entry event to the flow canvas.
- Connect the Queue with Media object to it with this configuration:
- Queue: Select the queue that will receive the email work offers.
- Media: Select any media in your tenant. This is a required parameter for this notation but is not used for non voice channels.
- Callback Enabled: Leave disabled.
- Dequeue After Timeout: Leave disabled.
- Resource: Enter a binding variable for the agent receiving the work offer, such as agent.
- Connect an Exit object to the Queue with Media object.
- Design the agent portion of the flow:
- Add a Resource Entry object to the flow canvas with this configuration:
- Signal Name: resource-acquired
- Condition: Not required
- Resource: Enter the binding variable used to identify the resource that was entered in the Queue with Media notation in the customer portion of the flow, such as agent.
- Add the Work Offer Flow notation and connect it to Resource Entry.
- Resource: Select the variable used to identify the resource receiving the work offer, such as agent. The list is populated with the variables entered previously in your flow. If your variable is not included in the list, check to ensure that you have entered it into the Queue with Media and Work Offer Flow notations.
- Configure the remaining parameters such as your wrap up settings and disposition codes the way that you want them for this flow. For help with configuring the parameters, refer to the Resource Control section of the Flow Designer Reference.
- Add the Conference Resource notation and connect it to Email Work Offer with this configuration:
- Resource: Select the variable used to identify the resource being conferenced in for this work offer, such as agent. The list is populated with available variables previously entered into your flow. If your variable is not included in this list, ensure that the Work Offer Flow notation is completely connected to Conference Resource.
- Muted: Leave disabled
- Add the Free Resource notation and connect it to Conference Resource with this configuration:
- Resource: Select the resource variable that is being released, such as agent. The list is populated with available variables previously entered into your flow. If your variable is not included in this list, ensure that the Conference Resource notation is completely connected to Free Resource.
- Set Presence: Ready
- Reason: Not required
- Add the Exit object and connect it to Free Resource.

- Add a Resource Entry object to the flow canvas with this configuration:
- Click the gear icon on the canvas to access the flow settings and select the Flow Defaults tab. Enter any default settings that you want for this flow.
- Click Publish.
- Enter a version name.
- Click Submit.
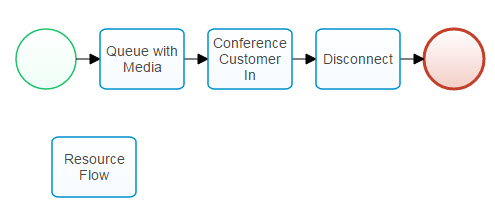
The complete flow looks like this: