Configuring Microsoft Office 365 Email Integrations
Updating the Email Integration To Use Microsoft Oauth
To update the existing email integration follow these steps.
-
Go to CxEngage > Configurations.
-
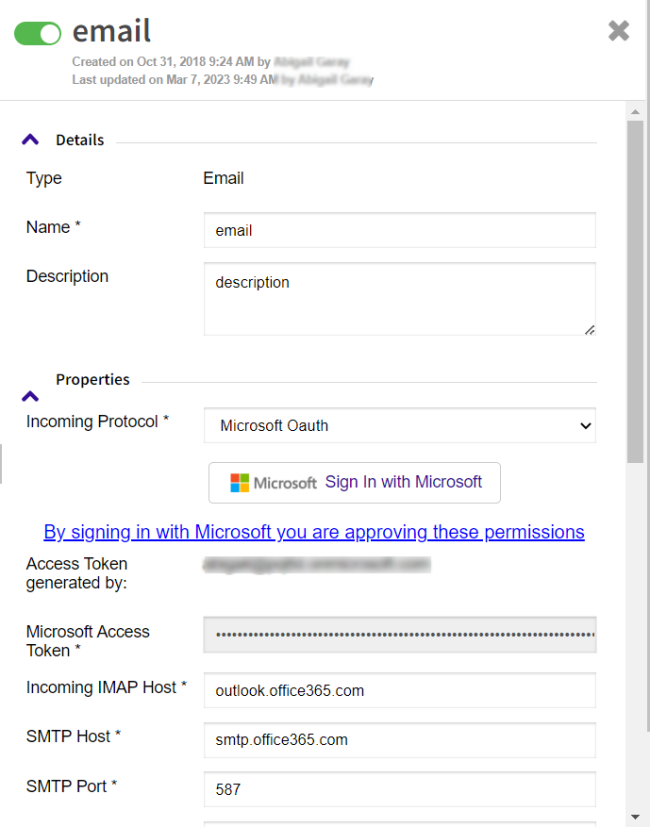
Highlight the email Integration configuration. The configuration panel displays.
-
Click the green toggle next to the integration name to disable the integration.
-
Click the Confirm button to affirm that you want to disable the integration. The toggle displays gray and the integration is disabled.
-
Under Properties on the email integration configuration panel, click the Incoming Protocol arrow and select Microsoft Oauthfrom the drop-down.
-
Click the Sign in With Microsoft button. A Microsoft login window displays.
-
From the Pick an account list, select an existing email account that you will use in CxEngage or click Use another account and enter the email account.
Note: Depending on the account you use for this integration, you may need to enter the Microsoft Log in and Password for the email account.
-
When asked if this app can access your info, click theYes button to allow CxEngage to connect to the email account. The Microsoft window closes and you are returned to the email integration configuration panel.
-
Under Properties in the SMTP User field, enter the email account.
Important: Use the same email address that you provided in the previous steps.
Note: Default values are automatically added to the remaining fields on the configuration panel. Check with your email administrator for the correct configuration for your company.
-
Click the Submit button to save your changes.
Note: You MUST click the Submit button and save your configuration before you enable it.
-
On the email configuration panel, click the gray toggle next to the integration name to enable it.
-
Click the Confirm button to affirm that you want to enable the integration. The toggle displays green and the integration is enabled.
Once this change is complete, your Office 365 email will use the Microsoft Oauth credentials to send emails.
Changing the Email Listener Settings
When updating the sender information, you will want to make sure the listener information is also updated for Microsoft Oauth.
-
Highlight the email Integration configuration. The configuration panel displays.
-
Scroll down to the Listener section.
-
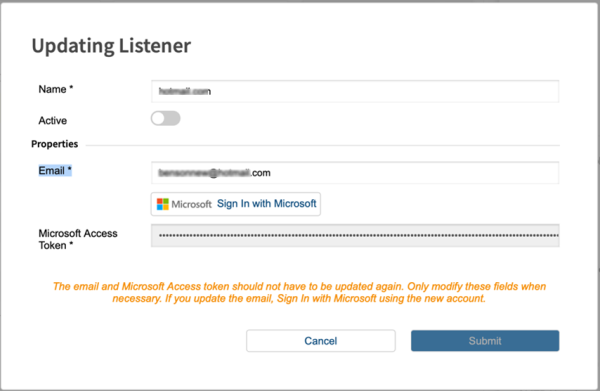
Click the Update button beside the email listener configuration with which you want to work.
-
Click the green Active toggle to turn the listener off. The toggle displays gray and the listener is disabled.
-
Enter the email address that you want to listen to for messages.
-
Click the Sign in with Microsoft button.
-
From the Pick an account list, select an existing email account or click Use another account and enter the email account that you will use in CxEngage.
Note: Depending on the account you use for this listener, you may need to enter the Microsoft Log in and Password for the email account.
-
When asked if this app can access your info, click theYes button to allow CxEngage to connect to the email account. The Microsoft window closes and you are returned to the email listener update window.
-
Click the Submit button to save your changes.
-
In the Listener section, click the Update button beside the email listener configuration for which you just saved changes.
-
Click the gray Active toggle to enable the listener. The toggle displays green.
-
Click the Submit button to save your changes. The listener is enabled.
Once this change is complete, CxEngage will use the Microsoft OAuth credentials to listen for emails on the associated email account.
Important: If you need assistance configuring your Office 365 mailbox, please contact Microsoft directly.
