Managing your Identity and Access
Whether it is a client application like a web or mobile app or a web API that backs a client app, the Microsoft identity platform performs identity and access management only for registered applications. Registering your application establishes a trust relationship between your app and the identity provider, the Microsoft identity platform.
Registering your Application
To register your application, follow these steps:
-
Log in as the Administrator to your newly created CxEngage AD Tenant.
-
Under Manage, select App registrations.
-
Click New Registration.
-
On the Register an application page, provide the name of the application. For example: "CxEngage-teams-integrations-app."
-
Under Supported account types, select Accounts in this organizational directory only (xxx only - Single tenant).
Important: Leave all fields blank under Redirect URI.
-
Click the Register button to complete your app registration.
Your new application is registered and a newly created application screen displays.
Be sure to note the Application ID (Client ID) of your new application listed on the Overview page. You will need it when you create the Microsoft Teams integration in CxEngage.
Configuring API Permissions
You must now configure the API application permissions.
-
Under Manage, select API permissions.
-
Click Add a permission.
-
On the Request API permissions panel, select Microsoft Graph.
-
Under What type of permissions does your application require?, select Application permissions.
-
Under Select permissions, expand each section and check all the boxes.
Note: See the API Permissions List for a list of Application permissions. -
Click the Add Permissions button to complete the process.
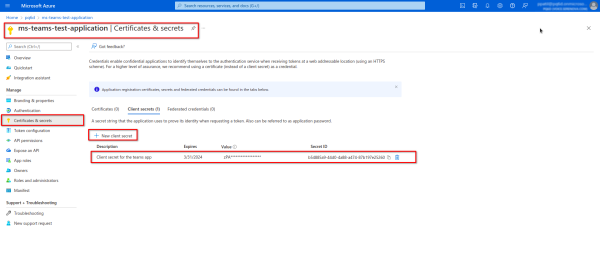
Creating the Client Secret
Once the API Application permissions are configured you must generate the application secret.
-
Under Manage, select Certificates & secrets.
-
Under Client Secrets, click New client secret.
-
Add a Description for your client secret, such as MS Teams CxEngage integration secret.
-
From the Expires drop-down, select Custom.
-
For the Start date, choose the current day.
-
For the End date, choose the current day + 1 year.
-
Click the Add button to save your secret. Your secret is added to the Client secrets list.
-
Immediately, click the Copy button for the secret and save it to an accessible location.
Warning: The secret value is visible only once on this page! Immediately copy the secret and save it. You must enter the secret value while creating the integration in CxEngage.
