Configuring a CxEngage Service Account
When integrating Microsoft Teams and CxEngage, there must be at least one user that has permission to read the MS Teams and Active Directory user profiles. We recommend the user account be called CxEngageService Account. It does not need to be linked to a CxEngage agent's account.
The CxEngage Service Account is used to:
-
Read all Active Directory and Microsoft Teams user details, such as email, phone number, other emails, account state, and display name.
-
Create or delete the user presence subscription for a group of users.
-
Receive user presence change notifications, when the Microsoft Teams presence status is updated.
Note: The CxEngage Service Account must be common between Microsoft Teams and Active Directory and have administrative read access to both Microsoft Teams and Active Directory.
Creating the CxEngage Service Account
To create a CxEngage Service Account, do the following:
-
Log in as the Administrator to your newly created CxEngage AD Tenant.
-
Select Users from the menu.
-
Click New User.
-
Enter the Name and email (user name) for the user.
-
Copy the auto-generated password from the Password field.
Note: Record the password that is created. It will be used when creating the Microsoft Teams integration in CxEngage.
-
Click the Create button.
Configuring API Delegated Permissions
Once the CxEngage Service Account is created you must configure the delegated permissions for the account.
While logged in with the Active Directory administrator account do the following:
-
Select App registrations from the menu.
-
Select the Active Directory application you created for the Microsoft Teams and CxEngage integration.
-
Under Manage, select API permissions.
-
Click Add a permission.
-
On the Request API permissions panel, select Microsoft Graph.
-
Under What type of permissions does your application require?, select Delegated permissions.
-
Under Select permissions, expand each section and check all the boxes.
Note: See the API Permissions List for a list of Delegated permissions. -
Click the Add Permissions button to complete the process.
Assigning Roles to the CxEngage Service Account
The CxEngage Service Account must be assigned certain roles to allow the user account to read information related to users in Active Directory and MS Teams.
-
Log in as the Administrator to your newly created CxEngage AD Tenant.
-
Select Users from the menu.
-
Click the CxEngage Service Account user.
-
Select Assigned Roles.
-
Click the Add Assignments button.
-
In the Directory Roles section, one by one, type in the following roles and click the Add button.
-
Global administrator
-
Teams administrator
Note: It may take a few minutes for the new roles to show in the user account.
Disabling Multi-Factor Authentication
You will want to disable multi-factor authentication for the CxEngage Service Account.
-
Log in as the Administrator to the Azure Active Directory Admin Center.
-
Select the Active Directory tenant that was created for the MS Teams and CxEngage integration.
-
Select Users.
-
Click the Per-user MFA button.
-
From the list of users, click the CxEngage Service Account user.
-
Click Disable MFA.
-
When prompted, confirm that you want to disable MFA for this user.
Disabling Security Defaults
You will want to disable the security defaults for the CxEngage AD Tenant.
-
Log in as the Administrator to the Azure Active Directory Admin Center.
-
Select the Active Directory tenant that was created for the MS Teams and CxEngage integration.
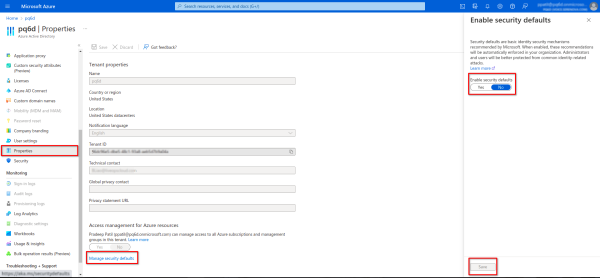
-
Select Properties.
-
Click the Manage security defaults button.
-
In the Enable security defaults panel, click the toggle to change it to No.
-
Click the Save button to keep your changes.
