Migrating Data to Open CTI 2.0
After you complete the update to Salesforce Open CTI 2.0 you must migrate your data and users from the Open CTI 1.0 application to the 2.0 application.
Important: Once you migrate your data, it will be upgraded to Open CTI 2.0. You cannot return to Open CTI 1.0. If specific users remain at 1.0 or only certain users move to 2.0, you will need to migrate them individually. Speak to your Enghouse Interactive support representative for help.
Preparing your Data
You must create two custom objects in Salesforce: CxEngage Interaction (new) and CxEngage Interaction Agent (new).
Note: The new namespace you will work with is nt_cxengage.
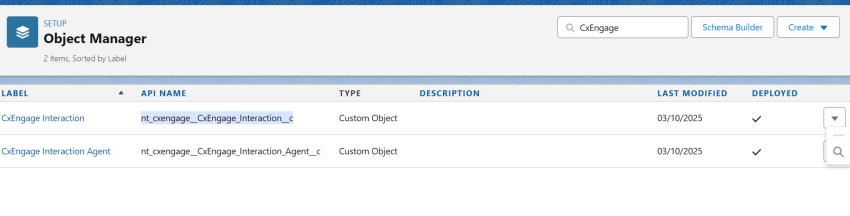
- Login into Salesforce.
- From the Setup panel, navigate to Object Manager .
- In the Search field, enter CxEngage.
- Click on the CxEngage Interaction label with nt_cxengage_CxEngage_Interaction_c as the API Name.
- Click Fields and Relationships.
- Click New.
- For the Data Type, select Text.
- Click Next.
- Complete the following fields:
-
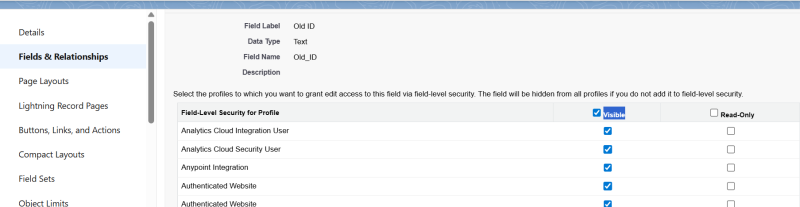
Field Label: Old ID
-
Field Name: Old_ID
-
Length: 80
-
External ID: true
-
Click Next.
-
Check the Visible box in the header, so that all profiles are able to see this field.
-
Click Next.
-
Click Save.
-
Repeat these steps for CxEngage Interaction Agent. In the Search field, enter CxEngage.
- Click on the CxEngage Interaction Agent label with nt_cxengage_CxEngage_Interaction_Agent_c as the API Name.
- Click Fields and Relationships.
- Click New.
- For the Data Type, select Text.
- Click Next.
- Complete the following fields:
-
Field Label: Old ID
-
Field Name: Old_ID
-
Length: 80
-
External ID: true
-
Click Next.
-
Check the Visible box in the header, so that all profiles are selected to be visible.
-
Click Next.
-
Click Save.
Running the Migration Scripts
After you have created the objects, you will need to migrate your data and users.
Important: Before you begin the migration process, content your Product Manager or Account Manager to get the necessary data migration script.
-
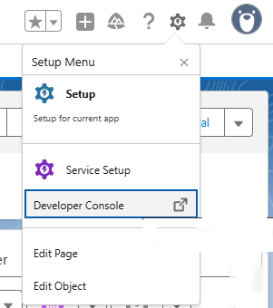
In Salesforce, click the Setup Menu icon in the upper right corner.
-
Select Developer console from the menu that pops up. A new window displays.
-
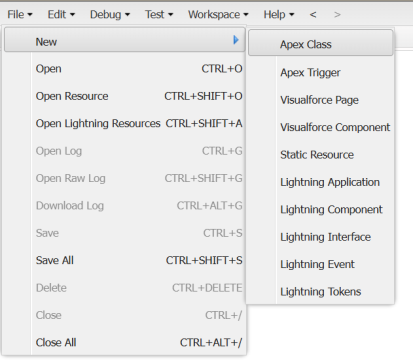
Click File.
-
Click New.
-
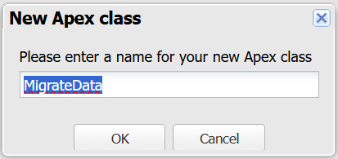
Click Apex Class.
-
Enter MigrateData as the name of your new Apex class.
-
Click OK.
-
Copy the script that you received from Enghouse Interactive and paste it into your Apex class.
-
Click Save.
-
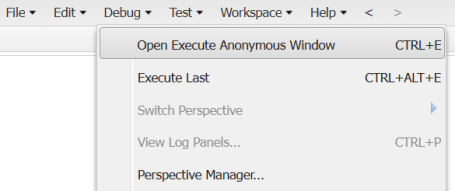
Click Debug.
-
Click Open Execute Anonymous Window.
-
In the window that opens, enter and execute the following syntax one by one.
MigrateData.CallCenterUser();
MigrateData.CxInteraction();
MigrateData.CxInteractionAgent();
MigrateData.ActivityReport();
Important: You must run this script again if any users that continue to use Open CTI 1.0 after this update need to move to Open CTI 2.0.
