Managing Outbound Identifiers
If you have outbound identifiers configured for your tenant, you can view and manage them under Configuration > Outbound Identifiers.
| To manage an outbound identifier list, you must have either the default Administrator or Supervisor role or a custom role with the OUTBOUND_IDENTIFIER_MODIFY permission. |
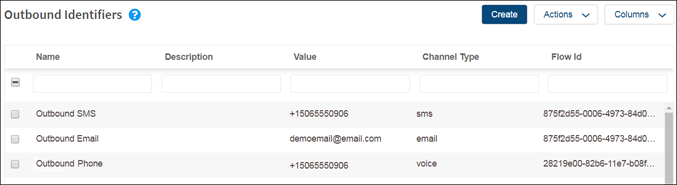
The Outbound Identifiers page displays the following information for each outbound identifier:
- Name: A unique name for the outbound identifier. This is the name that is listed as an option on the Outbound Identifier list in the agent interface.
Note: To prevent spam calls and comply with the evolving regulatory requirements of various countries, Enghouse Interactive does not allow anonymous outbound calling. Therefore, creating an Outbound Identifier named "Anonymous" is not permitted. - Description: Optional. A short description of the outbound identifier.
- Value: The contact details that are displayed to customer when an agent makes an outbound interaction. The value can be a valid phone number, Sms number, or email address.
- Channel Type: The channel type for the outbound identifier. This is either voice, sms, or email.
- Flow Id: The flow to which you want to apply this outbound identifier.
You can customize your column display. Click Columns and select the columns you want to display or select All.
Updating an Outbound Identifier
To update an outbound identifier:
- Select the row for the outbound identifier that you want to update.
- Update any of the following parameters:
- Enter a new Name for the outbound identifier.
- Enter a new value, for example, a valid phone number, SMS number, or email address.
- From the Flow Id drop-down menu, select the different flow to which you want to apply this outbound identifier. Choices depend on the names of the flows configured for your tenant.
- From the Channel Type drop-down menu, select another channel type. Choices include voice, Sms, or Email.
- Optionally, update the Description.
- Click Submit.
Disabling and Enabling an Outbound Identifier
The toggle at the top of the right panel indicates whether the outbound identifier is enabled or disabled. If the toggle is green, the outbound identifier is enabled. If the toggle is grey, the outbound identifier is disabled.
To disable an outbound identifier:
- Select the row for the outbound identifier that you want to disable.
- Click the green toggle at the top of the panel.
- Click Confirm on the confirmation message.
To enable an outbound identifier:
- Select the row for the outbound identifier that you want to enable.
- Click the grey toggle at the top of the panel.
- Click Confirm on the confirmation message.
