User Interface (UI) Rebranding
You can update the logo and color scheme for your tenant to reflect your business branding. After logging in to the UI, users will see the logo and color(s) that you have configured.
To update tenant branding configuration, you must have the default Administrator role or a custom role that includes the MANAGE_ALL_BRANDINGS permission.
Tenant branding is inherited. If you rebrand a parent tenant, any child tenants below that tenant will inherit the configurations and show the same UI branding.
At this time, the following items may be individually configured:
- Logo
- Favicon image
- Navigation menu color
- Navigation menu text color
- Primary color
- Accent color
- Hover text accent color
Rebranding Your Tenant
To rebrand your CxEngage tenant:
- Go to Configuration > Tenants.
The list of available tenants appears. - Select the tenant that you want to update.
The tenant details panel appears. - Under Branding, configure the fields to reflect your personalized branding.
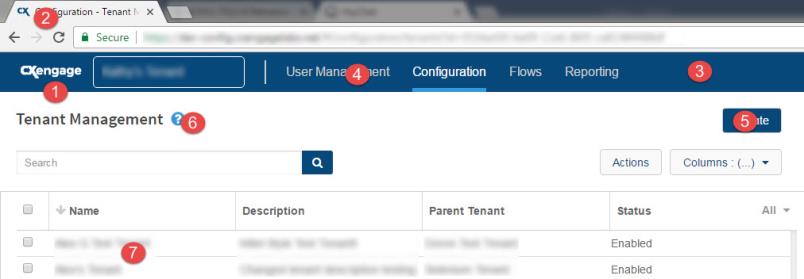
A visual map of the items that can be configured is included under What can you update with your own branding? above.- Product Name: Enter the name of your product or business
- Logo/Header: Upload an image to use for your logo within the UI
- Favicon: Upload an image to use as the icon displayed on the internet browser tab while in the UI
- Navigation Bar: Change the color of the top navigation menu bar by selecting it from the image map or entering a hex code for a specific color
- Navigation Bar Text: Change the color of the top navigation menu item text by selecting it from the image map or entering a hex code for a specific color
- Primary Color: Change the color of the primary action buttons within the UI by selecting it from the image map or entering a hex code for a specific color
- Accent Color: Change the color of the secondary action buttons within the UI by selecting it from the image map or entering a hex code for a specific color
- Accent Hover Color: Change the color of list items when they're hovered on by selecting it from the image map or entering a hex code for a specific color
- Click Submit.
If you do not see the changes immediately, refresh your browser.
Resetting Tenant Branding
You can reset your tenant's branding configuration to it's default values. Remember that if this is a child tenant the default values are those of the parent tenant.
To restore your tenant's branding back to default values:
- Go to Configuration > Tenants.
The list of available tenants appears. - Select the tenant that you want to restore to default settings.
The tenant details panel appears. - Under Branding, click Reset to Default.
- Click OK on the confirmation pop up message.
If your settings do not reset immediately, refresh your browser.
Watch the CxEngageTraining video to see this in action:
