Release Notes
Maintenance items, fixes, and new features for CxEngage and CxQM are released as needed throughout the year. This release note reflects changes to CxEngage and CxQM that were made since the last release.
You can find release notes for recent releases below.
Historical release notes can be found in the Release Notes Archive.
| To receive email notifications for CxEngage platform issues, subscribe to updates from https://status.cxengage.enghouse.cloud/. Please check this page regularly for release details. |
Important: A fresh log in ensures that your cache is cleared and that software updates are immediately available to you. Following a release in CxEngage and you are prompted to refresh your application.
-
In CxEngage click the Refresh link and log back into the application.
-
In click the notification and log back into the application.
Note: You can also log out of the application and log back in to update your instance of the application.
What's New
Here is a summary of the features and fixes included with the latest release(s).
| CxEngage Release 26.07.08 | |
|---|---|
| All Regions | July 08, 2026 |
Update: Enhanced Agent Experience: Introducing the New Contacts Tab in and Skylight Desktop
To improve your agent's experience, the Info and History tabs have been replaced with the Contacts tab. This new tab combines the Info and History tabs into one with a more user friendly interface.
Important: A fresh log in ensures that your cache is cleared and that software updates are immediately available to you. In and Skylight Desktop click the notification and log back into the application.
Note: You can also log out of the application and log back in to update your instance of the application.
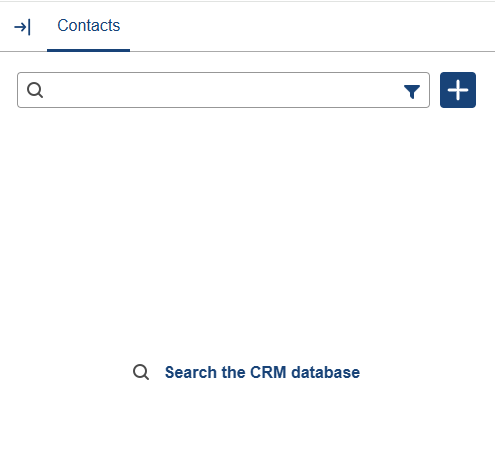
While performing the same functions, the user interface is now streamlined to allow agent's to find contact information and historical interactions on a single tab.
Agents will notice that the following icons have been introduced to replace buttons:
| Icon | Action | Definition |
|---|---|---|

|
Filter | Select Filter to specify an attribute to use in the search. |

|
Add Contact | Select Add Contact to create a new contact. |

|
Edit |
Select Edit to modify the contact information. |

|
Select Contact | When not in an interaction, Select Contact displays the contact's details and historical interactions. When in an interaction, with no contact match, the agent can search for the appropriate contact and then click Select Contact to assign the interaction. |

|
Unassign Contact | When in an interaction, Unassign Contact removes the interaction from the matched contact. |

|
Search Contacts | Select Search Contacts to return to the Contacts search. |
Once a contact is selected, historical interactions display below the Personal information.
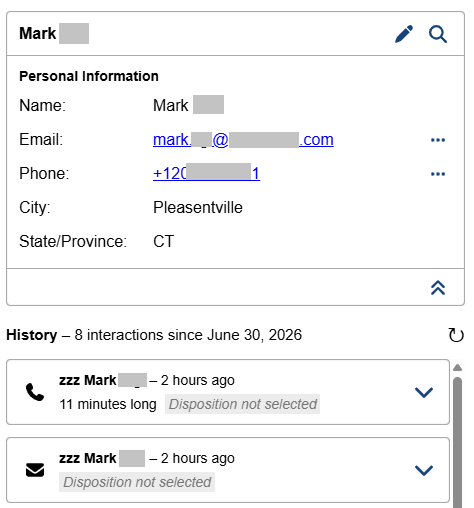
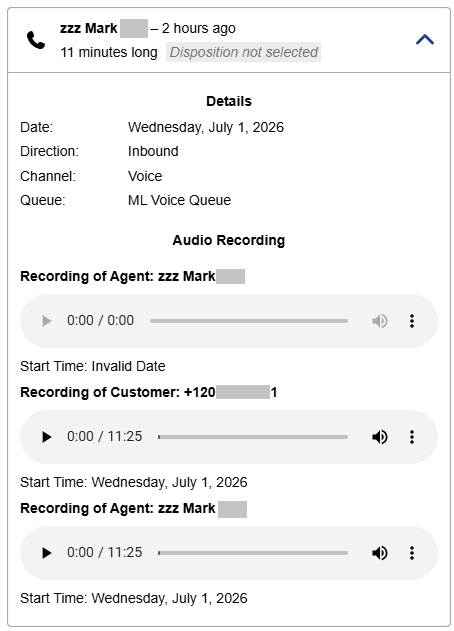
The agent can expand the interaction tile to see details regarding the interaction. With the proper permissions, the agent can hover over Transcript or Audio Recording and click to load the media.
Fix: CxEngage | Agents able to access call recordings of other agents through interaction history in Skylight Desktop (CXV1-32036)
CxEngage now enforces configured user permissions for historical interactions displayed in the Skylight Desktop contact management panel. Users will only be able to view past interaction records and associated artifacts that align with their assigned roles and permissions, ensuring consistent access control and improved security.
Recent Releases
Select a release date for a summary of the features and fixes included with that release. For other release information, categorized by year, see Archived Release Notes.
| CxEngage Release 26.07.01 | |
|---|---|
| All Regions | July 01, 2026 |
Coming Soon: July 8, 2026 - Enhanced Agent Experience: Introducing the New Contacts Tab in and Skylight Desktop
To improve your agent's experience, the Info and History tabs have been replaced with the Contacts tab. This new tab combines the Info and History tabs into one with a more user friendly interface.
While performing the same functions, the user interface is now streamlined to allow agent's to find contact information and historical interactions on a single tab.
Agents will notice that the following icons have been introduced to replace buttons:
| Icon | Action | Definition |
|---|---|---|
|
|
Filter | Select Filter to specify an attribute to use in the search. |
|
|
Add Contact | Select Add Contact to create a new contact. |
|
|
Edit |
Select Edit to modify the contact information. |
|
|
Select Contact | When not in an interaction, Select Contact displays the contact's details and historical interactions. When in an interaction, with no contact match, the agent can search for the appropriate contact and then click Select Contact to assign the interaction. |
|
|
Unassign Contact | When in an interaction, Unassign Contact removes the interaction from the matched contact. |
|
|
Search Contacts | Select Search Contacts to return to the Contacts search. |
Once a contact is selected, historical interactions display below the Personal information.
The agent can expand the interaction tile to see details regarding the interaction. With the proper permissions, the agent can hover over Transcript or Audio Recording and click to load the media.
These changes will take place automatically on or about July 8, 2026. Agents may need to log out and log back into and Skylight Desktop to see the new tab.
| CxEngage Reporting Release 26.06.17 | |
|---|---|
| All Regions | June 17, 2026 |
Update: Tenant ID default in CxEngage Reporting
To improve performance, the Tenant ID filter for any new or existing asset, including standard and custom reports, dashboards, and schedules, will default to the Tenant ID of the current tenant when the asset is opened.
Note: Existing assets will automatically receive this update.
| CxEngage Release 26.04.18 | |
|---|---|
| All Regions | April 18, 2026 |
Update: Virtual Agent Integration with CxEngage
Enghouse Interactive's Virtual Agent can now be integrated with CxEngage to automate responses and support the routing of SMS and Chat interactions. Virtual Agent is an active participant in a conversation, designed to follow rules you create in order to provide answers based on customer questions. Virtual Agent automates handling of routine inquiries so your agents can focus on more complex tasks, improving the overall efficiency of your call center.
To provide a successful customer experience, you will need to create objectives, responses, and conversation logic in your Virtual Agent platform. Enghouse Interactive Professional Services will help you complete the configuration and integration of Virtual Agent.
Contact your Enghouse Interactive Sales Representative for more information.
| CxEngage Release 26.04.01 | |
|---|---|
| All Regions |
April 01, 2026 |
Update: Agent Assist in Skylight Desktop
AI-driven guidance has been introduced into Skylight Desktop chat and SMS messaging, allowing for real-time agent assistance and improving agent efficiency and consistency. This new functionality takes a live digital interaction and returns suggested responses, knowledge content, summaries, and wrap-up assistance.
When an agent accepts a chat or SMS interaction, the Agent Assist tab displays on the right side of the Skylight Desktop screen. Agent assist analyzes the real-time conversation between the customer and the agent and provides suggestions for responses to the customer and knowledge base articles to share.
When Agent Assist is active the following tabs are available :
-
Live Assist - Displays all items that the agent may need to address based on the current conversation. This includes a checklist of best practices and possible responses based on the customers inquiry. Depending on what the customer inputs into the chat, Live Assist provides response suggestions to the Agent.
The Agent can scroll through the possible responses, find the most appropriate, and click Insert to add it to the chat. Or, the Agent can manually enter a different response. Wrap-up information is also available.
Note: The Agent can edit the suggested response before adding it to the interaction by clicking Edit under the entry. -
Checklist - If one has been created, a checklist displays. A checklist of best practices can help guide the agent through all the recommended steps during an interaction. When Agent Assist detects that a step has been met, the item is automatically checked off in the list.
This list also shows on the Live Assist tab. As an item is checked off from the list, that item no longer displays on the Live Assist tab. -
Search - Enter a keyword or key phrase to find specific content.
-
Browse - Shows a tree view of all the articles used to create the Knowledge base. The agent can expand categories to find related articles which can be sent to the customer. Click Insert for the article you want to include and then click Send on the response bar.
How to get Agent Assist
Agent Assist is a separate Enghouse Interactive application and you must have a license before you can use it with Skylight Desktop.
If you have an Agent Assist license, contact your Enghouse Interactive support representative to integrate the application with your CxEngage tenant.
If you are interested in adding Agent Assist to your tenant, contact your Enghouse Interactive sales representative.
Fix: Integrations without schemas cannot be updated (CXV1-31551)
Users were able to create integrations with arbitrary types and properties, but once submitted, they could not be updated. The ability to create integrations that are not assigned a CxEngage designated type has been disabled.
Fix: SMS interactions getting matched against wrong CRM contact despite "strict" setting in flow (CXV1-31678)
When matching SMS interactions that came from numbers that were not in the user's CRM database, was finding the closest match, even when strict was specified. The search functionality has been improved and fuzzy search has been disabled by default.
Fix: Unable to create new custom Realtime dashboard (CXV1-31990)
Users were unable to create and edit custom dashboards using the CxEngage UI. This issue has been resolved.
| CxEngage Release 26.03.28 | |
|---|---|
| All Regions |
March 28, 2026 |
Update: Multi-Media Messaging Service (MMS) Support for Twilio
Important: You must contact your Enghouse Interactive support representative to enable this functionality. You will not automatically be able to send attachments with your SMS interactions.
CxEngage has enhanced SMS so that agents can send and receive multi-media content, such as images and file attachments, within customer interactions. MMS functionality is only available to customers who use Twilio as their messaging provider.
Note: MMS (multi-media messages) can be sent and received in the United States, Canada, and Australia by using a Twilio phone number that is MMS-enabled. Currently, Twilio offers MMS-enabled long code phone numbers in the US and Canada, MMS-enabled short codes in the US, and Australian Long Codes.
Agents can now send and receive file attachments in active SMS messages in , via Twilio. Attachments are stored and retrieved along with interaction history. Supervisors can view attachments in Agent State Monitoring.
After the initial contact with a customer, whether the interaction is inbound or outbound, a paperclip icon displays beside the Send button. The agent simply clicks the paperclip, browses to the image, video, or document that they want to send, and clicks Open. The agent can include text with the attachment. As well, the customer can send attachments to the agent. The agent can click on an attachment to open and download the file.
Note: When creating an outbound interaction, the agent must send an initial message before the paperclip appears and attachments are allowed.
When an agent transfers or copies the interaction the attachments are included.
Agent Monitoring and Reporting
Supervisors can monitor interactions with attachments through Skylight or Interaction Monitoring. The supervisor can click the attachment to open or download the file. Once an interaction is completed, reporting includes attachments with the interaction.
File Attachment Requirements
Some file formats that can be sent via attachment during an interaction include jpeg, png, gif, heic, mp3, mp4, mpeg, and quicktime. If the agent or customer attempts to send a format that is not supported, an error message displays. See the online help for a full list of accepted formats, media size limits, and file naming guidelines.
| CxEngage Release 26.01.31 | |
|---|---|
| All Regions | January 31, 2026 |
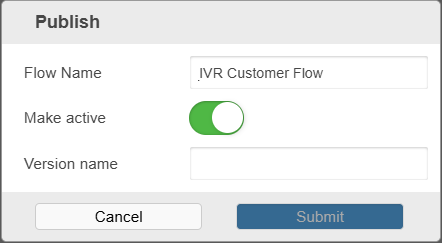
Update: While publishing a flow, make Active Default should be OFF/Disabled (CXV1-31034)
When publishing a flow, the Make active toggle defaults to inactive. The toggle is gray to indicate the flow is inactive or green to indicate it is active. If the flow is disabled you can enable it at a later time.
Update: Time zone in Flow Debug Logs One Hour Behind (CXV1-31036)
Flow debug and reporting events API now includes the event timezone in the response.
| CxEngage Release 26.01.28 | |
|---|---|
| All Regions | January 28, 2026 |
Fix: Duplicate day in the Report - Queue Service Level by Day (CXV1-31702)
Some users were seeing duplicate dates in reports due to a time-zone handling error.
The issue with date grouping not taking time zones into account has been fixed.
Update: Salesforce Legacy Chat End-Of-Life
Legacy Chat in Salesforce Classic and Lightning Experience is scheduled for retirement on February 14, 2026. After February 14, 2026, legacy chat will be removed. You will not be able to access or use it. If you are unsure what the next step is after Legacy Chat end-of-life, contact your Enghouse Interactive Support Representative.
| CxEngage Release 26.01.24 | |
|---|---|
| All Regions | January 24, 2026 |
Fix: Remove fuzzy search being the default on contact searches in Configurator (CXV1-31703)
Previously, contact searches could return broad matches, making it difficult to locate exact records. Searches are now restricted to exact matches, improving accuracy and making it easier to find specific contacts.
| CxEngage Release 26.01.07 | |
|---|---|
| All Regions | January 07, 2026 |
Fix: Interactions remain in queue and not getting assigned to available agents "Inbound and outbound" (CXV1-31677)
In some cases, calls were not being routed to available agents. This issue has been fixed.
