Navigating Voice Interactions

You can accept inbound voice interactions in Skylight. Voice interactions are indicated with an microphone icon () in the interactions management panel. You can accept only one voice interaction at a time.

Managing Voice Interactions

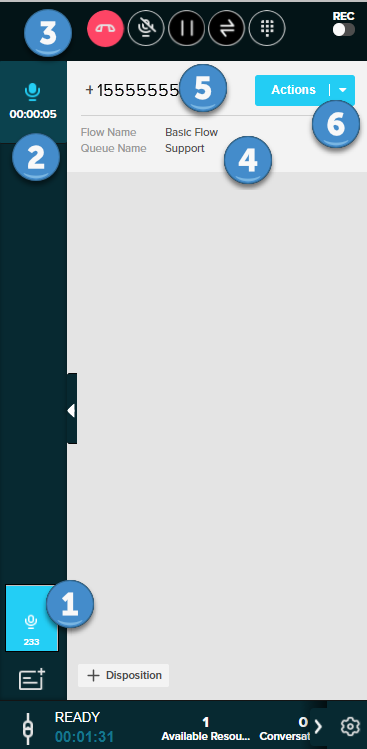
After you accept a voice interaction, the primary content updates to look like this:

  Object Description
1 Voice Work Offer The incoming voice notification. Click the toaster notification to accept the interaction.
2 Active Interactions

Lists all active interactions. Click the interaction to view the conversation. Voice interactions are indicated by an microphone icon ().

The icon also displays the amount of time that has elapsed since the phone call began. Elapsed time for voice interactions is specified in hours, minutes, and seconds (hh:mm:ss)

3 Phone Controls

Phone controls and voice interactions are always listed at the top of this panel regardless of which interaction you are currently working with. The following phone controls are available:

Handset: Click to end the phone call.
Mute/Unmute: Click to mute your side of the conversation. When the icon is white () you are muted.
Hold: Click to place the caller on hold. Media, such as music or a recorded message, is played to the caller while they are on hold. When the icon is white (), the caller is on hold.
Transfer or Add Participant: Click to open the transfer menu. From here, you can add a participant or transfer the call to a queue or a contact on a transfer list.
Dial Pad: Click to open the dial pad. You can use the dial pad to make IVR selections. When the dial pad is open, the icon is white ().
Recording: Click to record your call. Click again to turn call recording off. The option to pause and resume recording is enabled by your administrator.
4 Contact Identifier The contact's name or phone number.
5 Flow and Queue Information
  • Flow Name: The name of the flow that the voice interaction was received on
  • Queue Name: The name of the queue that the contact waited in
6 Actions

Use to Actions drop-down menu to perform the following actions:

  • Click Hang Up when you are done interacting with the contact. This completes the interaction.
  • Click Wrap Up On to enable the wrap up feature.
  • Click Wrap Up Off to disable the wrap up feature.

Watch the CxEngageTraining video to see this in action:


You might also be interested in: