Flow Tutorial: Design a Basic Interaction Flow
This tutorial will guide you through a basic interaction flow design using the configuration console. After completing this tutorial, you will:
- Understand the basic elements of a standard interaction flow
- Be able to link those elements together to build a flow
- Know how to configure the options for those elements
You will create a flow that:
- Supports work offers from any channel type available on your tenant
- Greets callers
- Prompts callers to make an IVR queue selection between 2 options
- Asks existing customers to provide their customer number on voice calls
- Provides an agent resource for either queue selection
- Asks callers to provide a satisfaction score at the end of the call
- Places the agent in Ready status when the interaction is complete and they are disconnected
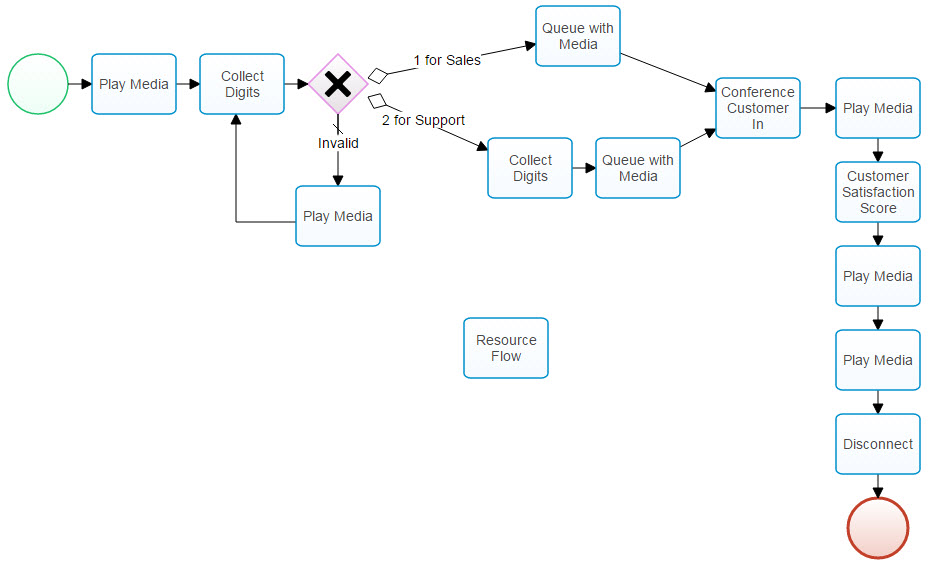
Here is what the completed flow canvas should look like:
Prerequisites
This tutorial assumes that your tenant is populated with the following data. If your tenant does not include this data, you can substitute values for those that apply for your tenant.
| Media | Configured Data |
|---|---|
| A "welcome" greeting | Disposition List |
| A "main menu" option asking callers to select an option, such as 1 for Support and 2 for Sales | Presence Reason List that is assigned to your user |
| A "customer number" option asking callers to enter their customer ID/number | Support Queue |
| Hold music | Sales Queue |
| A "sorry" message to play for invalid entries | |
| A "satisfaction score" message asking callers to rate their experience between 1 and 5 | |
| A "thank you" message to thank customers for calling | |
| A "good bye" message letting callers know that they can hang up |
Designing the Flow
To begin, access your tenant.
- Go to Flows > Flows.
- Click Create.
- Enter a name for your flow.
- Select Customer as the Type.
- Click Submit.
The Flow Designer opens.
Complete these steps to populate your flow with the activities and events.
| Step | Details | Element |
|---|---|---|
| Step 1 |
Drag and drop an Entryevent into the Flow Designer window. This event indicates the beginning of a flow. |

|
| Step 2 |
Next to the Entry event, add a Play Media activity to play a welcome greeting to the caller.
Connect the Entry event to the Play Media activity. |

|
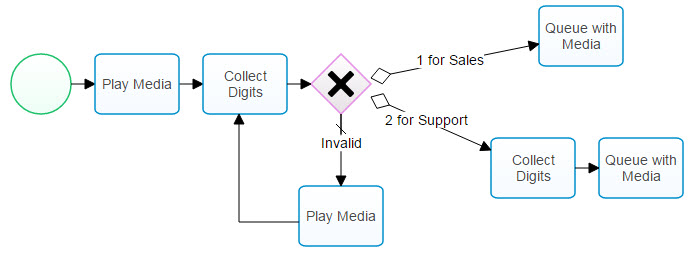
| Step 3 |
Next to the Play Media activity, add a Collect Digits activity for an IVR to prompt the customer to enter a selection identifying what they are looking for.
This tells the flow that the customer will be making a choice by selecting one number on their telephone. Connect the Play Media and Collect Digit activities. |

|
| Step 4 |
Next to the Collect Digits activity, add a Decision Branchso that our flow can support the decision paths available for the scenario. Connect the Collect Digit activity to the branch. |

|
|
Checkpoint: Your flow should look similar to this example:
|
||
| Step 5 |
Now we will create gateway branches for the different decision point options. Branching off of the upper right side of the decision branch, where we will create a path for a Sales queue for new customers, add a Queue with Media activity to place the customer into the queue and find an available resource, while playing hold music to voice callers.
Connect the decision branch to the Queue with Media activity. Because this connection is from a decision branch, we have to configure the connection to tell the flow when to use it.
The condition statement uses menu because that's what we used as the binding variable for the Collect Digits activity from Step 3. We're telling the flow that this branch should be followed if the digit that a customer entered is 1. |

|
| Step 6 |
Step 5 created the path for a Sales queue - let's create a separate path for a Support queue for existing customers that first asks for their customer number. Branching off of the lower right side of the decision branch from Step 4, add a Collect Digits activity.
Create a second connection from the decision branch and connect it to this Collect Digits activity.
|
|
| Step 7 |
Next to the Collect Digits activity, add another Queue with Media activity.
Connect the Collect Digits activity to this Queue with Media. |
|
| Step 8 |
Steps 5 and 6 created paths for possible customer selections of 1 and 2. Now we'll create a path for an invalid entry that will allow the caller to try again. Below the decision branch from Step 4, add a Play Media activity to advise the caller that their selection was invalid and to try again.
Create a third connection from the branch point and connect it to this Play Media activity. This connection will tell the flow that this is the default path to follow if the other conditional paths (i.e. 1 or 2) do not apply.
Create a new connection from this Play Media activity and connect it to the initial Collect Digits activity directly before the gateway, creating a loop. Once the connection is made, you can bend or reposition it by clicking and dragging at any point on the line. |
|
|
Checkpoint: Your flow should look similar to this example.
|
||
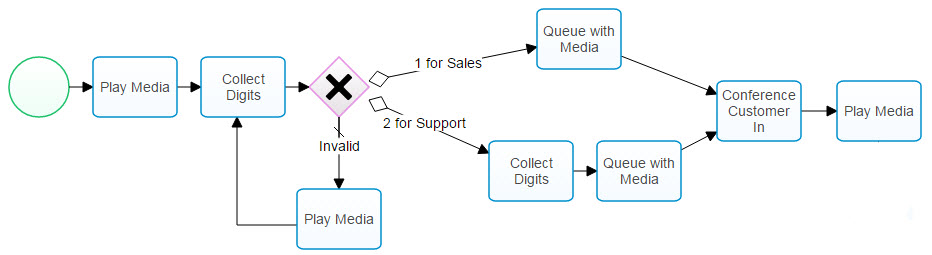
| Step 9 |
Now that we have resources available from the Queue interactions for two queue options, each will need to have the customer connected to the applicable resource. Since each require the same action, we can combine the paths and use the same item. Add the Conference Customer In activity next to the Queue with Media activities to add the customer into a conference with the resource.
Connect both of the Queue with Media objects to the Conference Customer In object. |

|
| Step 10 |
Next to the Conference Customer In object, add a Play Media activity to thank the caller at the end of the conversation when the agent has disconnected.
|
|
|
Checkpoint: Your flow should look similar to this example.
|
||
| Step 11 |
Below the Play Media activity, add a Customer Satisfaction Score activity to ask the caller to rate their satisfaction level for the call by selecting 1 through 5 where 1 is the lowest and 5 is the highest.
Connect the Play Media activity to the Customer Satisfaction Score activity. |

|
| Step 12 |
Below the Customer Satisfaction Score activity, add a Play Media activity to thank the caller again.
Connect the Customer Satisfaction Score activity to the Play Media activity. |
|
| Step 13 |
Below the Play Media that thanks the caller, add another Play Media activity to close the call by saying goodbye to let the caller know that they can hang up.
Connect the Play Media activities. |
|
| Step 14 |
Below the Play Media activity that says goodbye, add a Disconnect activity to disconnect the caller.
Connect the Play Media activity that thanks the caller to the Disconnect activity. |

|
| Step 15 |
Below the Disconnect activity, add the Exit event and connect the items. This identifies the end of this particular part of the flow. |

|
|
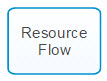
Now we need to configure the agent or resource sub-flow. The resource sub-flow:
This tutorial uses the simplest way to configure this with an independent flow object. |
||
| Step 16 |
In an empty section of the Flow Designer, add a Resource Flow object. This is a stand alone flow object that does not need to be connected to any other piece of the flow.
|
|
|
Checkpoint: This completes the canvas portion of your flow design. It should look similar to this example.
Don't worry if your sections are in different locations within the flow designer or go in different directions, like down instead of to the side. The important part is that the objects are connected in the proper sequence with the correct configuration details. |
||
| Step 17 |
There are some basic flow functions that may be required for every customer flow but are not necessarily specific to the customer or agent portions of that flow. These functions are configured through mandatory flow settings. Click the gear icon on the canvas to access the flow settings and select the Flow Defaults tab. We will only configure the settings that are necessary for this flow. The remaining default values can be left as they are.
|

|
|
Congratulations! You can now publish your completed flow. |
||