Step 5: Design an Interactive Flow
A flow represents the business logic of a call. It is a series of call actions and parameters that describe the caller and resource/agent experiences during an interaction and "tells" the application how to handle the entire interaction. For example, the flow dictates what IVR messages to play to callers (media prompts), which queue to place them in (created queues), and which agents the work offer may be sent to, based on their assigned groups and/or skills. It also tells the application how to handle functions like placing someone on hold or disconnecting the call.
Flows are designed using various objects in a graphical flow designer where you drag and drop elements, link, and configure them to create a flow.
| Flow Object | Description |
|---|---|
| Activity |
An action taken by the system during a call or to complete a function. Example: Playing a media file or dialing a resource.
|
| Event |
Starting and end points of a flow as well as any intermediate events that trigger movement throughout a flow progression. Example: Start, End, or throwing a signal that work was accepted. |
| Branch |
Controls the sequence of a flow by branching off into different paths and acting as decision points. Example: Different paths to different queues, based on IVR selections. |
| Reusable Flow |
Holds series of activities and events that include multiple pieces of standard business logic combined into one activity selection. You can create a reusable flow that is then an available object in your future customer flow designs. Example: You may have a series of individual media prompts that you want to play to a caller. Rather than configuring each Play Media object in your call flow, you can create a reusable flow with them and insert that as one object into your call flow. |
The Flow Designer allows you to tell the console exactly how to handle and manage the interaction, based on the objects that you add and how you configure them. While you are free to design any number of possible flows in the Flow Designer, this activity will walk you through a basic flow creation that will route a caller through different prompts, provide two queue options and offer a satisfaction survey.
Create a Flow
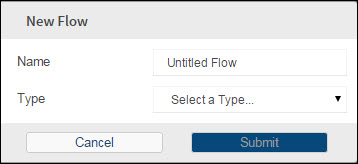
Go to Flow > Flows to get to the Flow Management window. Existing flows will be listed.
- Click on Create in the upper right corner to open the New Flow window

- Enter a Name for your flow
This is a free form entry field. Use any Flow Name that doesn't already exist, such as Main IVR, ABC Inc Main Flow, John's Flow - Select the flow Type of Customer
- Click Submit
Add Flow Objects
The steps below only include the objects required for this activity. For a list of the current flow objects and their explanation, refer to the Flow Object Reference appendix included at the end of this guide.
| If any object is missing a required configuration item, that object will be highlighted in red. those objects must be resolved prior to the flow being saved or published. |
We will design a flow that includes the customer, agent, and standalone functions. Each will require their own piece of the same flow.
Create the Agent Portion of a Flow
| Step | Details | Object |
|---|---|---|
| 1. |
Add an Entry event. This event indicates the beginning of the flow. |

|
| 2. |
To the right of the Entry event, add a Play Media activity. This activity will play a welcome message to the customer calling.
Connect the items
Connection lines can be removed at any time clicking on the "x" that appears on it. They can also be moved, extended, or bent at given angles. |

|
| 3. |
To the right of the Play Media activity, add a Collect Digits activity.
Connect the Play Media activity to the Collect Digits activity. |

|
| 4. |
To the right of the Collect Digits activity, add a Decision Branch. This allows you to branch the flow into different paths, based on conditions that you set on the outgoing branches of the object. These are based off of the options that were presented to the caller in Step 3. In our example, we presented the caller with two options, so this object will require two branches to accommodate those. We can also be prepared for invalid entries and add a third branch that routes back to the Main Menu. Otherwise, if we only prepared for a selection of "1" or "2" and the caller pressed "4" in error, nothing would happen and the caller would be stuck. Connect the Collect Digits activity to the decision branch. |

|
|
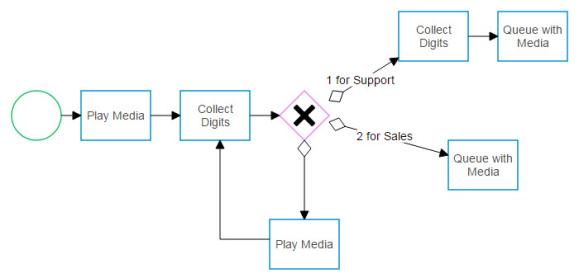
CHECKPOINT: Your flow should now look similar to this example.
|
||
| 5. |
Coming off of the upper right side of the decision branch, we will create the Support path from the decision point created and add another Collect Digits activity. This activity will ask the caller to enter their customer number to identify themselves.
Connect the Decision Branch to the Collect Digits activity. Important: Because this connection is from a Decision Branch, we have to configure the connection to tell the flow when to use it. Click once on the connection line to bring up the details if necessary. You can also access connection configurations by clicking on the gear icon that appears when hovering your mouse over them.
This tells the flow that this path is only to be used when the digit "1" is entered in step 3. |

|
| 6. |
Next to the Collect Digits activity, add the Queue with Media template and connect the items. This template places the interaction into the specified queue which triggers the process of finding an available resource based on the queue search query, while simultaneously playing back specified hold music to the customer.
|

|
| 7. |
Steps 5 and 6 created the path for the Support queue for an existing customer. Now, let's create a separate path for a new customer looking for Sales, which was option 2 on the IVR Main Menu step. Coming off of the lower right side of the branch from step 4, add another Queue with Media template.
Connect the Decision Branch to this Queue with Media object. Important: Because this connection is from a Decision Branch, we have to configure the connection to tell the flow when to use it. Click once on the connection line to bring up it's details if necessary. You can also access connection configurations by clicking on the gear icon that appears when hovering your mouse over them.
This tells the flow that this path is only to be used when the digit "2" is entered in step 3. |

|
| 8. |
Steps 5 and 7 configured flow paths for the possible customer selections - now we'll create a path for an invalid entry that will allow the caller to try again. Below the Decision Branch, add a Play Media activity.
Connect the Decision Branch and this Play Media activity. Important: Because this connection is from a Decision Branch, the connection has to be configured to tell the flow when to use it. Click once on the connection line to bring up its details if necessary. You can also access connection configurations by clicking on the gear icon that appears when hovering your mouse over them.
This tells the flow that this path is the default path to follow if the other conditional paths (options 1 or 2) do not apply. Next, to give the caller another chance to make their selection, create another connection from this Play Media activity to the Collect Digits activity, directly before the Decision Branch. |

|
|
CHECKPOINT: Your flow should now look similar to this example.
|
||
| 9. |
Now that you have resources available from the Queue actions for both the Support and the Sales options, each will need to have the customer connected to the applicable resource. Since each require the same action, we can combine the paths and use the same activity. Next to the Queue actions, add the Conference Customer In object.
This action adds the customer into a conference with the resource. Connect both of the Queue Interactions to the Conference Customer In object. |

|
| 10. |
To ask the caller to rate their satisfaction level at the end of the call by using the dial pad, add a Customer Satisfaction Score activity next to the Conference Customer In object and connect the items.
|

|
| 11. |
Below the Customer Satisfaction Score activity, add a Play Media activity to thank the caller and say good bye.
Connect the Customer Satisfaction Score activity to this Play Media activity. |

|
| 12. |
Below the Play Media activity, add a Disconnect activity and connect the items.
This will disconnect the customer from the call. |

|
| 13. | Below the Disconnect activity, add the Exit event and connect the items. |

|
|
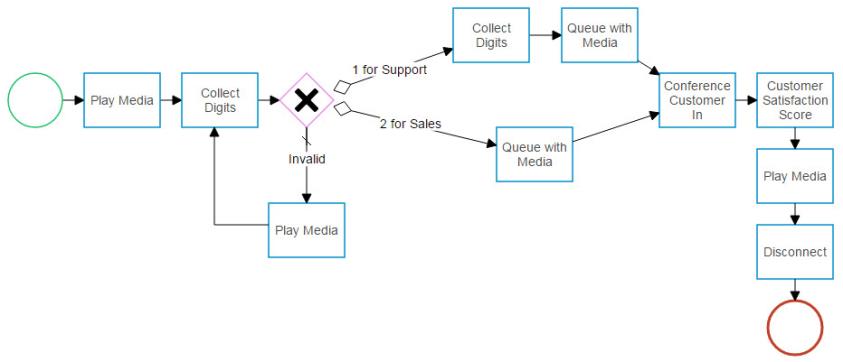
CHECKPOINT: This completes the customer portion of the flow which should now look similar to this example.
|
||
Create the Agent Portion of a Flow
The previous section created a caller experience. This section will create the agent experience.
| Step | Details | Object |
|---|---|---|
| 1. |
In an empty section of the Flow Designer, add a Resource Entry event.
This event identifies a sub flow that will not be triggered until the resource-acrquired signal is ready. That signal is sent from the Queue actions in the customer experience portion of the flow. |

|
| 2. |
Next to the Resource Entry event, add a Work Offer Flow reusable flow. This object sends the work offer (call) to the agent.
Connect the Resource Entry event to Work Offer Flow. |

|
| 3. |
Next to Work Offer Flow, add a Conference Resource template and connect the items.
This Participant will always match the resource value specified by the Resource Entry event. |

|
| 4. |
Next to the Conference Resource In object, add a Disconnect activity and connect the items.
This Participant should always match the resource value specified by the Resource Entry event. |

|
| 5. |
Next to the Disconnect activity, add a Free Resource activity and connect the items.
This activity lets the flow know that when the agent is disconnected from the call that they should be removed from the interaction and placed in a Ready status. |

|
| 6. | Next to the Free Resource activity, add the Exit event and connect the items. |

|
|
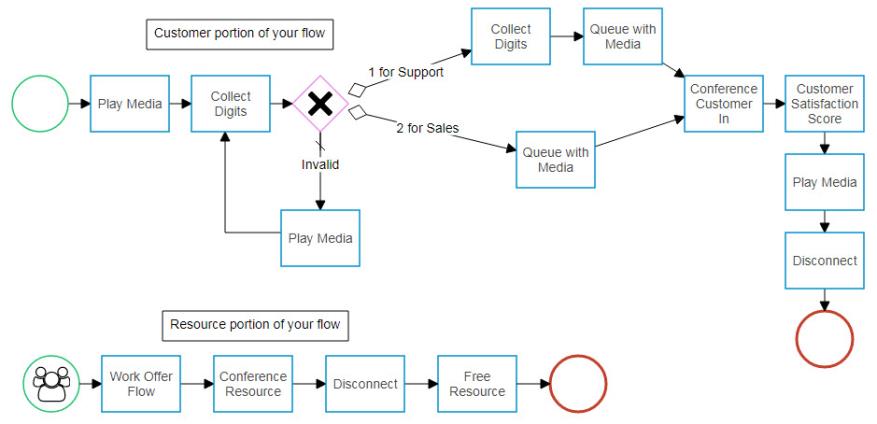
CHECKPOINT: Your flow should look similar to this example.
|
||
Configure the Flow Defaults
There are some basic functions of a standard interaction flow that are not necessarily specific to the customer or agent portions of the flow. These functions are configured through mandatory flow settings.
| Step | Details | Object |
|---|---|---|
| 1. |
Access the flow settings by clicking the gear icon next to the Publish button. |

|
| 2. |
Go to the Flow Defaults tab.
|
|
| 3. |
Configure your flow defaults. We will only configure the settings that are necessary for this flow. The remaining default values can be left as they are.
|
|
| 4. | Exit the flow settings by clicking anywhere outside of the settings window. | |
End Result
This completes your flow design! You may have noticed that your flow automatically saved after each change. You can close your flow designer at any point and return to that draft version to continue from where you left off, but your flow isn't active until you publish it. Feel free to move items before you publish your flow by dragging them on the canvas.
| Don't worry if your sections are in different locations within the Flow Designer or go in different directions like down instead of to the side. The important part is that the objects are connected in the proper sequence with the correct configuration details. |
Next Section:
You might also be interested in:


