Step 6: Publish Your Flow
You may have noticed that the Flow Designer saved your work. This is a draft version that will auto save any time a chance is made on the canvas. When you have finished designing your flow, it must be published and made active before it can be used.
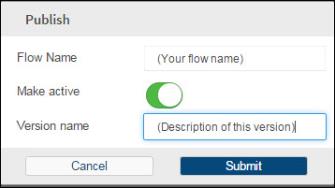
- Click on Publish in the upper right corner of the Flow Designer to make the Publish window appear.

- Enter the required details.
- Flow Name: The name defaults to the one entered when creating the flow, but you can edit it here.
- Make Active: This tells CxEngage whether this version should be the active one or not. Click to toggle the status indicator to green for active (default) or gray for inactive.
- Version name: Enter a short description of this flow version. The Flow Manager will automatically assign a sequential numerical version number such as v1 and v2. This version name is free form entry and will differentiate between the versions. For example, "Starting version", "Added new actions"
- Flow Name: The name defaults to the one entered when creating the flow, but you can edit it here.
- Click Submit to save your flow and to return to the Flow Management window.

If there is a problem with the designed flow, it will not publish. Check your flow objects for things like missing configuration details or an incomplete connection.
Next Section:
Step 7: Map the Flow to an Assigned Contact Number
You might also be interested in:
- Editing a Published Flow
- Troubleshooting Tips
- Flow Designer Tips

