Configuring Chat Widgets
| Please note that this section is specific to the chat widget, configurable through the configuration UI. It has default behavior and responses that cannot be modified. For a fully customizable version of web chat, refer to our new Messaging SDK (V2). |
You can configure many sections of your chat widget to customize behavior and reflect your corporate branding.
Chat Widget Branding
Branding for your chat widget can be configured while you're creating it, or by editing it after submission.
All chat widget branding settings are optional.
To customize branding for a chat widget:
- Go to Configuration > Chat Widgets. If your chat widget doesn't already exist, create one.
- Click on an existing chat widget's name to access the details panel.
- Configure the Branding options to match the desired branding desired for your business web messenger chat window.
- Display Style: The web messenger can be displayed as a button (default) or tab.
- Button Icon URL: Enter a URL of an image to use as a messenger button icon.
- Button Width: You can customize the button width by entering the number of pixels to use. The default value is 58.
- Button Height: You can customize the button height by entering the number of pixels to use. The default value is 58.
- Business Name: Enter a business name to be displayed at the top of the message conversation window.
- Business Icon URL: Enter a URL of an image to use as an icon displayed next to your business name at the top of the message conversation window.
This image must be at least 200px x 200px in size and in either JPG, PNG, or GIF format. - Background Image URL: Enter a URL of an image to use as a background image in the message conversation window. This image will be displayed full size if it is large enough to fill the conversation window, and tiled if not.
- Brand Color: The brand color is used for the messenger window header, the button/tab coloring in an idle state, and default app icon if a business icon URL is not specified. The default value is #65758e.
- Conversation Color: The conversation color is for the customer messages in the conversation window. The default value is #0099ff.
- Action Color: The action color is used for hyperlinks or buttons in the agent messages, as seen in the customer's conversation window. The default value is #0099ff.
- Fixed Intro Pane: Toggle to enable/disable. When enabled, the intro pane with your business name and icon remains pinned to the top of the conversation. When disabled, the intro pane scrolls with message contents. The default setting is disabled.
- Prechat Capture: Select Name or Email as the identifier requested of customers initiating a message, or None to remove the prechat capture message.
- Optionally, add any allowed URLs.
- Click Submit.
Prechat Capture
A "prechat" message and confirmation can be sent to a customer before an agent receives the work offer. A prechat message is used to capture either a customer name or email address, followed by a confirmation. For example, greeting each customer who initiates a message with a standard "Hi there! To start off, we'd like to know a little bit more about you." and a request for their name. That's followed up with "Thanks for that! What can we help you with?" while an agent is being queued.
While you can choose between requesting a name or email address with the branding configuration, any additional pre-chat capture verbiage configuration is defined within the script tags added to your page to implement your chat widget. You can remove the prechat message completely and instead have the interaction sent directly to an agent without customer entered data.
Removing Prechat Capture
Prechat capture messages can be removed or disabled as part of your chat widget branding configuration. To remove prechat messages:
- Go to Configuration > Chat Widgets.
- Click on the chat widget being updated, or create a new one.
- Select None for the Prechat Capture option under the Branding section of your chat widget's design panel.
- Optionally, configure additional branding settings.
- Click Submit.
Removing via API
You can user a POST or PUT request to remove any prechat capture messages from your web integration through the API. This means that customers initiating a chat interaction through your site will not be asked any pre-chat details. Instead of passing on the customer's name or email address to agents, will display the customer name of Customer, until the interaction is assigned to a contact at which point the name is updated to the contact's name.
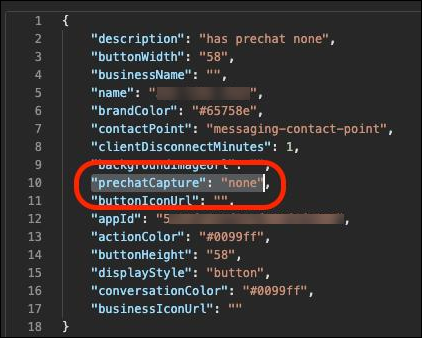
To remove the prechat capture from your web chat integration, set the prechatCapture parameter to be "none" in your POST (to create) or PUT (to update existing) request.
Allowing URLs
You can ensure that messages are only sent and accepted from your specified business pages by restricting access to only the specified URLs. Allowed URLs are those that you define as having access. Allowed URLs can be defined while you're creating your chat widget, or by editing it after submission.
To define allowed URLs:
- Go to Configuration > Chat Widgets. If your chat widget doesn't already exist, create one.
- Click on an existing chat widget's name to access the details panel.
- Under the Origin Whitelist section of the details panel, enter the address that you want to add in the Whitelisted URLs field.
- Click the + sign to add additional URLs as needed.
- Click Submit.
