Managing Facebook Integrations
This topic assumes that you have created and configured your Facebook App and are ready to set up the integration details on your CxEngage tenant.
Creating the Facebook Integration
To create a Facebook Integration in the configuration UI:
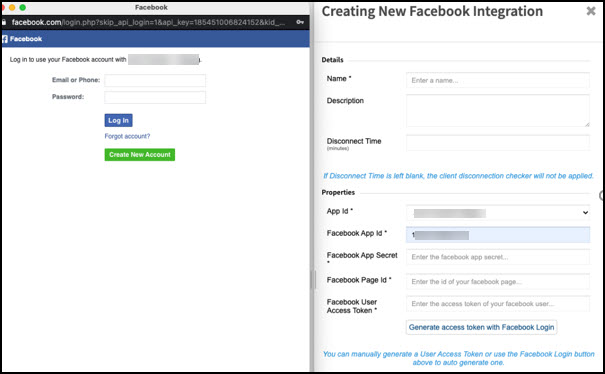
- Go to Configuration > Facebook.
- Click Create.
- Enter the Name of the Facebook integration.
- Optionally, add a Description for this integration.
- Optionally, add a Disconnect Time, in minutes with 1 being the minimum and 1440 as maximum. This setting allows interactions to end automatically when no agent messages have been replied to by the customer within the defined time frame. If this is not used, interactions will not automatically end based on customer response time.
- Select the Digital Channels App to be associated with this integration from the drop down menu.
- Enter your Facebook App ID, Facebook App Secret, and Facebook Page ID. These are details obtained in the "Gather your Facebook App details" step to create and configure your Facebook app.
- Enter your Facebook User Access Token.
- If CxEngage was enabled as an authorized login, click on Generate access token with Facebook Login button to have one automatically generated.
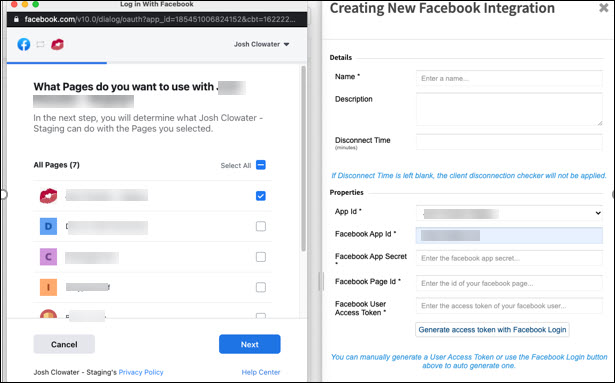
If the button isn't activating, ensure that you have the correct Facebook App ID entered from the previous step.- If not already logged in, enter the login details and proceed. Otherwise, continue with the current user.
- Select the account and the page.
- Accept the requested permissions for the specific page.
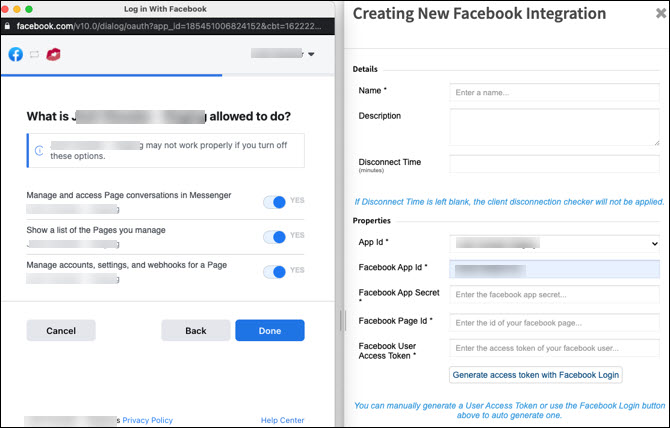
- the token will be automatically generated and populated into the field upon success.
- If not already logged in, enter the login details and proceed. Otherwise, continue with the current user.
- Otherwise, use a user token manually generated via Facebook's Graph API Explorer.
- If CxEngage was enabled as an authorized login, click on Generate access token with Facebook Login button to have one automatically generated.
- Click Submit.
Creating a Dispatch Mapping for Facebook Integration
| If you are migrating from a previous integration, you do not need to update the existing dispatch mapping. |
To create a dispatch mapping for your Facebook integration:
- Got to Flows > Dispatch Mappings.
- Click Create.
- Enter a Name for this mapping.
- Select Messaging from the Interaction Type.
- Select Contact Point from the Mapping list.
- Enter the Facebook Page ID in the Mapping Value field.
Updating a Facebook Integration
After initial creation, your Facebook integration shouldn't need to be updated again. You may choose to edit the name or description, or adjust the disconnect time. The Facebook App Secret and User Access Token are editable fields but would only require being looked at again in a very rare situation, as with Facebook revoking your access for some time.
To edit the name, description, or disconnect time in the configuration UI:
- Go to Configuration > Facebook.
- Select the integration.
The integration's detail panel apears. - Make your edits.
- Click Submit.
Deleting a Facebook Integration
Deleting a Facebook integration is an irreversible process. You cannot delete it with the configuration UI; this can only be completed by using the API. Once deleted, the only way to reinstate would be to create a new integration.
