Managing Facebook App
A Facebook App is necessary for customers to be able to message your business page.
Refer to these steps to create and configure a Facebook app.
| If you already have a Facebook app, use that existing app and configure it as needed. |
Creating An App
- Go to https://developers.facebook.com/apps/ and click the Create App button.
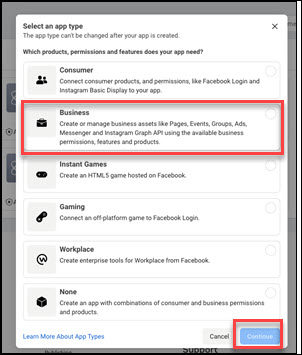
- Select the Business type and click Continue.
- Enter the required App details including App Display Name, App Contact Email, and App Purpose.
If you want public users on Facebook to be able to message the app and to have those messages go through, you need to create a Business Manager account. This is a very strict process that requires you to provide official business documentation to Facebook for approval. This can be added separately at a later date, but without this the only messages that can go through CxEngage are only from the app admin and app tester(s). Receiving messages from anyone else, including customers, requires advanced levels of permission.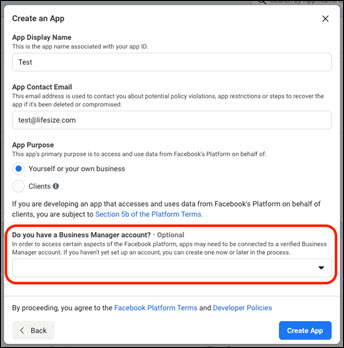
- Click Create App.You may be asked to verify your Facebook account's credentials.
Requesting Advanced Access Permissions
- Go to Facebook App > App Review > Permissions and features and request Advance Access for the following permissions:
-
pages_show_list
-
pages_manage_metadata
-
pages_messaging
-
Business Asset User Profile Access
-
public_profile
Notes: Without these Advanced Access permissions, only the app admin and the app testers can see messages through CxEngage.
You must have your Business Manager account set up prior to requesting this access.
For more information, see the Facebook App Review Process.
-
Click Continue beside a permission to provide more information about the permissions you are requesting.
-
Click the arrow beside Provide verification details.
-
On the App Verification Details page, enter step-by step instructions explaining how the reviewer can access your app.
Note: You must provide a valid Login and password for the reviewer to use.
For example, if your app is located at https://ABC.net, you would provide the following instructions: -
Go to the site: https://ABC.net/ and log in with the credentials provided.
-
In the "Please Select a Tenant" panel, select "XXXX Tenant."
-
When you first log in to the CxEngage Platform main page, the status bar at the bottom is "red". Move your mouse to the bottom left corner and click the plugin icon.
-
On the panel that pops up, select "Ready".
-
You are now ready for user interactions, which can include Chats or Phone Calls.
|
Test Login Credentials: Login: abc@yourdomain.com Password: YourPassword
|
-
Click Save.
Next, explain how the requested permissions are used by your app. -
Under Requested Permissions and Features, click the arrow beside each permission and provide a description of how your app uses that permission along with a video that walks through how your app uses the permission. Below is information on what you may want to include in the detailed description and video.
| Permission | What the Permission Does | Wording the Permission Request | What to Include in the Uploaded Video |
| pages_show_list | Allows the access token to view the pages list on a Facebook account. | The pages_show_list permission is needed to test that the CxEngage chat app can communicate with clients from the Facebook page's Messenger. | |
| pages_manage_metadata |
Allows the platform to sent webhooks on the Facebook account. |
The pages_manage_metadata permission is needed to test that the CxEngage chat app can communicate with clients from the Facebook page's Messenger. | In the video, show how a new message creates an interaction in CxEngage and includes the Facebook user's name. Then from an agent's experience, show typing indicators and read receipts, and notifications when a new message is received. |
| pages_messaging | Allows a customer to send messages to CxEngage. | The CxEngage platform is a communication app that supports multiple chats. The pages_messaging permission is needed to test the chat function with the client from the Facebook page's chat Messenger. | In the video, show both the customer and agent experience. For example, when sending messages, include the automated messages sent from flow or CxEngage when an agent joins or leaves, typing indicators, and read-receipts. |
| Business Asset User Profile Access | This allows the agents to see the first and last names of associated customers. | We are adding Facebook integration to our platform CxEngage. The integration needs the first name and last name of the customer who initiated the message. | |
| public_profile | This doesn't require approval and can be upgraded from Standard Access to Advanced Access at any time. |
- Submit the request for App review. Click Submit for Review, acknowledge the Platform Onboarding Terms, and then click Submit.
- Click OK to complete your App Submission.
Gather Your Facebook Details
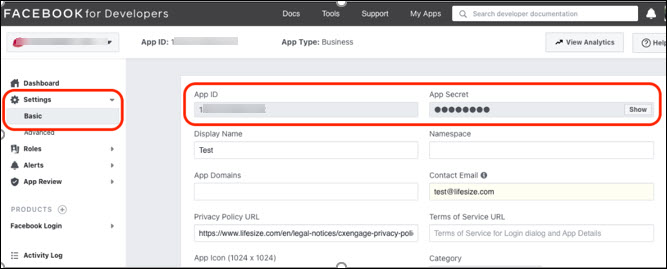
- Facebook App ID: This is found on the basic setting page of the Facebook App in the top left corner.
- Facebook App Secret: This is found on the basic setting page in the top right corner. You'll be asked for your Facebook account password to reveal it.
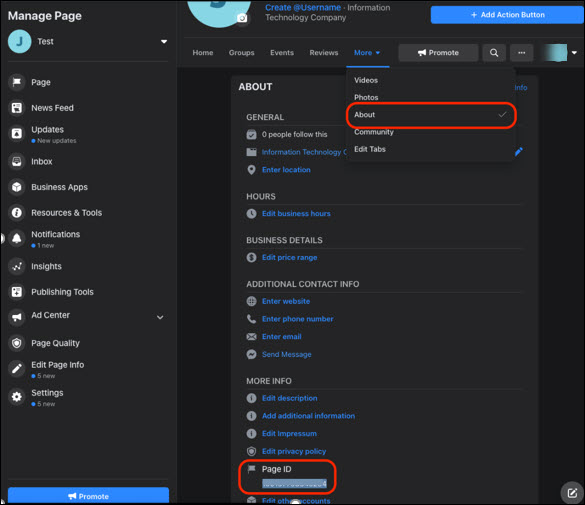
- Facebook Page ID: You can get this by accessing your Facebook page directly via https://facebook.com. The Page ID is found in the About page, which may be nested under the More menu. You may need to scroll near the bottom to see the Page ID under More Info.
Generate a User Access Token
. There are two different ways to generate a user access token. Click on a method to see details.
To allow CxEngage to automatically generate a user access token for you, the CxEngage URL must be enabled for Facebook login. This is the recommended method to generate a user token.
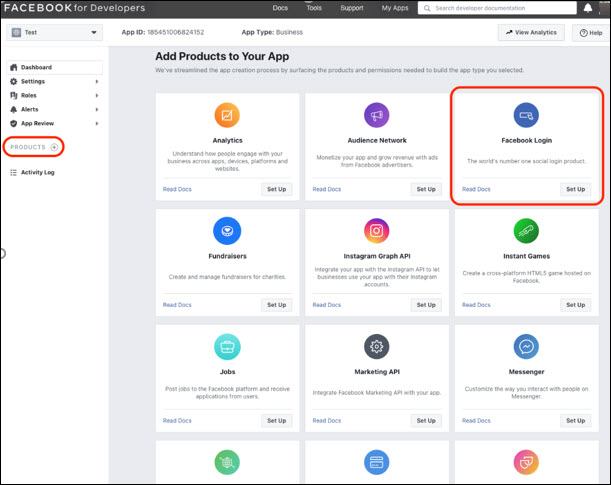
- Go to Facebook App Dashboard > Add Products to Your App.
- Select Facbook Login. This should be located under Products in the left side panel.
- Select Settings. Under Client OAuth Settings, edit Valid OAuth Redirect URIs.
- Enter the following URL, depending on your tenant's region:
US: https://us-east-1-prod-config2.cxengage.net
EU: https://eu-west-1-prod-config2.cxengage.net - Click Save Changes.
Alternatively, you can manually generate a user access token via Facebook's Graph API Explorer instead of the Facebook Login button via CxEngage. Please note that this is not our recommended approach, and that having CxEngage generate a user access token through the Facebook Login button is the more reliable option. If that is not an available or preferred solution for your business, refer to these steps to have one generated through Facebook's Graph API Explorer.
- Go to https://developers.facebook.com/tools/explorer/
- Under Facebook App, select your App name.
- Under User or Page, select User Token.
- Under Permissions, add the following permissions:
- pages_messaging
- pages_show_list
- pages_manage_metadata
- public_profile
- Click on Generate Access Token.
- Copy the token and paste it in Facebook User Access Token.
