Flow Tutorial: Design a Reusable Flow
This tutorial guides you through a basic reusable flow design using the configuration console. After completing this tutorial, you will:
- Have a basic understanding of how you can use reusable flows as objects within a flow
- Understand how predefined variables can work with a reusable flow
You will create a reusable flow that:
- Plays a message asking the caller to wait for the next available agent
- Plays hold music for 30 seconds
- After the hold music plays for 30 seconds, provides the caller with the option to be transferred to voice mail by pressing 1
- Forwards the caller to voice mail if 1 is pressed
- Continues to loop between the hold music and voice mail option until the caller selects voice mail or until the next step in the main flow is ready, usually with an available resource.
We will use predefined variables for the hold music and the voice mail number. This means that any time the reusable flow is used in another flow design, those pieces are individually configured. For example, if you use this reusable flow in three different flows, each one can have a different voice mail number.
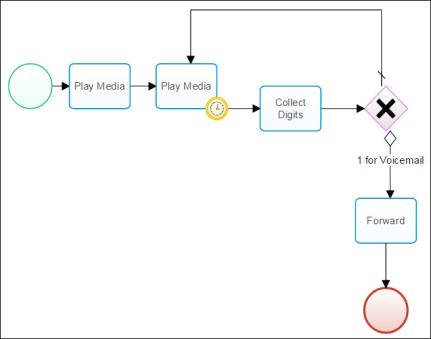
Here is what the completed flow will look like:
A common scenario for this type of reusable flow is to use it within a Queue Interaction With Flow activity, where it is the sub flow that runs while the caller waits in a queue until a resource is acquired.
Prerequisites
- This tutorial assumes that your tenant is populated with two media prompts. One that asks the caller to hold for an available agent, and another that provides the option to press 1 to leave a voice mail message rather than wait. If your tenant does not include these, or something similar, you may want to add them prior to continuing.
Example TTS scripts:
- Hold: "Please hold for our next available agent."
- Voicemail Option: "Please hold for our next available agent, or you can press 1 to leave a voice mail message instead."
- You should be familiar with how to design a basic flow. This will be necessary to use this reusable flow and to effectively see how the predefined variables work. If you're not familiar with how to create a basic customer flow to the point of a queue interaction, you may want to start with the Design a Basic Interaction Flow Tutorial.
Create the Flow
To create the reusable flow:
- Go to Flows > Flows.
- Click Create.
- Enter a name for your flow.
- Select Reusable as the Type.
- Click Submit.
Design the Flow
| Step | Details | Element |
|---|---|---|
| Step 1 |
Drag and drop an Entry event into the Flow Designer window.
|

|
| Step 2 |
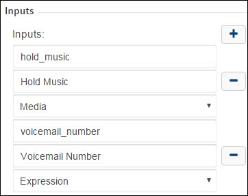
Create Inputs for the sections of the flow that are to be predefined variables. Select the Entry event to bring up the Input list. Click the + sign for each input variable being created. Each variable requires :
Create the following input variables:
|
|
| Step 3 |
Next to the Entry event, add a Play Media activity asking the caller to wait for the next available agent.
Connect the Entry event to the Play Media activity. |

|
| Step 4 |
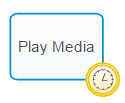
Next to the Play Media activity, add another Play Media activity for the hold music.
Connect the first Play Media activity to this one. |
|
| Step 5 |
Drag and drop the Timer event onto the last Play Media activity, so that it is attached to the lower right corner of the activity.
This tells the flow to play the assigned hold music for 30 seconds and then continue to the next flow activity. |

|
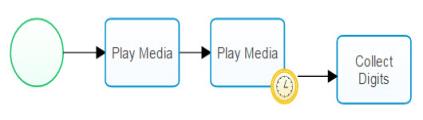
| Step 6 |
Next to the Timer event, add a Collect Digits activity to give the caller the option to select 1 for voice mail.
This tells the flow to check for a single digit being pressed on the telephone keypad. Connect the Timer event to the Collect Digits activity. |

|
|
Checkpoint: Your flow should now look something like this example.
|
||
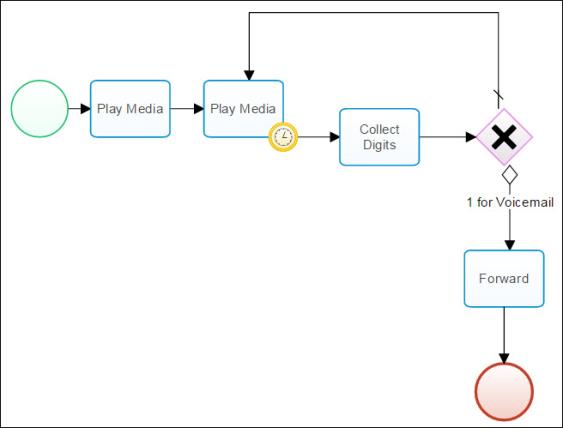
| Step 7 |
Next to the Collect Digits activity, add an Exclusive gateway so that the flow can handle the decision paths available. Connect the Collect Digits activity to the gateway. Next, we will create gateway branches for the different decision point options. |

|
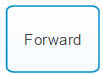
| Step 8 |
Below the gateway, add the Forward activity so that the caller can be forwarded to a designated voice mail number if that was their selection.
Connect the gateway to the Forward activity. Because this connection is from a decision gateway, we have to configure the connection to tell the flow when to use it.
This tells the flow that if the caller pressed 1 during the previous Collect Digits activity, that they should proceed on this path and forward them to another number.
|
|
| Step 9 | Below the Forward activity, add an Exit event. |

|
| Step 10 |
In Step 8, we created the path for a caller pressing 1 for voice mail. Now we will create a path for any other result. If the caller presses any other option, or nothing at all, we want them to continue to hear hold music and the voice mail option until it is selected or a resource is available. Create a second connection from the gateway and connect it to the Play Media activity with the 30 second timer for hold music from Step 4, creating a loop. This connection tells the flow that this is the default path to follow if the conditional path does not apply.
Click on the connection to drag a point to a desired location above the flow in order to make the connection easily visible. |
|
|
Checkpoint: Your completed flow should look something like this example.
|
||
| Step 11 | Publish the flow and make it the active version. |

|
Using the Flow
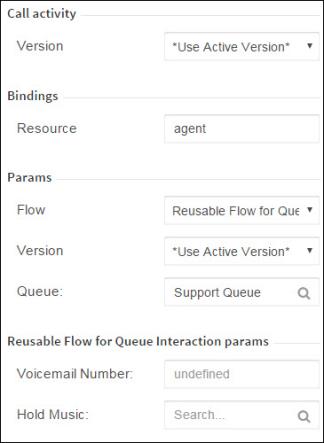
The published flow is now available as a single activity in the Reusable Flow section of the flow designer palette for your tenant. It has configuration details to select based on the predefined variable inputs that you created. If you drop it on the flow designer canvas, the configuration panel will look something like this:
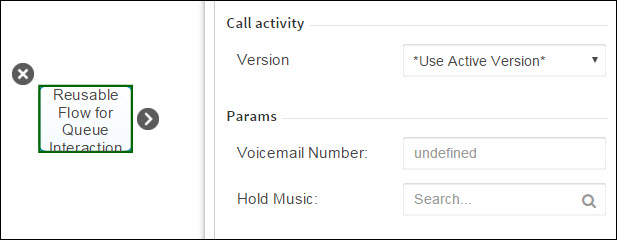
This reusable flow is designed to run while a resource is being acquired and not as a stand alone activity. Let's look at how to use your new flow within a Queue Interaction.
To use the reusable flow:
- Create a Customer flow.
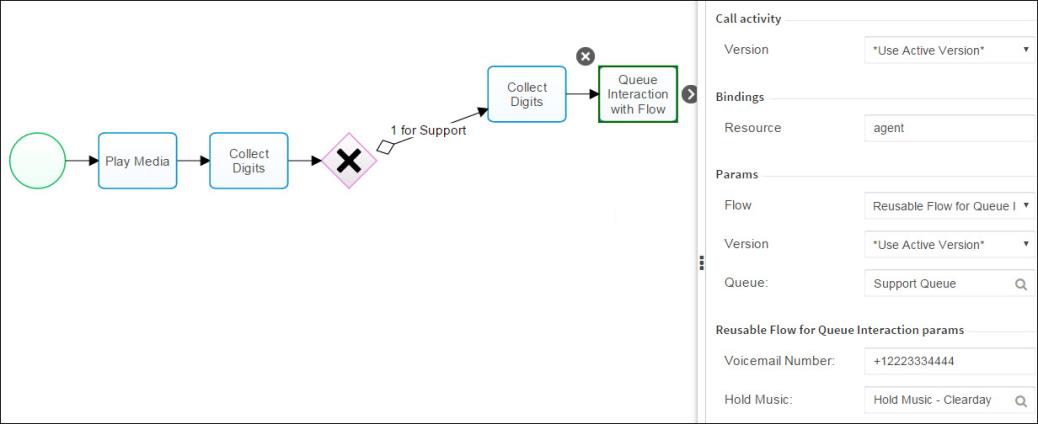
- Design a basic customer flow up to the point where a Queue Interaction activity is required.
For example, the standard "press 1 for Support, or 2 for Sales" flow that is used in our basic interaction flow tutorial. - For the queue interaction, use the Queue Interaction with Flow object.
Queue Interaction with Flow runs a secondary reusable flow while acquiring an available resource. You select the reusable flow and version from the drop down lists in the Queue Interaction with Flow configuration panel.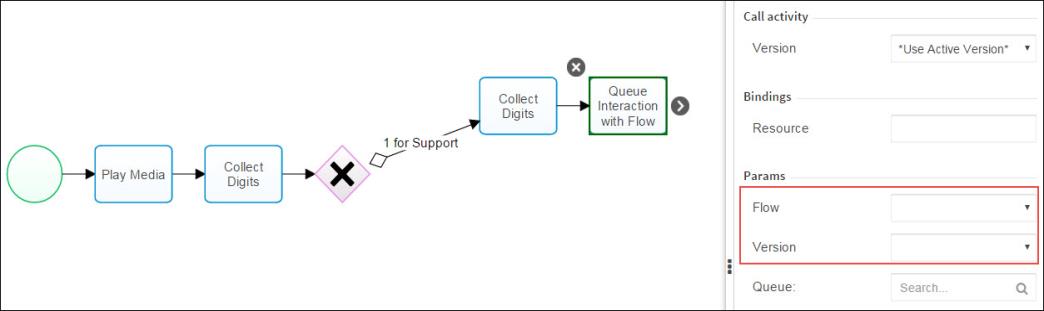
- Configure the Queue Interaction details as required, selecting your reusable flow and *User Active Version* from the Flow and Version drop down menus respectively. For example:
Notice that once the reusable flow and version are selected, additional parameter fields appear. In this example, Voicemail Number and Hold Music. These are the fields that we created as predefined inputs when we designed the reusable flow. - In the Voicemail Number field, enter the E.164 format telephone number that a caller is forwarded to when they select the voice mail option.
- In the Hold Music menu, select the hold music that you want to play to the caller during this queue interaction wait.
- Continue designing the customer flow as desired.
If there is another Queue Interaction required, you can use Queue Interaction with Flow with the same reusable flow, but you can enter a different voice mail number and hold music for the different queue.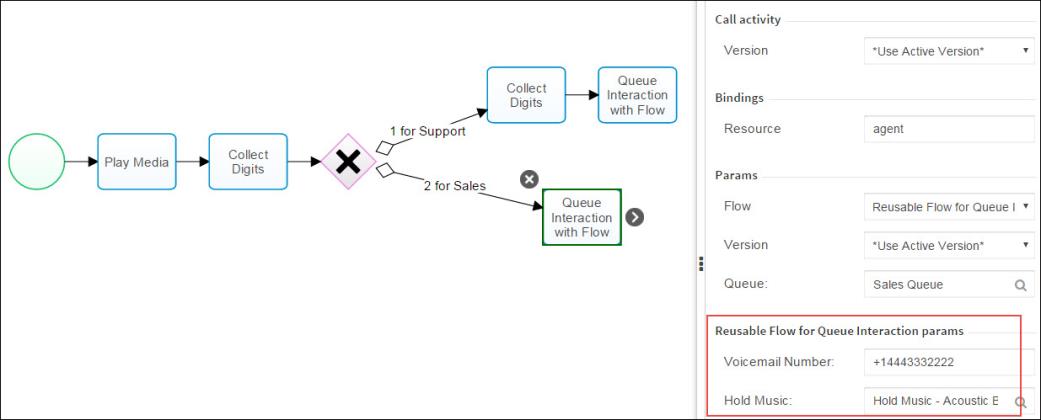
Summary
Congratulations! You have created a reusable flow that uses predefined variables, making it versatile and adaptable to different queues.
You have also learned how to incorporate your reusable flow into a main flow by embedding it within a Queue Interaction with Flow activity.
