Flow Tutorial: Designing a Payment Collection Flow
This tutorial shows you how to design flows to enable secure credit card payment collection with CxEngage, powered by a third party. After completing this tutorial, you will:
- Have a basic understanding of how CxEngage can use third party integrations
- Understand how reusable flows can be used within customer flows to provide repeatable robust experiences
- Be able to design a flow that uses presents a script to agents that connects to a third party for secured payment collection
This feature can be configured as either:
- A customer flow that has the resource portion built out to include agent scripting and a secure third party connection.
- A reusable flow that includes the agent script, a secure third party connection, and presents the payment collection script. The reusable flow is then invoked in the resource portion of a customer flow. This is the suggested method and the one used in this tutorial.
Prerequisites
- To fully configure a payment collection flow, configuration details are required that are only available for users with an account with a third party provider who provides this service, such as KeyIVR or Eckoh. Contact your account representative for additional information.
- To complete the conference, you need to have a Twilio SIP domain that points to your CxEngage tenant. If your telephony service is provided by Enghouse Interactive and you require assistance, please contact your CxEngage representative.
- You should be familiar with how to design a basic flow. This will be necessary to use this reusable flow and to effectively see how the predefined variables work. If you're not familiar with how to create a basic customer flow to the point of a queue interaction, you may want to start with the Design a Basic Interaction Flow Tutorial.
- The third party is accessed through an iFrame script component. We recommend that you have a basic understanding of creating and configuring agent scripts.
- If you are following along by building your own flows, this tutorial assumes that your tenant is populated with a queue to send interactions to as well as media prompts that you want presented to callers.
Part 1: Create a Reusable Payment Collection Script
The payment collection is presented as an agent script with an iFrame component. The secure connection is established with the Start and Stop Secure DTMF Collection notations. Include these components in a reusable flow that is then used as an object in your main interaction flow.
To create a payment collection script flow:
- Create a new flow, selecting Reusable as the type.
- Enter a name for the reusable payment collection flow. This appears as the flow notation's name in the flow designer. For example, "Collect Payment Script".
- Click Submit.
- Design the flow using the steps below as your guide.

|
Reusable flows have the option to turn any notation's parameter into variable input. Leave the Variable toggle disabled unless specified otherwise. |
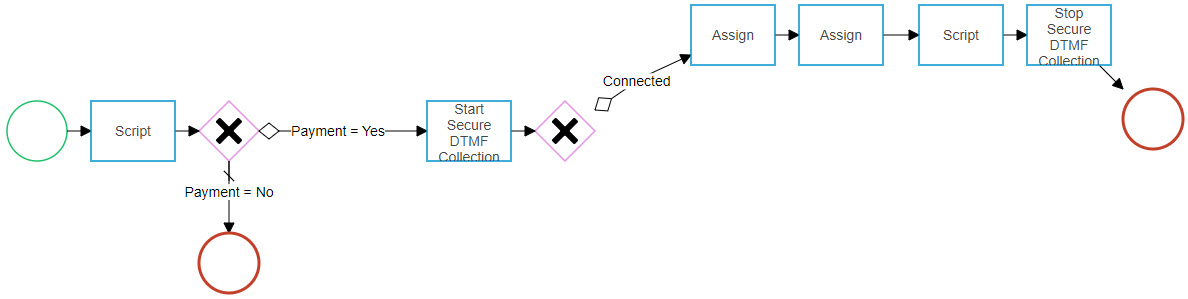
Your completed reusable flow will look something like this:
| Step | Details | Element |
|---|---|---|
| Step 1 |
Drag and drop an Entry event into the Flow Designer window. |

|
| Step 2 |
Add a Script notation and connect the Entry event to it. This script will ask the agent if they are ready to collect payment, and provide any required instructions or scripting. |

|
| Step 3 |
Access the script editor. Bind the script to the resource name that will be used in your interaction flow, such as agent. Enter a variable name for the script that will be referenced later in this flow. For example, paymentprompt. Configure the script with the following components.
|
|
| Step 4 |
Next to the Script notation, add a Decision Branch and connect the Script notation to it. This allows the flow to progress through different paths depending on the response to the dropdown question presented in Step 2. Next, we will design the different path options.
|

|
| Step 5 |
We'll start with the "Yes" path, which will be followed when an agent selects Yes from the drop down menu from Step 3. Next to the Decision Branch, add a Start Secure DTMF Collection notation. This notation triggers the third party connection by forwarding the customer to the third party and conferencing the customer with them and the agent. These calls are made to a SIP endpoint with interaction details including the interaction ID, an authentication token, and contact data to forward the call back and complete the conference.
|

|
| Step 6 |
Next, we'll configure the flow to only proceed to the secure collection if the agent selected "Yes" to the script question from Step 3 asking if they need to collect payment. Any other responses will be handled with an upcoming step. Connect the Decision Branch from Step 4 to the Start Secure DTMF Collection notation (Step 5). We'll design the flow to only proceed to the secure collection if the agent selected "Yes" to the script question from Step 3 asking if they were ready to collect payment. Any other responses will result in the script ending.
|
|
| Step 7 |
Next, we'll design the default flow path, for any response to the script question other than "Yes". Below the Decision Branch, add an Exit event. |

|
| Step 8 |
Connect the Decision Branch from Step 4 to the Exit event. We'll configure this connection path for anything other than a "Yes" response to the payment collection question from Step 3.
Next, we'll assign some variables that will be used to display data to the agent during the payment collection. |
|
|
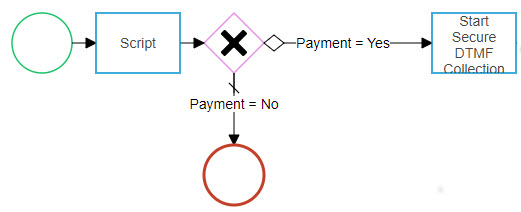
Checkpoint: Your flow should look similar to this example.
|
||
| Step 9 | Next to the Start Secure DTMF Collection notation, add another Decision Branch and connect the Start Secure DTMF Collection notation to it. This Decision Branch will be used to provide one path for a successful third party connection, and a path for any unsuccessful attempts. |
|
| Step 10 |
We'll assign a second variable that will be used to present the agent ID to the agent in the payment collection script. Next to the Decision Branch, add an Assign notation and connect them. Design Tip: Add this notation slightly above the Decision Branch. Creating an arch will make it easier to connect branches later in this tutorial.
|

|
|
Checkpoint: Your flow should look similar to this example.
|
||
| Step 11 |
Next, we'll continue designing the path for successful connections. The third party uses the interaction ID to link the payment information appropriately. We'll assign a variable to provide the interaction ID to the agent during payment collection. Next to the Assign notation, add another Assign notation and connect them.
Next, we'll create the payment collection script. |
|
| Step 12 | Next to the Assign notation, add a Script notation and connect them. |
|
| Step 13 |
Access the script editor. Enter a variable name for the script that will be referenced later in this flow. For example, paymentprocess. Bind the script to the resource name that will be used in the resource portion of your interaction flow, such as agent. Configure the script with the following components.
|
|
| Step 14 |
Next to the Script notation, add the Stop Secure DTMF Collection notation and connect them. This notation disconnects the third party connection and places the customer back into conference with the agent.
|

|
| Step 15 |
Next to the Stop Secure DTMF Collection notation, add an Exit event and connect them. Design Tip: Add the Exit event slightly below the Stop Secure DTMF Collection notation, bringing it back in line with the Decision Branch or similar location. Creating this arch will make it easier to connect branches later in this tutorial. |
|
|
Checkpoint: Your flow should look similar to this example.
|
||
| Step 16 |
Steps 9 through 15 created a path for a successful Eckoh connection. Now we'll create a path for unsuccessful connections and configure both branch paths. Click on the Decision Branch from Step 9. Create a second connection branch from the Decision Branch and connect it to the Exit event from Step 15. Design Tip: If you created the previous connection branch with the suggested arch, this connection doesn't overlap with your current design. If your flow follows a straight path, you may have trouble locating this new connection path over the existing one. You can also click anywhere on a connection to drag out into angles, depending on your design preference.
|
|
| Step 17 |
Configure both of the connection branches from Steps 10 and 16. Branch from Step 10
Branch from Step 16
|
|
|
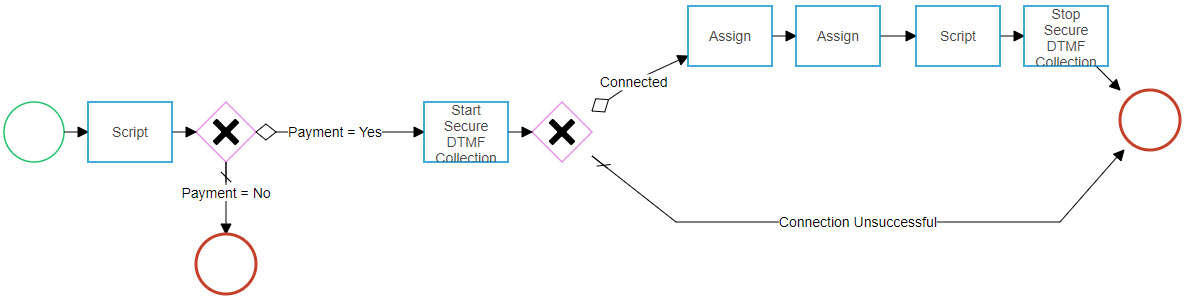
End Result: Your completed design should look similar to this example.
|
||
| Step 18 |
Publish the flow.
|

|

Part 2: Create a Customer Interaction Flow
The payment collection flow is a reusable flow that can now be inserted into any interaction flow. We'll create a customer interaction flow that invokes the reusable payment collection script.
To create a customer interaction flow:
- Create a new flow, selecting Customer as the type.
- Enter a name for the flow. For example, "Call Flow with Payment Script".
- Click Submit.
- Design the flow using the steps below as your guide.
| Step | Details | Element | ||
|---|---|---|---|---|
| Step 1 |
Drag and drop an Entry event into the Flow Designer window. |
|
||
| Step 2 |
Add a Queue with Media notation and connect the Entry event to it.
|

|
||
| Step 3 |
Add a Conference Customer In notation and connect Queue with Media to it.
|

|
||
| Step 4 |
Add the Disconnect notation and connect Conference Customer In to it.
|

|
||
| Step 5 | Add the Exit event and connect Disconnect to it. |

|
||
|
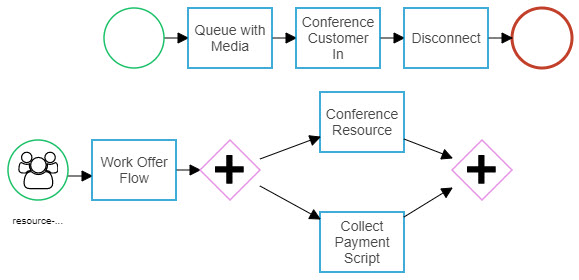
Checkpoint: Your flow should look similar to this example.
|
||||
| Step 6 |
Now we need to design the resource sub-flow. In an empty section of the canvas, add the Resource Entry event.
|

|
||
| Step 7 |
Add the Work Offer Flow notation and connect the Resource Entry to it.
|

|
||
| Step 8 |
Add a Parallel Branch and connect the Work Offer Flow to it. This allows the flow to progress through multiple paths simultaneously. We'll design two branches to run in parallel; one to conference the resource into the conversation and another to run the reusable payment collection script created in Part 1 of this tutorial. |

|
||
| Step 9 |
Next to the Parallel Branch, add a Conference Resource notation and connect them.
|
|
||
| Step 10 |
In an other area next to the Parallel Branch, add the reusable flow that you created in Part 1 of this tutorial. It will be on your design palette as a flow notation under the Reusable heading. The name will be the name entered when you created the reusable flow. In this tutorial, we called it Collect Payment Script.
Connect the Parallel Branch from Step 8 to this reusable flow. |

|
||
| Step 11 | Add another Parallel Branch and connect both Conference Resource and your reusable payment collection script flow to it. |
|
||
|
Checkpoint: Your flow should look similar to this example.
|
||||
| Step 12 |
Next to the Parallel Branch, add a Disconnect notation and connect them.
|
|
||
| Step 13 |
Next to the Disconnect, add a Free Resource notation and connect them.
|

|
||
| Step 14 | Next to Free Resource, add an Exit event and connect them. |
|
||
|
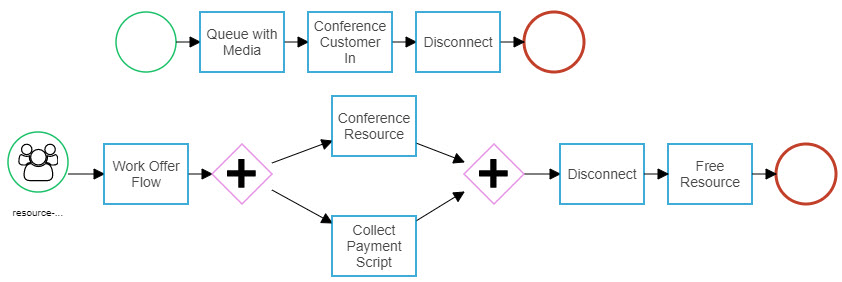
End Result: Your completed design should look similar to this example.
|
||||
| Step 15 | Click the gear icon on the canvas to access the flow settings and select the Flow Defaults tab. Enter any default settings that you want for this flow. |

|
||
| Step 16 |
Publish the flow. Enter a mandatory version name and click Submit to save the flow. |
|
||