DEPRECATED: Configuring Facebook Messaging
Updated information for configuring Facebook messaging can be found at Digital Channels > Facebook
| CxEngage has a new digital channels integration that, as of the Spring 2021 Feature Release, supports Facebook. Any new Facebook integrations should use the new digital channel version instead of the one referenced on this topic. The Facebook Messaging details on this page will be deprecated and removed following the Spring 2021 Feature Release. |
When you integrate Facebook Messenger with CxEngage, you can read or respond to messages sent to your company's Facebook page or messaging app directly from the Agent Toolbar.
There are a number of steps that you need to complete to enable the interactions between your Facebook page and CxEngage tenant. Detailed instructions to complete each step are included below.
- Create and configure your Facebook page.
- Add a listener to your CxEngage Facebook integration
- Create and publish a flow for Facebook messages sent to your page.
- Create a Dispatch Mapping to point incoming Facebook messages to the correct flow.
- Submit your messaging app for review
Creating and Configuring your Facebook Page for CxEngage
To create and configure your Facebook page:
- If you don't already have a Facebook page for your business, create one by accessing Facebook and selecting Create Page under the actions menu.
- Go to Settings > Page Roles to add any users to your page who may receive or send messages from the page. This access requires either the Moderator, Editor, or Admin page role.

Only users that have been invited to your page with the appropriate role are able to handle messages.
- Go to developers.facebook.com and select Add New App under the My Apps menu.
- Complete the Create New App ID screen by entering a display name and email address.
- Click + Add product on the developer's side panel.
- Select Messenger and click Get Started, completing sections as needed.
- Set up Webhooks with the following details:
- Callback URL: Enter this URL, where <tenant-id> is the unique identifier for your tenant.
https://us-east-1-prod-facebook-gateway.cxengage.net/tenants/<tenant-id>/ - Verify Token: This is a mandatory field that can accept any free form text, used to associate any verification code that may be included at your webhook URL entered in the previous field
- Subscription Fields: Select the following: message_deliveries, messages, messaging_optins, messaging_postbacks
- Click Verify and Save
- Callback URL: Enter this URL, where <tenant-id> is the unique identifier for your tenant.
- In the Token Generation section, select your page from the Page drop down.
- In the prompt that appears, grant permissions to the app that you are creating for your page.
- Copy the Page Access Token that appears and keep it somewhere as you will need this to configure your CxEngage settings later.
- In the Webhooks section, subscribe your page to the assigned webhooks by selecting the page name from the Select a Page drop down.
If you change the webhook in the future- for example, updating your tenant ID - you must unsubscribe and resubscribe the page.
- Click Settings on the developer's side panel.
- Complete the basic settings as needed, including an icon for your messaging app and a URL to the privacy policy that your page should be associated with. Optionally, select a page category.
You're now ready to configure your CxEngage tenant with a listener for Facebook messaging events.
Creating a Listener for your Facebook Integration
Your tenant is configured with an integration for the Facebook channel. You need to update that integration to have a listener for events from your Facebook page to the integration.
To add a listener to your CxEngage Facebook integration:
- Go to Configuration > Integrations.
- Click on the facebook integration to access the integration details side panel.
- Click on the + symbol next to listeners and complete the required fields:
- Name: Enter a name for this listener
- Active: Click the toggle to activate this listener
- Page Id: Enter your Facebook page ID
- For pages that are managed in Facebook Business Manager, the Page ID can be found by navigating to the Page in Business Manager > About > More Info and Page ID.
- For all other pages, navigate to the Page that you are an Admin on > About > More Info and Page ID.
- Page Token: Enter the Facebook page token that you copied earlier, from Step 10 of your Facebook page configuration.
- Click Create.
You're ready to create a flow that is configured to receive and route messaging work offers.
Creating a Messaging Flow
Your tenant needs to have a basic customer flow published and enabled that routes to a queue and is configured for message work offers. You can accomplish this by using one of the following flow design examples.
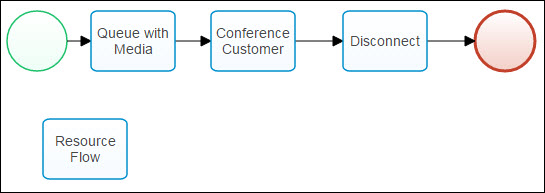
The Work Offer Flow notation is the parent work offer that includes voice, email, SMS, and messaging channels.
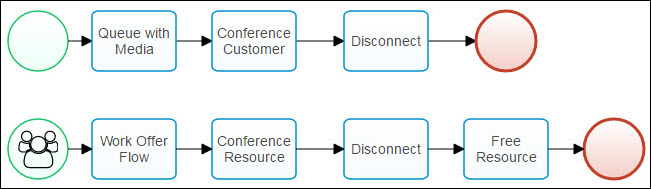
|
|
You need to change the Signal Name in the Resource Entry event to resource-acquired. |
Now that you have a flow for your messages, you're ready to create a dispatch mapping to tell your tenant to use this flow for Facebook message events.
Creating a Dispatch Mapping for Facebook Messenger
Create a dispatch mapping to tell your tenant what flow an incoming Facebook message should go through.
To create the dispatch mapping:
- Go to Flows > Dispatch Mappings.
- Click Create to access the dispatch mapping details side panel.
- Enter a Name for this dispatch mapping.
- Optionally, enter a brief description for this dispatch mapping.
- Select Messaging from the Interaction Type list.
- Select Contact Point from the Mapping list.
- Enter the Facebook Page ID in the Mapping Value field. You can get this by accessing your Facebook page and looking at the URL. The page ID is located after <your page name->. In this example, the page ID is 1234123412341234.

- Select your messaging flow from the Dispatch to flow list.
Submitting Your Messaging App for Review
|
|
Before submitting your messaging app for review, ensure that you are able to receive and reply to messages in or the Agent Toolbar that are sent from your Facebook developer user. This step validates that the Facebook integration was set up successfully. During the app review process, Facebook may send you a message that requires you to reply within a specified time frame; therefore, it is important to ensure that you can receive messages. |
The final configuration step is to submit the messaging app created in step 7 of Creating and Configuring your Facebook Page for CxEngage for review. Refer to the App Review instructions in the Facebook developer documentation for detailed steps. At minimum, ensure that you select the pages_messaging permission. Review the rest of the permissions to determine if there are others relevant to your app.
Once your app is approved, you are ready to receive and respond to Facebook messages from customers with CxEngage.
