Release Notes for 2022
The release notes contained on this page reflect the changes made to CxEngage and CxQM in 2022, excluding the most recent releases.
For release information regarding the most current releases, see the What's New. For other release information, categorized by year, see Archived Release Notes.
| CxEngage Release 22.12.03 | |
|---|---|
| All Regions | December 03, 2022 12:00 - 15:00 UTC |
Update: Ability to Add a Location to a User (CXV1-28573, CXV1-28574, CXV1-28978)
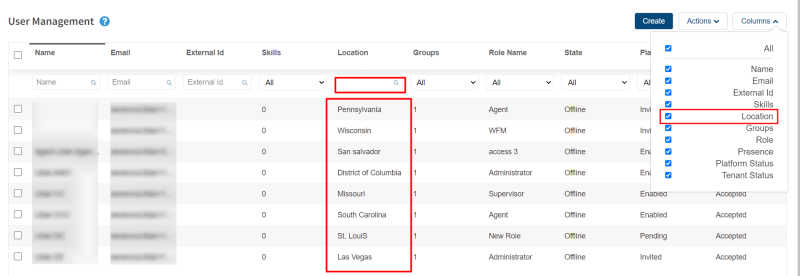
An enhancement to CxEngage allows you to add a location to an existing user's profile. Once locations have been assigned, you can filter your users by the Location column on the User Management page.
Adding a Location to a User
To enter a user's location from the User Management > Users page, do the following:
-
Click on the existing user with which you want to work.
-
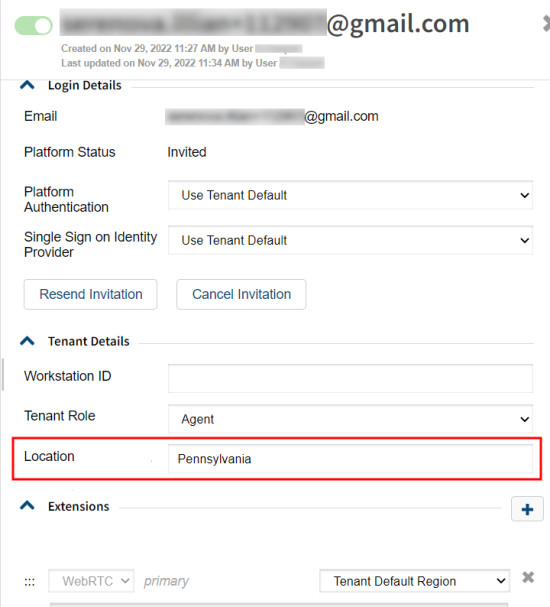
On the information panel, in the Tenant Details section, type in the Location you want to add to the user's profile.
Note: The Location field is a text field. Enter any characters or numbers that you want to assign to the user.
-
Click the Submit button to save your changes to the user's profile.
Note: Only users with a Supervisor or Administration role can assign a location to a user .
Filtering Users by Location
After adding locations to your users, you can filter them on the User Management page by the assigned location.
Note: You may need to add the Location column to the User Management page. Click the Columns button and check the Locations box in the list that displays. Then, click the Columns button again to hide the list.
On the User Management page, in the Location column search field begin entering the location's match criteria. The list filters to show only users that match your entry.
| CxEngageCxQM Release 22.11.19 | |
|---|---|
| All Regions | November 19, 2022 12:00 - 15:00 UTC |
Fix: Intermittent Screen Recording Errors (CXV1-28965, CXV1-27744)
Previously, some Agents received intermittent screen recording errors when taking short back-to-back calls. The screen recording displayed as gray when an Agent started a call before the previous call's wrap-up period had ended.
The CxQM capture service has been enhanced to promptly handle new capture requests that occur during the wrap-up period of recently ended calls.
| CxEngageCxQM Release 22.11.12 | |
|---|---|
| All Regions | November 12, 2022 12:00 - 15:00 UTC |
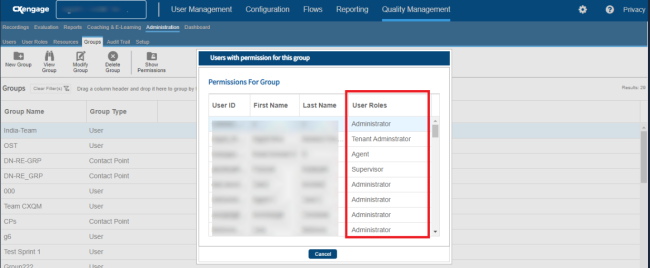
Fix: Showing User Roles in CxQM
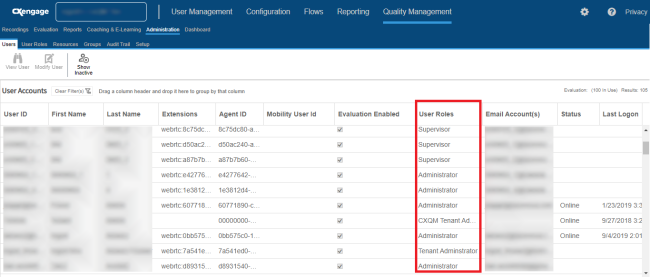
Currently, when viewing User Accounts at Quality Management > Administration > Users and the Users with permission for this group window at Quality Management > Administration > Groups, the User Roles column shows the Role ID.
To make the information more user-friendly, this column has been changed to show the Role Description.
| CxEngage Release 22.11.05 | |
|---|---|
| All Regions | November 05, 2022 12:00 - 15:00 UTC |
Update: Supporting Microsoft OAuth Credentials (CXV1-28804)
Note: As of December 31, 2022, the Basic auth protocol will no longer work. Complete this update before the protocol expires. Contact your customer support representative if you need assistance with the update.
Lifesize recently sent an email to customers who use Office 365 with CxEngage advising them to perform opt out procedures before the impending deprecation of Basic auth. Opting out allows those customers to continue using the Basic auth protocol until the end of December 2022.
CxEngage email integration settings have been updated to allow the use of the Microsoft Oauth protocol and a Microsoft Access Token. Use the following instructions to help you change your authentication credentials for email.
Changing the Email Integration Settings
To update the current Microsoft Office 365 mail with Microsoft OAuth, do the following:
-
Go to CxEngage > Configurations.
-
Highlight your email integration configuration. The configuration panel displays.
-
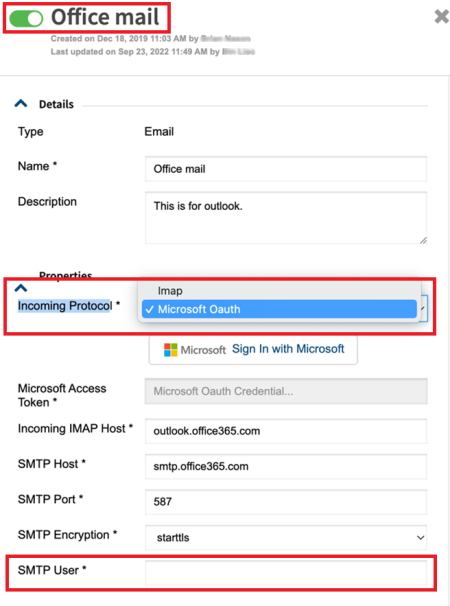
Click the green toggle next to the integration name to turn it off.
-
Click the Confirm button to affirm that you want to disable the integration. The toggle displays gray and the integration is disabled.
-
Under Properties on the email integration configuration panel, click the Incoming Protocol arrow and select Microsoft Oauthfrom the drop-down.
-
Click the Sign in With Microsoft button. A Microsoft login window displays.
-
From the list, select an existing email account that you will use in CxEngage or click Use another account and enter the email account you will use.
-
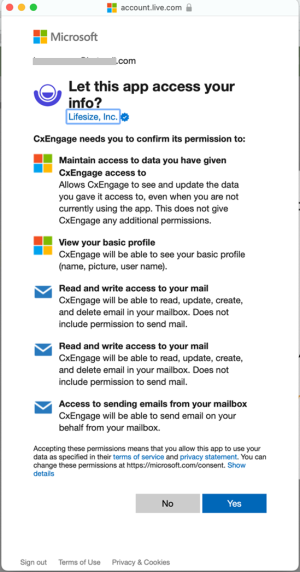
When asked if this app can access your info, click theYes button to allow CxEngageto connect to the email account. The Microsoft window closes and you are returned to the email integration configuration panel.
-
Under Properties, enter the email accountin the SMTP User field.
Important: Use the same email address that you provided in the previous steps.
-
Click the Submit button to save your changes.
-
Click the gray toggle next to the integration name to enable the integration.
-
Click the Confirm button to affirm that you want to enable the integration. The toggle displays green and the integration is enabled.
Once this change is complete, your Office 365 email will use the Microsoft OAuth credentials to send emails.
Changing the Email Listener Settings
When updating the sender information, you will want to make sure the listener information is also updated for Microsoft Oauth.
-
Highlight the email integration configuration. The configuration panel displays.
-
Scroll down to the Listener section.
-
Click the Update button beside the email listener configuration with which you want to work.

-
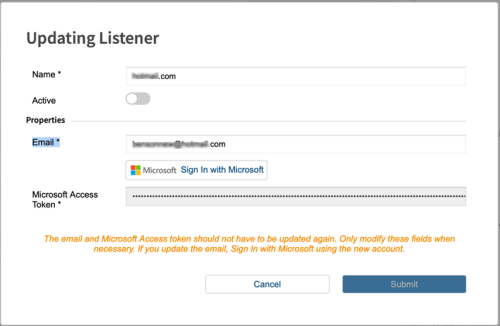
Click the green Active toggle to turn the listener off. The toggle displays gray and the listener is disabled.
-
Enter the email address that you want to listen to for messages.
-
Click the Sign in with Microsoft button.
-
Select an existing email account or click Use another account and enter the email account that you will use in CxEngage.
-
When asked if this app can access your info, click theYes button to allow CxEngageto connect to the email account. The Microsoft window closes and you are returned to the email listener update window.
-
Click the gray Active toggle to enable the listener. The toggle displays green and the listener is enabled.
-
Click the Submit button to save your changes.
Once this change is complete, your Office 365 email will use the Microsoft OAuth credentials to listen for emails on the associated email account.
| CxEngage Release 22.10.29 | |
|---|---|
| All Regions | October 29, 2022 12:00 - 15:00 UTC |
Fix: Listener Frequently Requires Manual Restart (CXV1-28258)
Some email listeners were timing out and requiring a manual restart. Now, after an authorization error, the listener will automatically attempt to restart. The listener will be disabled after the fifth unsuccessful attempt and must be manually restarted.
| CxEngage Release 22.10.22 | |
|---|---|
| All Regions | October 22, 2022 12:00 - 15:00 UTC |
Fix: Unable to Download Recording (CXV1-28767)
Although multiple Twilio recordings are available on a report, when you attempt to download different recordings, the same recording is downloaded no matter which one you selected.
This issue has been readdressed and the correct recording is now downloaded.
| CxEngageCxQM Release 22.10.12 | |
|---|---|
| All Regions | October 12, 2022 12:00 - 15:00 UTC |
Fix: Enhanced Quality Evaluator Comparison in CxQM (CXV1-28852)
Previously, a restricted user could only see the evaluations for which the user is an evaluator and did not consider the assigned resources (Agents) evaluations. An enhancement to the Quality Management > Dashboard > Quality - Evaluator Comparison graph now allows a restricted user to see all the evaluations of the assigned resources along with his evaluation.
| CxEngage Release 22.10.12 | |
|---|---|
| All Regions | October 12, 2022 12:00 - 15:00 UTC |
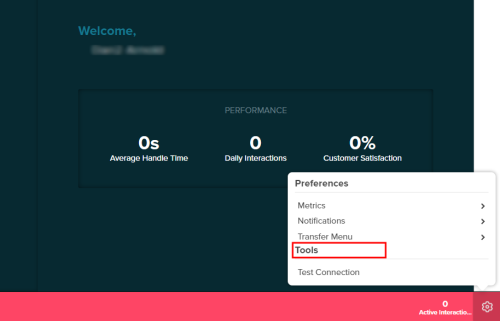
Update: Tools Menu Available in (CXV1-28867)
Previously, the Tools menu option in was only available to certain users. The Tools menu option is now available to all users.
| CxEngage Release 22.10.05 | |
|---|---|
| All Regions | October 5, 2022 12:00 - 15:00 UTC |
Fix: Incorrect Daily Interaction Count (CXV1-27752)
Previously, interactions were applied to the agent's daily interaction count on the day the interaction ended. For interactions that spanned several days, this could cause an agent's daily interaction count to be higher than expected. This has been changed, and now the agent's daily interaction count includes only interactions allocated to the agent that day.
| CxEngage WFM Release 22.10.01 | |
|---|---|
| All Regions | October 1, 2022 12:00 - 15:00 UTC |
Fix: Lag in Workforce Management Reporting Performance (CXV1-28244)
Users experienced poor performance when running WFM reports. Enhancements were made to how calculations are handled, resulting in improved performance for Historical Workforce Management Data Intervals processing.
| CxEngage Release 22.09.24 | |
|---|---|
| All Regions | September 24, 2022 12:00 - 15:00 UTC |
Fix: Site Colors Empty in Tenant Management (CXV1-28586)
In some cases, when managing tenants in CxEngage Tenant Management, the Edit Panel failed to load correctly.
This error has been fixed.
Fix: Unable to Download Recording (CXV1-28767)
Although multiple recordings are available on the report, when you attempt to download different Twilio recordings, the same recording is downloaded no matter which one you selected.
This issue is fixed, and the correct recording is now downloaded.
Fix: Reporting Issue with Reports (CXV1-28660)
The known reporting issue when the user opens a report and sometimes receives an error that data could not be retrieved has been fixed.

Previously the user had to click Reload for the report to run properly. Now, the report automatically retrieves the data.
Fix: No Data in Downloaded Interaction Report (CXV1-28768)
Sometimes when exporting a report, the data section of the report was blank. This has been fixed. Data is now properly exported.
| CxEngage Release 22.09.17 | |
|---|---|
| All Regions | September 17, 2022 12:00 - 15:00 UTC |
Fix: Salesforce IDs Being Truncated (CXV1-27930)
When fetching Salesforce IDs through CxEngage, the ID is truncated. This has been corrected and IDs are no longer truncated.
| CxEngage Release 22.09.10 | |
|---|---|
| All Regions | September 10, 2022 12:00 - 15:00 UTC |
Fix: Queues Not Routing Calls to Agents (CXV1-28348)
In some cases, newly created Queues were unable to route calls to agents. In these cases, the new queues were incorrectly flagged to use an older style query version that is maintained for backward compatibility. This issue has been fixed and calls are routed as expected.
Fix: Abandons Not Showing Properly (CXV1-28222, CXV1-28634)
When using Queue with Flow and the customer disconnected during sequential Play Media or Collect Digits, actions were not registered as Queue Abandons in some cases. This issue has been corrected.
Fix: Unable to Update Capacity Rules (CXV1-28431)
Previously, users with VIEW_ALL_CAPACITY_RULES and MANAGE_ALL_CAPACITY_RULES permissions received a "403: Request forbidden" error when updating the user capacity rules. However, when the user added the MANAGE_TENANT_ENROLLMENT permission to their role in addition to VIEW_ALL_CAPACITY_RULES and MANAGE_ALL_CAPACITY_RULES, the user capacity role was able to be updated.
This issue has been fixed. Now, as expected, users with both VIEW_ALL_CAPACITY_RULES and MANAGE_ALL_CAPACITY_RULES permissions can update capacity rules.
| CxEngage Release 22.08.20 | |
|---|---|
| All Regions | August 20, 2022 12:00 - 15:00 UTC |
Fix: Customer Abandons Not Counted (CXV1-28634)
An issue was fixed where Queue with Flow failed to count customer abandons when unhandled flow errors were received from the Media Flow. Errors received from Play Media and Collect Digits are now handled as part of Queue with Flow.
Fix: Call Recording Downloaded as .xml (CXV1-28631)
Previously, call recordings were erroneously downloading as a .xml file. This issue has been fixed. Recordings now download correctly as a .mp3 file.
Fix: Test Connect Tool Requiring Password (CXV1-28639)
When users log into and open the Test Connection tool, they are prompted to enter a password. This has been corrected and users no longer see the password request.
Fix: Accessing CxWFM Displays Playbook (CXV1-28645)
When accessing CxWFM through the CxEngage navigation bar, Playbook opens instead. As well, when choosing to open Playbook, CxWFM opens. This issue has been corrected and both CxWFM and Playbook now open as expected.
Fix: Skills and Queues List in the Order Added (CXV1-28602)
When creating a custom dashboard, the Skills and Queues lists display in the order that they were added to CxEngage, rather than alphabetically. This issue has been fixed. The lists for Skills and Queues now display in alphabetical order.
Fix: Outbound Identifiers Not in Alphabetical Order (CXV1-28350)
The Flow selection on the creation for an Outbound Identifier does not display in alphabetical order. This has been updated and Outbound Identifiers now displayed alphabetically.
| CxEngage Release 22.08.13 | |
|---|---|
| All Regions | August 13, 2022 12:00 - 15:00 UTC |
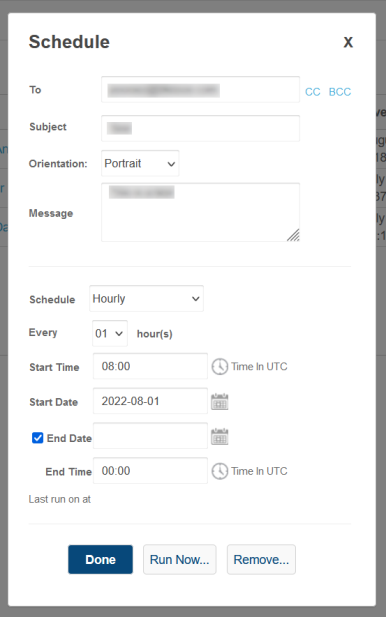
Fix: Updates to the Schedule Dialog (CXV1-28620)
Changes that were previously made to the Schedule dialog and then removed have been restored. These changes include:
-
The "Time in UTC" label displays for both Start Time and End Time.
-
The Minutes option is no longer available in the Schedule drop-down.
Fix: Uploading Images in Author Report (CXV1-19639)
Previously, when adding or changing an image in a report using Author Report, the uploaded image's name and preview did not show. This problem has been fixed. Now, thumbnail images and image names show correctly on the Settings window.
Fix: Adhering to Permissions When Sharing An Analysis (CXV1-23674)
Previously, users with read-only permissions could make changes to an analysis that was shared with them. This issue has been corrected. Now, if users with read-only permissions want to make a change to a shared analysis, the user must make a copy of the analysis and make changes to the saved copy.
Fix: Logi Dashboards Stop Working When Shared (CXV1-23827)
An issue with Logi dashboards failing to work after sharing them with other users has been fixed.
Update: Improving Reporting Application Performance (CXV1-28609)
An upgrade to the reporting engine has improved the overall performance of the reporting application.
Update: Preparing for Microsoft® Teams Integration with CxEngage
In preparation for future integration between and Microsoft Teams, you may notice new settings and options in CxEngage and . The initial release of this feature allows agents to answer voice interactions in MS Teams. Further work is necessary before the full functionality of this feature is released to the general audience. Look for more information in future release notes.
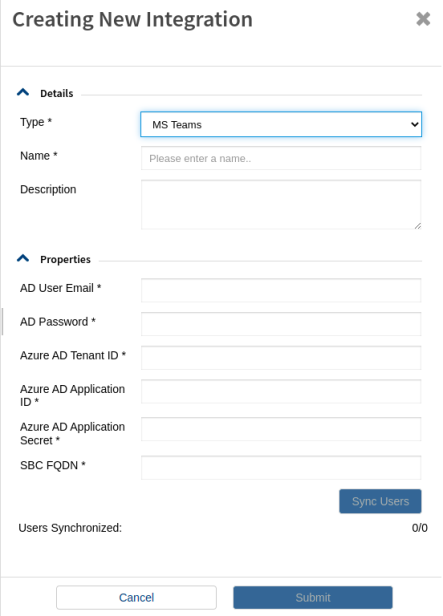
Note: When creating an Integration in CxEngage, MS Teams has been added to the Type drop-down. When selected, properties display that are required for the integration with MS Teams.
Known Issue: Reporting Issue with Shared Reports
When a shared report is opened, the user receives an error that data could not be retrieved. When this error is encountered, the user must click Reload to run the report.

| CxEngage Release 22.08.03 | |
|---|---|
| All Regions | August 03, 2022 12:00 - 15:00 UTC |
Fix: Allowing Supervisor Role to Download Recordings
The July 27 release only updated the "Administrator" system role to include permission to download recordings. So that supervisors can perform downloads of recordings, the RECORDING_DOWNLOAD permission has been added to the system role "Supervisor". Both of these system roles now have the proper permission to download recordings.
| CxQM Release 22.07.27 | |
|---|---|
| All Regions | July 27, 2022 12:00 - 15:00 UTC |
Fix: Headers Not Loading
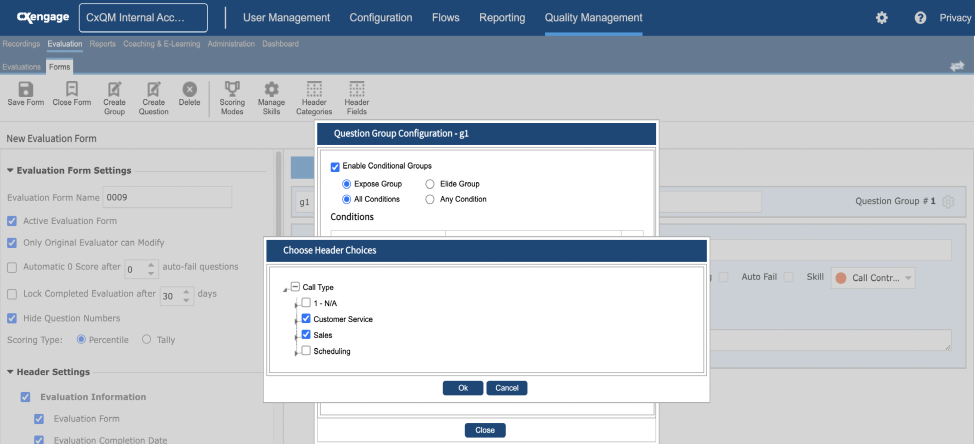
Previously, in CxQM while attempting to configure a Question Group to show as headers in an Evaluation Form, the user was unable to configure header choices. Category choices were not getting populated and a loading message displayed on the Choose Header Choices window.
This issue has been fixed to ensure that category choices are always populated in the Choose Header Choices window.
Update: New Permission for Downloading Recordings
In preparation for future functionality, the ability for users to download recordings has been separated from the ability to play recordings.
A new permission, RECORDING_DOWNLOAD, allows users to download recordings. If the user does not have a tenant role with this permission assigned, the user will not see the new Download icon on the media player.

The system role "Administrator" which has the MANAGE_ALL_RECORDINGS permission has automatically been updated with permission to download recordings.
| CxEngage Release 22.07.16 | |
|---|---|
| All Regions | July 16, 2022 12:00 - 15:00 UTC |
Update: Scheduling Analyses
In addition to scheduling a report or dashboard, you can now schedule an analysis in CxEngage. Based on the set schedule, the analysis will be sent in Excel format, to the specified recipients.
To schedule an analysis:
-
Go to Reports > Historical Reporting.
-
On the Home page, find the analysis you want to schedule.
-
Click the Schedule icon.
-
Enter the appropriate information on the Schedule window and click the Done button.

Notes: You are only able to send the analysis in Excel format. Rapid Excel Export is not enabled for scheduling.
Only the data table will be included in the Excel file. Existing charts or graphs will be excluded from the file.
Update: Choosing Filters and Data Before Running Reports
Previously, when you opened a report, it would automatically run and show a table with information for the current filters and data definitions. Now, when you open a report, the information does not immediately load. You have the opportunity to make any changes you need to the report before the data is retrieved, such as adjust the filters that are applied to the report and add or remove data definitions. Once you are ready to run the report, click the Resume button.
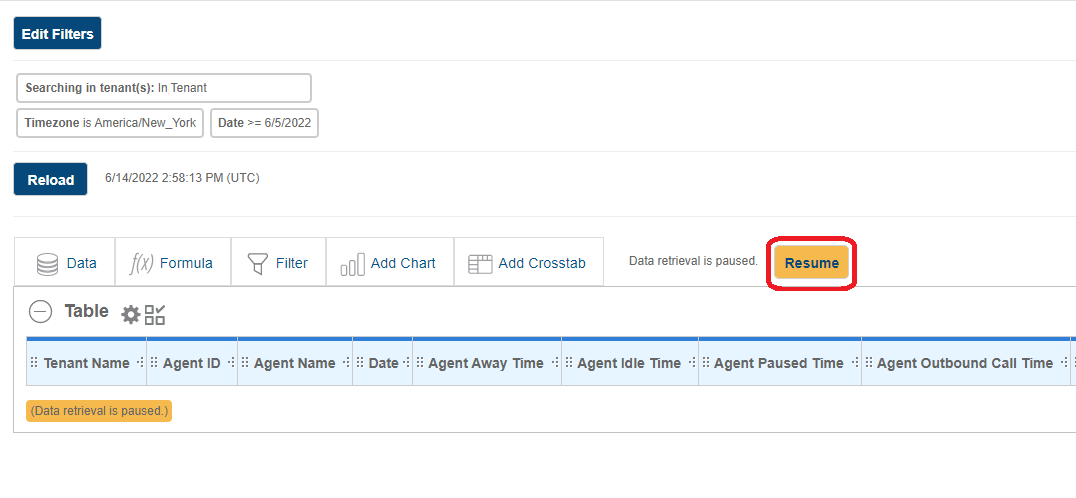
Note: Shared reports will still automatically load when opened.
Fix: Blank Table When Running Report
The query used to run the Interaction Report has been improved so that it does not prompt a timeout error. You must refresh the report definition to apply the change to existing reports.
To refresh the report definition:
-
Go to Reporting > Historical Reporting.
-
Open the Interaction report.
-
Click the Data tab and then click the OK button.
Note: You do not need to make changes to the report: open it, go to the Data tab, and click the OK button.
| CxEngage Release 22.07.13 | |
|---|---|
| All Regions | July 13, 2022 12:00 - 15:00 UTC |
Fix: Auto-refresh Failing on Agent State Monitoring Page
Intermittently, the data on the Agent State Monitoring page would not automatically refresh. This issue has been fixed.
| CxEngage Release 22.07.06 | |
|---|---|
| All Regions | July 06, 2022 12:00 - 15:00 UTC |
Update: Reviewing Wrap-Up State and Time in Wrap-Up
New columns on the Agent State Monitoring page allow supervisors to see which agent interactions are in the process of being wrapped up and how long an interaction has been in the wrap-up state.
The Wrap-Up State column shows which channels are in the final stages of interaction for an agent. A number below a channel icon represents the number of interactions for that channel that are in the Wrap-Up stage.
The Time in Wrap-Up column indicates the amount of time the agent has been in Wrap-Up for a specific interaction. The duration is displayed in the format of hh:mm:ss. If the agent has more interactions than can be seen in the column, use the scroll bar to scroll across the column to see each interaction and its duration in the wrap-up state.
You may need to add the Wrap-Up State and Time in Wrap-Up columns to your page. Click on the Columns arrow at the top of the page and check the appropriate boxes in the list. The columns show on the Agent State Monitoring page.

| CxEngage Release 22.07.02 | |
|---|---|
| All Regions | July 02, 2022 12:00 - 15:00 UTC |
Update: Managing Active Interactions
A new feature has been added to CxEngagethat allows administrators to manage active interactions. Specifically, those that are stuck in the queue and have not terminated properly.
To access Interaction Management, the user must have an Adminstrator role or a custom role with the TERMINATE_INTERACTIONS permission enabled in CxEngage.
To terminate an interaction, follow these steps.
-
Go to Reporting > Interaction Management. A list of all contacts in IVR, inQueue, and active interactions displays.
-
Find the interaction you want to terminate.
Note: You can filter the list to easily find a specific interaction.
-
Check the box associated with the interaction you want to remove.
-
Click the End Interaction button. A message displays stating that you will terminate the selected interaction.
-
Click Yes to end the selected interaction.
Note: You can terminate more than one interaction at a time. Check as many interaction boxes as you need and click the End Interaction button.
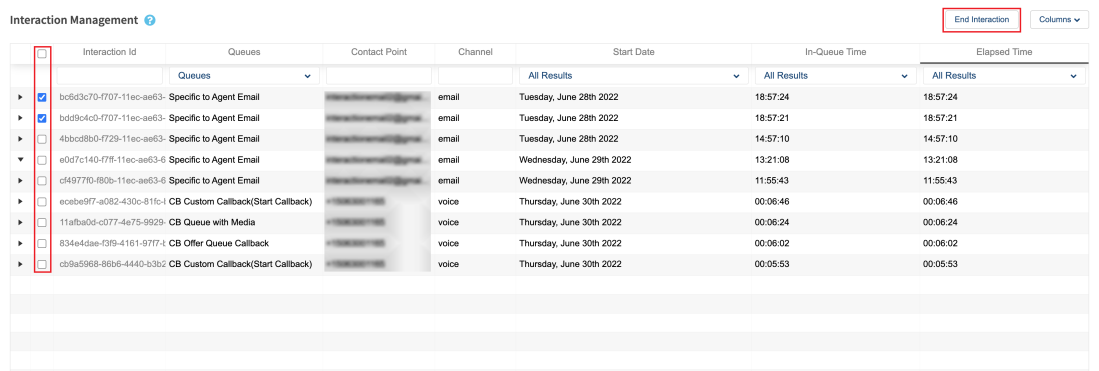
When interactions are terminated, that interaction is removed from the Interactions in Queue Realtime Dashboard.
Fix: Corrected Known Issues Regarding Multiple Source Switcher Functionality
The following items from the Known Issues list have been corrected.
-
Issue when filtering by All skills or All groups. When no filters are selected, all data is returned.
-
Elements overlapping.
-
The update button is not displayed correctly and cannot be clicked when several elements are in a table.
-
When you update the switcher on an existing dashboard, you must recreate the table, or the switcher will not change.
-
Existing custom dashboards do not correctly display the checked options in the drop-down.
-
Sometimes, when you click on the filter drop-down, it loses focus, and you cannot select the desired item.
-
When only "Lock to" is enabled and multiple default is disabled, no options are selected for multiple default, or multiple default is set to "All", the initial display of the dashboard defaults to show only the first filter in the list. When you perform the filter after loading the dashboard, it filters correctly.
| CxQM Release 22.06.29 | |
|---|---|
| All Regions | June 29, 2022 12:00 - 15:00 UTC |
Update: Displaying Average Scores for Question Group and Skill
In CxQM when you create or modify a report with List Evaluation Details as the Primary Series, you can choose to analyze data related to the Average Question Group Score and Average Skill Score.
To create a new report or modify an existing one to show the new information, follow these steps.
-
Go to Quality Management > Reports > Designs.
-
Create a new report with List Evaluation Details as the Primary Series or modify an existing one.
-
On the Report Settings tab, under Reported Data, identify the evaluation score to be analyzed. Click the appropriate data arrow and choose Average Question Group Score or Average Skill Score from the list.
-
Click the Save button to complete your changes.
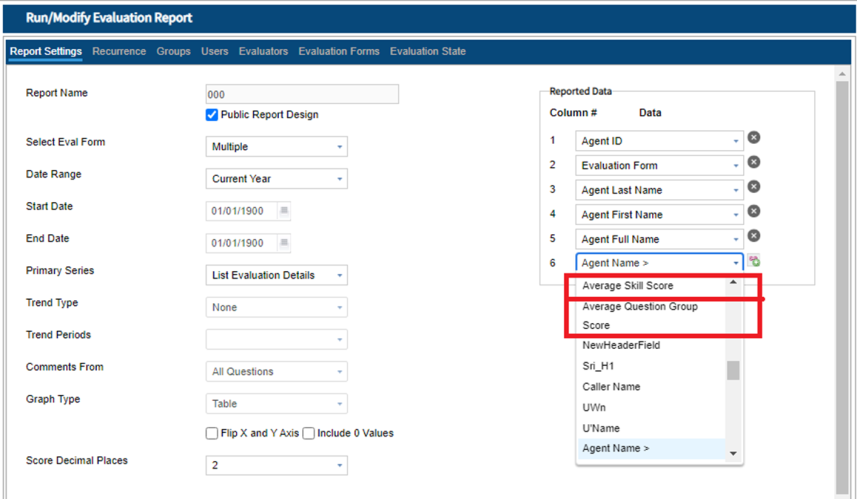
The report output contains a list of evaluation details showing the Question Group and Skill Set averages grouped by the appropriate question or skill.

| CxQM Release 22.06.04 | |
|---|---|
| All Regions | June 04, 2022 12:00 - 15:00 UTC |
Fix: Embedded Audio Player - Setting Call Portion Start and End Times
When using the embedded audio player to add a Call Portion to an evaluation, the user was unable to set the start or end time. This issue has been fixed and the start and end times can be set while using the embedded player.
| CxQM Release 22.05.25 | |
|---|---|
| All Regions | May 25, 2022 12:00 - 15:00 UTC |
Fix: Handling Long Pauses on Audio Recordings
Intermittently, when the agent paused the audio recording during an interaction and then ended the interaction without resuming the recording, the audio could still be heard on playback. CxQM is now equipped to properly handle audio recordings where the pause duration is longer than the actual interaction.
| CxEngage Release 22.05.21 | |
|---|---|
| All Regions | May 21, 2022 12:00 - 15:00 UTC |
Update: Selecting Multiple Resources, Groups, and Skills on Custom Dashboards
An update has been made that allows you to choose more than one resource, group, or skill at a time when using a custom dashboard for reporting. Previously, when using a custom dashboard, you could only analyze one item at a time. If you needed to review information that combined multiple resources, groups, or skills, you created a custom dashboard that reflected that specific combination of items. Now, you can set up your custom dashboard to allow users to choose their own combination when analyzing information. The ability to lock the dashboard so it is limited to specific resources, groups, and skills has also been added.
Note: The ability to select multiple queues was added in a previous update.
Configuring a Source Switcher for Multiple Resources, Groups, or Skills
To allow users to include more than one resource, group, or skill at a time, you must create a source switcher that lets them select multiple items from the switcher list.
Go to Reporting > Custom Realtime Dashboards and follow these steps.
-
Create a new dashboard or edit an existing one.
-
In the dashboard editor, click Add Widget.
-
From the Widget Type drop-down menu, select Source Switcher.
-
From the Entity drop-down menu, select Resource, Group, or Skill.
-
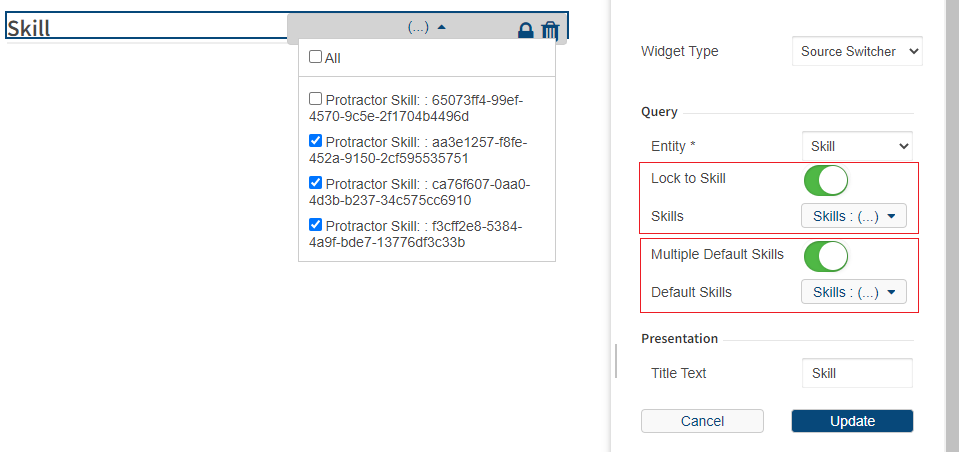
To filter the options in the source switcher list, click the Lock to Resource, Lock to Group, or Lock to Skill toggle to enable it. The toggle turns from gray to green.
-
In the Resources, Groups, or Skills drop-down menu, check the boxes for each resource, group, or skill you want included in the source switcher. Users will only be able to select items that you check.
Note: Selecting All results in "All Resources", "All Groups", or "All Skills" being the only option in the source switcher. -
To filter the dashboard to specific information when it is opened, click the Multiple Default Resources, Multiple Default Groups, or Multiple Default Skills toggle to enable it. The toggle turns from gray to green.
-
From the Default Resources, Default Groups, or Default Skills drop-down menu, check the boxes for the items you want to include when the dashboard is opened. Data for these items is combined together on the dashboard.
-
In Title Text, enter the label to display on the source switcher.
-
Click Submit to save the widget to your dashboard.
Selecting Multiple Resources, Groups, or Skills on a Custom Dashboard
When you or someone else uses the custom dashboard, check the boxes in the drop-down menu for the resources, groups, or skills you want included in the analysis. Data for these items is combined together on the dashboard.
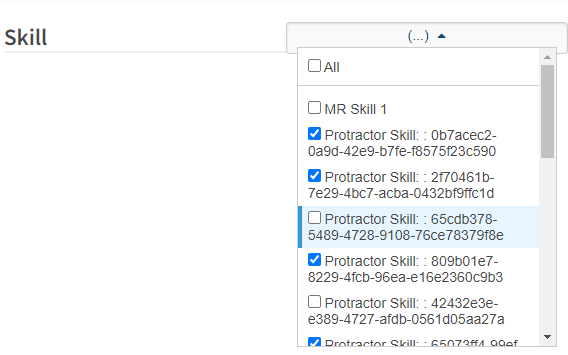
See Configuring Widgets on Custom Realtime Dashboards for detailed instructions on adding widgets.
| CxEngage Release 22.04.30 | |
|---|---|
| All Regions | April 30, 2022 12:00 - 15:00 UTC |
Fix: Organizing the Dispatch to Flow List
The Dispatch to flow drop-down menu, seen when creating or changing a dispatch mapping, now displays in alphabetical order.
This change can be found at Flows > Dispatch Mappings > Create a new dispatch mapping or click on an existing one > Dispatch to flow.
Update: Selecting Multiple Queues on Real Time Dashboards
Previously, on Real Time Reports, administrators were only able to select a single queue from a Queue Switcher. With this update Real Time Reporting users will be able to select Multiple Queues to be aggregated in the statistic widgets that are tied to a Queue Switcher.
| CxEngage Release 22.04.09 | |
|---|---|
| All Regions | April 9, 2022 12:00 - 15:00 UTC |
Update: Search for Message Templates
Previously when selecting a message template in Skylight or Skylight Desktop, you had to scroll up and down the list of available templates to find the one you wanted to use. Now, you can enter a template name or template contents into the Search field and select the template from a shorter list that reflects your search results.
After accepting an SMS, Facebook, WhatsApp, or web Chat interaction, follow these steps to use the Search feature.
-
Next to the message text box, click +. A list of available templates shows.
-
In the Search field, enter the template name or contents of a message template. The list of available templates shortens as you enter characters in the Search field.
-
If necessary, navigate up and down the list using your keyboard arrows.
-
Press Enter or click the template you want to use.
-
Press Enter or click Send to send the message to the contact.

You can use the template search for interactions with contacts via SMS, Facebook, WhatsApp, and web Chat.
Entries in the search field are case sensitive and matches can be made on partial or complete entries of a template name or template contents.
| CxEngage Maintenance Release 22.03.19 | |
|---|---|
| All Regions | March 19, 2022 12:00 - 15:00 UTC |
Fix: Digital Transcript Availability
An update has been made to allow digital channel transcripts to remain available when an interaction terminates in an unexpected manner. This change allows transcripts to be retained regardless of how an interaction completes.
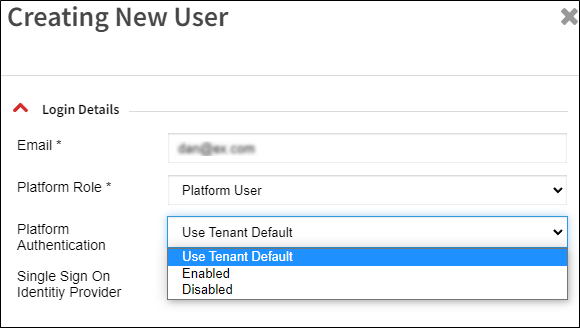
Fix: Platform Authentication Update
When creating a new user through Configuration UI, the value chosen for Platform Authentication was inverted. In some cases, this caused the email invitation sent to the user to fail until the new user's Platform Authentication method was updated manually. This issue has been resolved.
| CxEngage Maintenance Release 22.02.12 | |
|---|---|
| All Regions | February 12, 2022 12:00 - 15:00 UTC |
Fix: Improved Stability of Resource Allocations
To enhance the overall performance of CxEngage, changes were made to improve stability of resource allocations services. These improvements should increase stability and improve high availability of resource allocation services.
| CxQM Release 22.02.12 | |
|---|---|
| All Regions | February 12, 2022 12:00 - 15:00 UTC |
Update: Pop-Out Window Available for Audio Player
Currently the audio player is embedded within Quality Management screens and when it is used, occupies a large portion of the screen. CxQM has been updated to allow the audio player window to be viewed separately from Quality Management screens. The audio player pop-out allows you to view more information on Quality Management screens and allows for dual monitors, maximizing screen space for your applications.
The pop-out option is available from the following screens:
-
Recordings > Playback
-
Evaluation > Evaluations
-
Coaching & E-Learning > Activities
-
Dashboards > My Engage
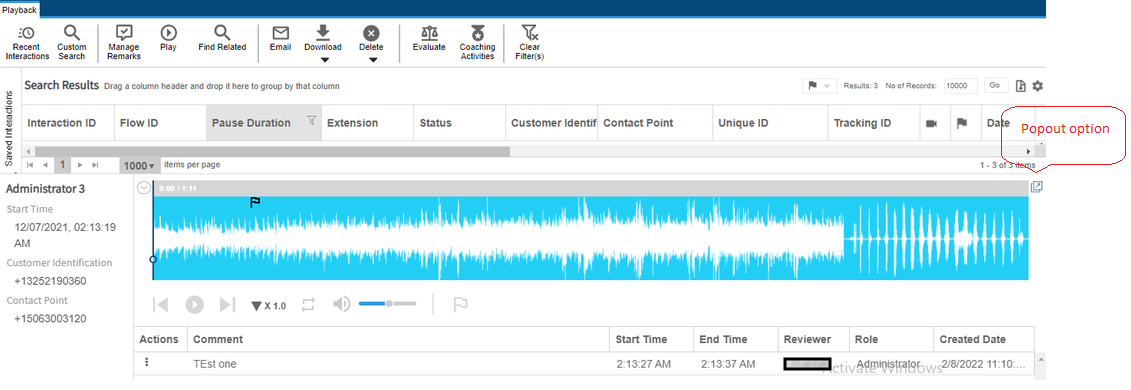
If the audio player is in pop-out mode, the pop-out option is not available.
The audio player pop-out feature is automatically enabled. If you want to have the audio player pop-out disabled, contact support.
| CxQM Release 22.01.29 | |
|---|---|
| All Regions | January 29, 2022 12:00 - 15:00 UTC |
Update: Added List Evaluation Details to Evaluation Report
A new Primary Series option “List Evaluation Details“ has been added to the Evaluation Report. There are 41 new columns that you can add to the report. This data includes but is not limited to agent first and last name, evaluation form, date, and time, evaluator ID and state, call date, time, and duration, and the skill and section score.
You can set the Primary Series to "List Evaluation Details" in Quality Management > Reports > New Report or Run/Modify Evaluation Report.
Then, in the Reported Data section, select the header fields and header categories you want to include in the report.
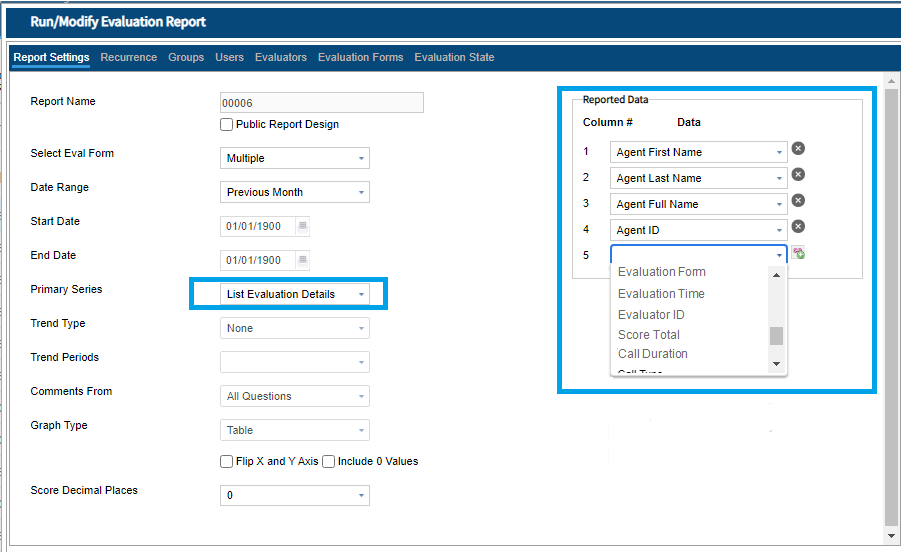
When you run or export the report, the evaluation header fields and categories are reflected in the report.
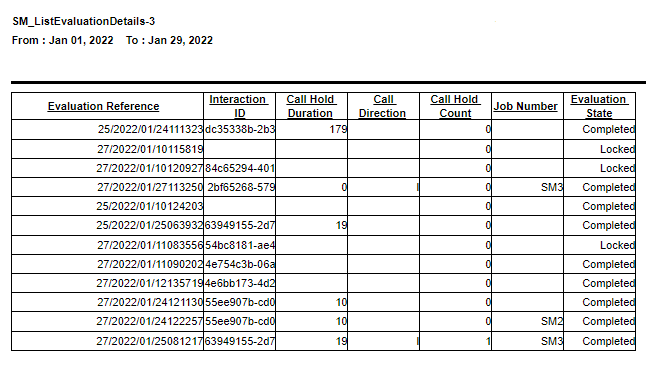
If you do not want to have the custom fields enabled in your Evaluation Section, contact support to have this feature disabled.
| CxEngage Maintenance Release 22.01.15 | |
|---|---|
| All Regions | January 15, 2022 12:00 - 15:00 UTC |
Update: Default Twilio Extension Renamed to Browser Phone
You can now configure the WebRTC Extension Label when you enable WebRTC in the Twilio Integration.
The new option is found in Config UI at Configurations → Integrations → Twilio.
When configuring new tenants, Label will default to Browser Phone. For existing tenants, Label will remain Default Twilio extension. Only users with the tenant permission MANAGE_ALL_PROVIDERS can edit the value of WebRTC Extension Label. If you want to change it, you must do it manually.
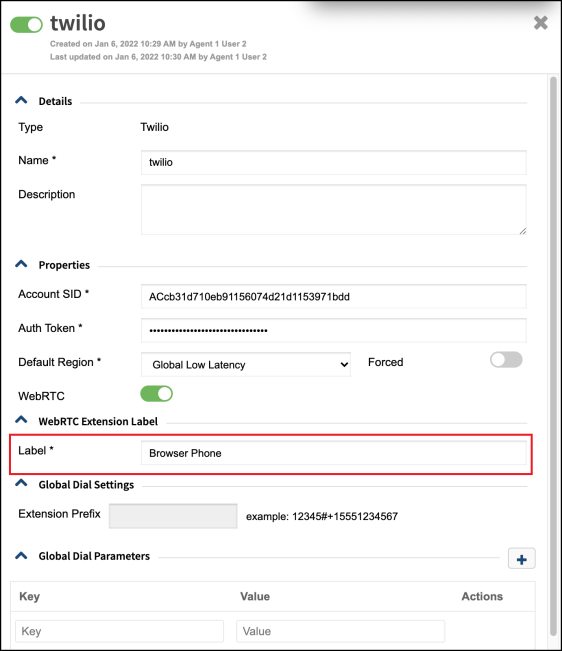
The WebRTC Extension Label allows for the customization of what shows for the Active Voice Pathway in Skylight and the WebRTC extension in Interaction Monitoring, User Management, and User Profile.
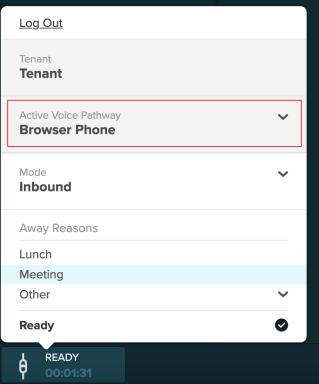
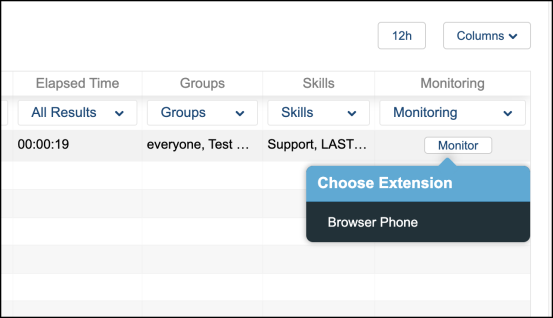
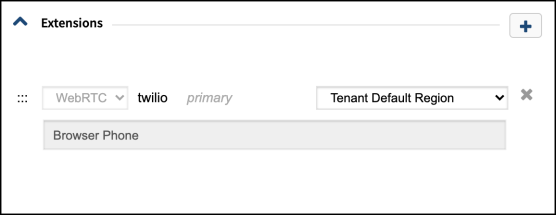
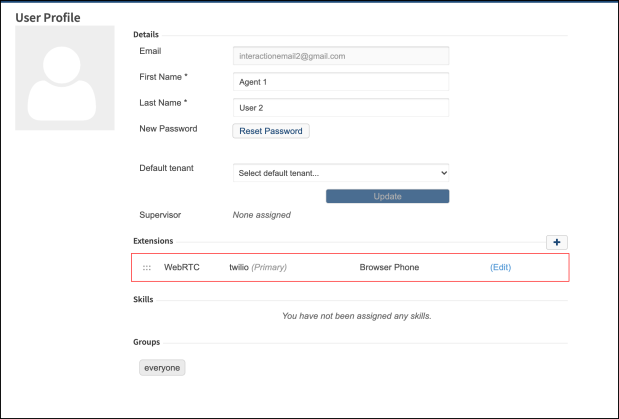
All users in the same tenant will have the same WebRTC extension label. You cannot customize the WebRTC extension label on a per-user basis.
| CxQM Release 22.01.15 | |
|---|---|
| All Regions | January 15, 2022 12:00 - 15:00 UTC |
Update: Interaction Data Available in Evaluation Headers
An update has been released which allows the Interaction ID header field to be displayed in Evaluation forms. This field will be auto-populated with the associated call's Interaction ID information and cannot be modified. This field will display on any Evaluation Form where any Call Information field is selected for inclusion. The same is applicable for View, Modify, Export to PDF, Export to Excel and Print Options for the Evaluation Form.

Update: Drag and Drop Attachment Upload
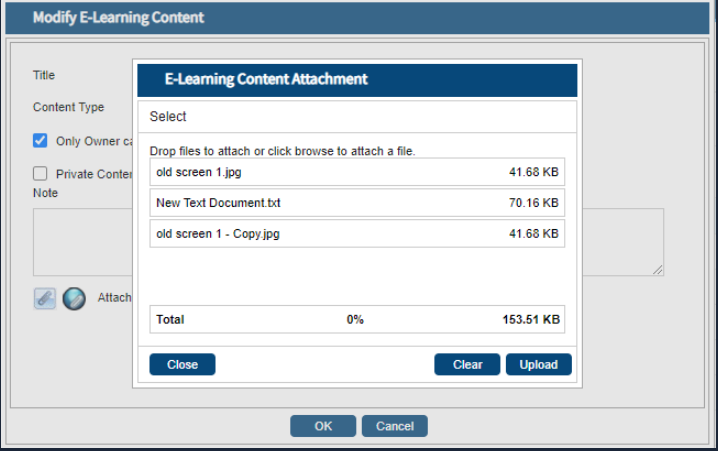
The ability to Drag and Drop files when uploading attachments has been added to E-Learning content controls.
