Contact Management
In the customer management panel in Skylight Desktop, you can find contact details and view historical interactions for a contact. If you have the required permissions, you can also create or modify the contact's information.
- Searching for Contacts
- Associating an Existing Contact with an Interaction
- Adding Contacts
- Editing Contacts
- Merging Contacts
- Deleting Contacts
- Viewing Historical Interactions
Note: If the Contacts tab does not display, contact your administrator to verify that your user role includes all Contact Management permissions.
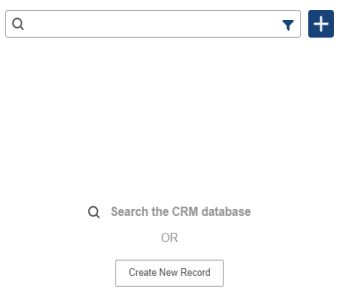
Searching for Contacts
- If the customer management panel is collapsed, click the arrow (
 ) to expand it.
 - On the Contacts tab, place your cursor in the search text box (
 ) and begin typing.
 - Optionally, select a filter (
 ) from the drop-down menu such as name or email address.
By default, the search finds All matches for the text added to the search text box. You can select a filter to narrow down the results.
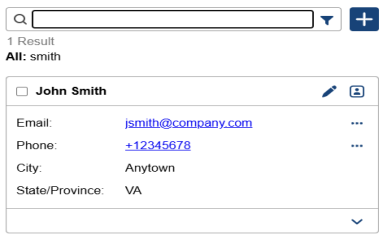
When entering text, use the asterisk (*) for a wild card character.
Example: Searching for dan returns contacts named Dan. Searching for dan* returns contacts named Dan, Daniel, Danielle, etc.When entering text, use a tilde (~) at the end of a query to enable fuzzy search. Do not use fuzzy search when searching numbers.
Example: Searching for den searches for contacts named den. Searching for den~ searches for contacts named den, dan, dem, ken, etc.
- Press Enter. Contacts that match the search term are shown in the search results. If you have entered text, you can click the x in the search text box to clear the search term or click the filter label below the search box to clear a specific filter.
Once you find the contact you want to work with you can choose an action to perform. Click Actions  beside the contact's personal information and select to compose an email, call a number, text using SMS, etc.
Associating an Existing Contact with an Interaction
If you have the CONTACTS_ASSIGN_INTERACTION permission, you can associate an interaction to an existing record. This action is used if a contact doesn't match the incoming interaction or if multiple contacts match the incoming interaction.
To associate a contact with an interaction:
- Search for a contact.
- In the search results, click Select Contact (
 ) next to the contact.
Adding Contacts
If you have the CONTACTS_CREATE permission, you can add new contacts. When you receive an interaction that does not match a saved contact, you can add a contact so that the contact will match future interactions.
To add a contact:
- Search for a contact.
The step ensures that there isn't an existing contact already.
-
If a contact doesn't exist, click Add Contact (
 ) on the search results screen.
 - In the New Customer Record, enter the contact's details.
The sections and fields available depend on the contact layout assigned to your tenant by your administrator. Enter phone numbers in E.164 format. For example, +12345678910.
- Click Create.
Editing Contacts
If a customer provides new or updated information, you can update their contact record. You must have the CONTACTS_UPDATE permission to modify contacts.
To edit a contact:
- On the contact record, click Edit Contact (
 ).
).
- Update the relevant fields with the new information.
Note: Click the Clear icon to clear the field entirely. - Click Save Changes.
Merging Contacts
If you have CONTACTS_MERGE_UNMERGE permission, you can merge duplicate contacts.
|
Merging contacts creates a new contact record and results in the loss of the interaction history associated with the original contacts. Merged contacts can't be unmerged. |
To merge contacts:
- Search for the contacts.
- In the search results, select the checkboxes next to the contacts that you want to merge.
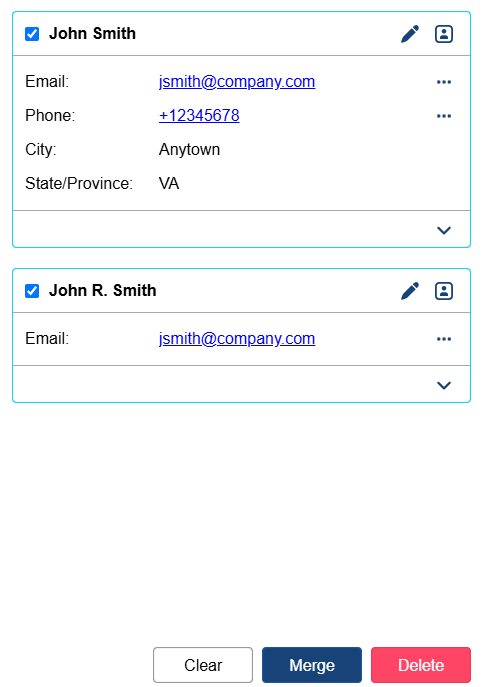
- Click Merge.
- On the Merging contacts page, select the values that you want to assign to the merged contact record.
For example, if each contact record has a different phone number associated with it, select the correct phone number for the contact.
If the contacts have any details in common, such as the same country listed, the common value is assigned to the merged contact.
- Optionally, update any of the values that are selected for the merged contact.
For example, you can update the contact name that you selected.
- Click Save Changes.
- In the confirmation message, click Yes, merge to complete the merge.
Click Keep editing to return to Merging contacts. Select Cancel to return to the Contacts tab without merging.
Deleting Contacts
If you have CONTACTS_DELETE permission, you can delete contacts. The contact is also removed from any interactions that are associated with it.
To delete a contact:
- Search for the contact you want to delete.
- Select the checkbox next to the contact.
- Click Delete.
- In the Delete Contact confirmation message, click Yes.
Historical Interactions
When handling an interaction, you might want to see the contact's past interactions. Details from past interactions might help you with the contact's current inquiry.
Historical interactions are displayed on the Contacts tab, under the contact's details.
If you don't see the Contacts tab, click the arrow ( ) to expand it.
Permissions for Historical interactions
You must have the proper permissions to see Historical interactions on the Contacts tab.
To access the history for all interactions on your tenant, you need one of the following permissions:
VIEW_ALL_RECORDINGS
ARTIFACTS_READ_ALL
ARTIFACTS_CREATE_ALL
To access history only for the interactions that you participated in, you need one of the following permissions:
VIEW_MY_RECORDINGS
ARTIFACTS_READ_SELF
ARTIFACTS_CREATE_ALL
Viewing Historical Interactions
Important: If you aren't assigned the proper permissions to view a historical interaction in and Skylight Desktop, nothing will display in the History section for that interaction on the Contacts tab.
-
If you are in an active interaction and there is a match with an existing contact, the person's information automatically displays on the Contacts tab and the interaction is assigned to the contact.
Note: If this is not the correct contact, click Unassign Contact ( ) . You can then search for the appropriate contact.
 -
The History for the contact displays beneath the contact's details, with the most recent interactions at the top. Interaction tiles display for each past interaction with the agents name, how long has passed since the interaction occurred, how long the interaction was, and the Disposition code applied to the interaction.
- Click the down arrow to open the tile and see the following information:
- Date: The date that the interaction began.
- Direction: The direction of the interaction, which is either Inbound or Outbound.
- Channel: The channel type of the interaction, such as SMS or Voice.
- Queue: The queue that the interaction waited in before connecting with an agent.
- Based on the channel type, you can see the Transcript or listen to the Audio Recording. Hover over the area and click Load Transcript or Load Recording.
Note: You can only see Transcript or Audio Recording if you have the proper permissions. - Click Search Contact (
 ) to return to the Contact tab.
