Configuring a CxEngage Integration for Microsoft Teams
Once you have completed the necessary setups in Azure Active Directory and Microsoft Teams, you will create a new integration in CxEngage.
-
Log into CxEngage with Administrator permissions.
-
Navigate to Configuration > Integration.
-
On the Integration Management page, click the Create button. The Creating New Integration panel displays.
-
Click the Type arrow and select MS Teams from the drop-down.
-
Enter a Name and Description for the integration.
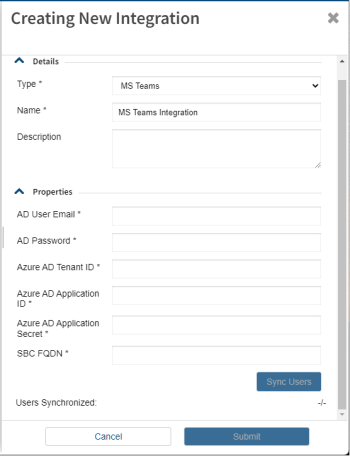
Complete the integration by entering the appropriate information in the Properties section. This information is required for Microsoft Teams to synchronize with CxEngage.
Note: This is the information you collected when setting up the tenant for the CxEngage and Microsoft Teams Integration in the Azure active Directory portal.
-
Enter the AD User Email that you assigned to the CxEngage Service Account.
-
Enter the AD Password that you assigned to the CxEngage Service Account.
-
Enter the Azure AD Tenant ID.
-
Enter the Azure AD Application ID.
-
Enter the Azure AD Application Secret.
-
Enter the SBC FQDN.
-
Click the Submit button to save the integration.
-
After the Microsoft Teams Integration is submitted, click the Sync User button.
Note: The synchronization of Active Directory and CxEngage users may take a few minutes. When new users are added, you must resynchronize the users. Return to the Microsoft Teams Integration in CxEngage and click the Sync Users button.
