Locking Resources, Groups, Skills, and Queues on Custom Realtime Dashboards
Use the Lock to toggle when configuring source switcher widgets on custom realtime dashboards to restrict which data users can view.
Configuring the Source Switcher
The first step in restricting data on a custom dashboard is to create a source switcher. Within the source switcher configuration, you can select which data you want available for users to select. When a source switcher is locked to only show specified data, it displays a padlock in the drop-down menu.
To configure a source switcher with locked resources, groups, skills, or queues:
- Go to Reporting > Custom Realtime Dashboards.
- Open an existing custom realtime dashboard or create a dashboard.
- In the dashboard editor, click Add Widget.
- From the Widget Type drop-down menu, select Source Switcher.
- From the Entity drop-down menu, select Resource, Group, Skill, or Queue.
- Click the Lock to toggle to enable it. The toggle turns from gray to green (
 ).
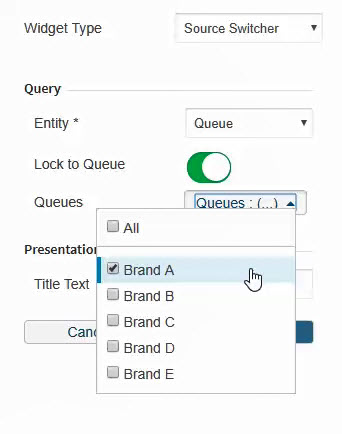
). - From the drop-down menu, check the boxes for the resources, groups, skills, or queues you want included in the source switcher. Users will only be able to select items that you check.
Note: Selecting All doesn't give you the option to select individual items on the tenant. Selecting All results in "All Resources", "All Groups", "All Skills", or "All Queues" being the only option in the source switcher.
- In Title Text, enter the title to display on the source switcher.
- Click Submit.
Connecting the Source Switcher to Widgets
After you've configured a source switcher with restrictions, configure any statistic or table widgets that you want to have these restrictions to be connected to the source switcher. The Source Switcher field appears in the widget's configuration only if a statistic or table with that data is selected.
| If a source switcher is connected to a table widget, the option to filter the Resource, Group, Skill, or Queue column using the filter in the column header is removed. To filter by the item, use the options in the source switcher. When you select a source switcher, a message displays advising that the filtering is removed "Applying a source switcher to a table will remove the column filter for the associated entity." |
- On the custom dashboard, click the widget that you want to connect to the source switcher or click Add Widget to create a widget.
Ensure that you select a statistic or table with the proper data in order to have the option to select a source switcher.
- From the Source Switcher drop-down menu, select the source switcher with the desired restrictions.
This drop-down menu shows only if you have a statistic or table with the proper data selected.
- If you're creating a new widget, finish configuring the widget.
See Configuring Widgets on Custom Realtime Dashboards for more information on each of the fields.
- Click Submit.
Consider a scenario where your tenant includes Brand A, Brand B, and Brand C. They each have their own queue. You want to create a dashboard for each brand, but want to make sure that they can only see data for their brand and not the other brands. For this example, we'll create a source switcher for Brand A.
Configure the widget as follows:
- Widget Type: Source Switcher
- Entity: Queue
- Lock to Queue: Enabled
- Queues: Brand A
- Title Text: Brand A Queue
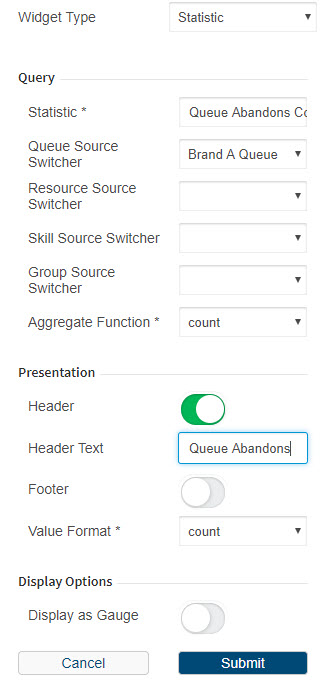
Now we want to associate the Brand A source switcher you created with a widget that measures queue abandons. Configure the statistic widget as follows:
- Widget Type: Statistic
- Statistic: Queue Abandons Count
- Queue Source Switcher: Brand A Queue
- Resource Source Switcher: (leave empty)
- Skill Source Switcher: (leave empty)
- Group Source Switcher: (leave empty)
- Aggregate Function: count
- Header: Enabled
- Header Text: Queue Abandons
- Footer: Disabled
- Value Format: count
- Display as Gauge: Disabled
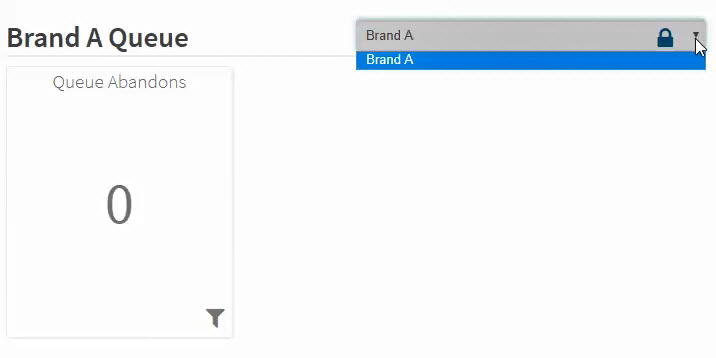
After you save the widget and enable the dashboard, the source switcher (as shown below), only has Brand A as an option in the Queue drop-down menu. The Queue Abandons statistic widget display data only for Brand A because it has been connected to the Brand A Queue source switcher.
What's Next?
After you've configured the widgets, click Save Dashboard to save your changes. If you want to explicitly share the dashboard with users who have the Access Controlled Supervisor role or a custom role with ASSIGNED_REPORTS_READ permission, create an Access Controlled Report and add the required users as members.


