Changing the FROM Address in an Email Interaction
Important: Before configuring the multiple reply email feature, the tenant must have a Flow and Dispatch Mapping for Outbound Email.
An administrator or supervisor must do the following configurations before the agent can select a different Reply As email address for the interaction.
-
Create your Outbound Identifiers, which are the email addresses that you want to include as a Reply As in your email interaction. See the Creating Outbound Identifiers page in the online help for detailed instructions.
-
Create your Outbound Identifier List containing all the Outbound Identifiers you want available as the Reply As email addresses. See the Creating an Outbound Identifier List page in the online help for detailed instructions.
-
Assign the Outbound Identifier List to the agents, skills, and groups that you want to be able to see the Outbound Identifier List in Skylight. See the Assigning Outbound Identifiers page in the online help for detailed instructions.
Note: Agents must be assigned the VIEW_ALL_PROVIDERS permission in order to see the list of emails in Skylight. -
So that Skylight can receive and send emails using different email addresses, assign and enable each Outbound Identifier to the Listener list in the CxEngage Email Integration. For detailed instructions, see the Listeners section of the Creating Integrations page in the online help.
Once you have completed these steps, agents given the proper permission can choose a different Reply AS email address during an interaction in .
To change the FROM address when replying to an email interaction, the agent will do the following:
1. In , when a notification is received that an email interaction is available, accept the work.
2. After reviewing the email, click Reply.
3. Enter a response and make any necessary updates.
4. Click the Reply As arrow and select from the list the email address to be used as the Reply As address—the Reply As email address in the email area changes to reflect the one chosen by the agent.
Note: You can also change the Reply As email address on the Info panel.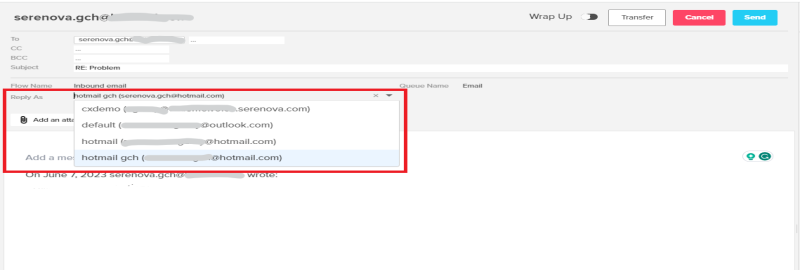
5. Click the Send button.
To change the FROM address when creating a new email interaction, the agent will do the following:
1. In , click the New Interaction icon.
2. Enter the contact's email address in the Search field.
3. Press the Enter key on the keyboard.
If the email already exists as a contact, the contact information displays.
4. Click the contact's email address.
5. If an Outbound Identifier List exists, the agent can select a different Reply As address. Click the Select Reply As arrow and then select the email address to use as the Reply As email.
6. Click Compose Email. The Compose Email window opens with the contact's information in the appropriate fields and the selected email address as the Reply As address.
Note: If the Reply As address is incorrect, cancel the interaction and re-initiate the email or on the Info panel click the email address, click Select Reply As and then select the correct email address.
If the email does not exist as a contact, the email address shows beneath the Search field with no other contact information.
4. Click the Select Reply As arrow and select from the list the email address to be used as the Reply As address.
5. Click the button that reflects the user's email address. A new email interaction opens with the email address in the To field and the selected Reply As email address.
Note: If the Reply As address is incorrect, cancel the interaction and re-initiate the email or on the Info panel click the email address, click Select Reply As and then select the correct email address.
Send the email with the different Reply As address.
Finally, enter a message, make any necessary updates, and click the Send button to complete the new email interaction.
Warning: If you previously set a From address in the Click to Email flow, ensure the address is the SMTP-User email address found in the Email Integration or any active Listener. Otherwise, the Send mail function will not work.
No matter which circumstance prompts the interaction, when the customer receives the email, the FROM address reflects the Reply As email address that the agent selected when creating the interaction. When the customer clicks Reply, the Reply To address reflects the chosen email address as well.
