Configuring the Agent Toolbar in Salesforce
Once you have installed the Agent Toolbar package in your Salesforce organization, you're ready to configure the toolbar. To configure the agent toolbar, you need to:
- Point the CTI Adapter to the Agent Toolbar
- Configure User Permissions
- Apply the LiveOps User Layout to User Profiles
- Select the navigation tabs for the Sample Console
- Customize the softphone layout
Pointing the CTI Adapter to the Agent Toolbar
- Log in to Salesforce.
- Click Your Name > Setup.
- In the sidebar under App Setup, click Customize > Call Center > Call Centers.
If the "Getting Started with Salesforce CRM Call Center" page displays, click Continue.
- Next to agent tool bar, click Edit.
- In CTI Adapter URL, enter the Agent Toolbar URL for your tenant's region:
- Update the Softphone Width.
The recommended minimum width is 655.
- Click Save.
Configuring User Permissions
Configure the Salesforce permissions for users that will use the agent toolbar to ensure they can access it.
-
In the sidebar under Administration Setup, click Manage Users > Users.
- Click the name of the user that will have access to the toolbar.
- Click Edit.
- Update the user's details under General Information:
- Select the Service Cloud User checkbox
- In Call Center, select agent tool bar
- Click Save.
Applying the LiveOps User Layout to All User Profiles
Users who will use the Agent Toolbar can have the CxEngage username and password fields (labeled Titan User Name and Titan Password) appear on their user details page. You can do this by either applying the LiveOps User Layout to their user profiles or adding the CxEngage username and password fields to your existing user layouts.
To apply the LiveOps User Layout:
- In the sidebar under App Setup, click Customize > Users > Page Layouts.
- Under User Page Layouts, click Page Layout Assignment.
- Click Edit Assignment.
- Assign the LiveOps User Layout to all user profiles or to the user profiles that will use the Agent Toolbar.
- Click Save.
To add the CxEngage username and password fields to your existing layouts:
- In the sidebar under Customize, click Users > Page Layouts.
- Under User Page Layouts, click Edit next to the page layout you are updating.
- In the palette at the top of the page, click Fields.
- Optionally, add a new section for the Titan User Name and Titan Password fields by clicking and dragging Section to the location where you want it in your layout.
Follow the steps in the configuration wizard to configure this new section.
- From the Fields section of the palette, click and drag Titan User Name to the section where you want it in the layout.
- From the Fields section of the palette, click and drag Titan Password to the section where you want it in the layout.
- Click Save.
Selecting the navigation tabs for the Sample Console
Choose the relevant objects to appear in the console's navigation tab in Salesforce.
- In the sidebar under App Setup, click Create > Apps.
- Under Apps, click Sample Console.
- Click Edit.
- Under Choose Navigation Tab Items, select the following items from the Available Items list and then click Add to move them to the Selected Items list.
- Accounts
- Contacts
- Cases
- Opportunities
- Leads
- Under Assign Profiles, select the System Administrator and Standard User checkboxes in the Visible column.
- Click Save.
Customizing the Softphone Layout
Customize which Salesforce call-related fields and objects are displayed.
- In the sidebar under App Setup, click Customize > Call Center > Softphone Layouts.
If the "Getting Started with Salesforce CRM Call Center" page opens, click Continue.
- Click New to create a softphone layout or Edit to edit the default layout.
-
Configure the softphone layout.
 Softphone Layout Settings
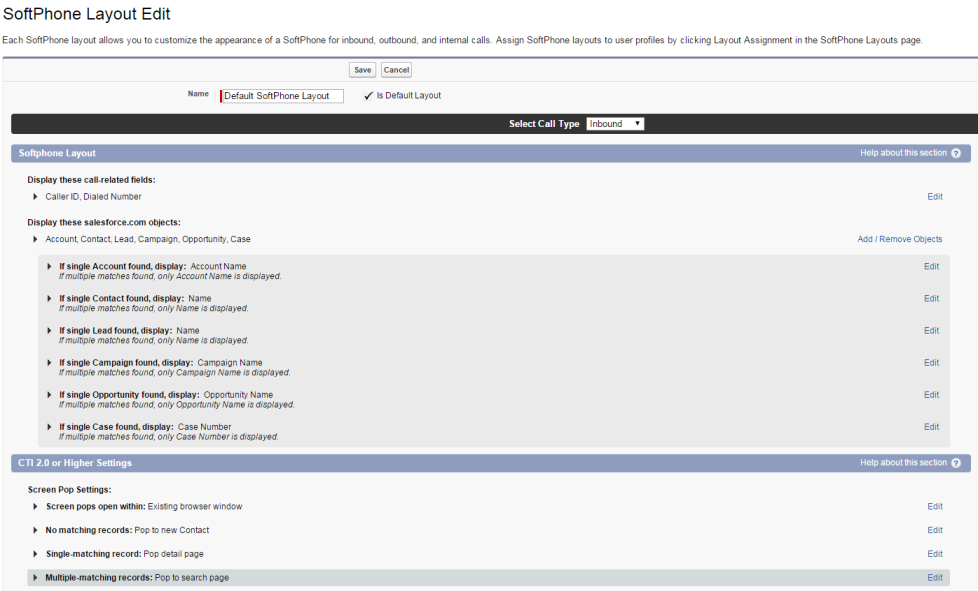
Use these settings (also shown in the screen capture below) as a guide when you create a softphone layout:
General
Field Value(s) Name Default Softphone Layout Is Default Layout (Select the checkbox) Select Call Type Inbound Softphone Layout
Field Value(s) Display these call-related fields: - Caller ID
- Dialed Number
Display these salesforce.com objects: - Account
- Contact
- Lead
- Campaign
- Opportunity
- Case
If single Account found, display:
Account Name
If single Contact found, display: Name If single Lead found, display: Name If single Campaign found, display: Campaign Name If single Opportunity found, display: Opportunity Name If single Case found, display: Case Number CTI 2.0 or Higher Settings - Screen Pop Settings
Field Value(s) Screen pops open within: Existing browser window
If you choose to configure screen pops to open in a new window, agents must ensure that their web browser is configured to allow pop-up windows. No matching records: Pop to new Contact Single-matching record: Pop detail page Multiple-matching records: Pop to search page 
- Click Save.

