Flow Designer Reference
Flows are created by connecting a series of notations that define the interaction experience. These notations are the events and activities that manage the interaction based on their sequence and configuration details.
Note: To create and manage flows, you must belong to the default Administrator role or to a custom role that includes the MANAGE_ALL_FLOWS permission.
To view the list of Flows, you must belong to the default Supervisor role or to a custom role that includes the VIEW_ALL_FLOWS permission.
To view the Flow Designer, you must belong to a custom role that includes all of the following permissions:
-
VIEW_ALL_FLOWS
-
VIEW_ALL_MEDIA
-
VIEW_ALL_PROVIDERS
-
VIEW_ALL_BUSINESS_HOURS
-
VIEW_ALL_QUEUES
-
VIEW_ALL_LISTS
-
VIEW_ALL_USERS
-
READ_DISPOSITION_LIST
-
READ_PRESENCE_REASONS
-
READ_REASON_LIST
-
VIEW_ALL_TRANSFER_LISTS
-
INTERACTION_ATTRIBUTES_CONFIG_READ
The Flow Designer palette groups notations and actions according to their general function. The tables below provide information on the purpose and configuration requirements of each item.
Search Tip: Press CTRL+F (Windows) or Command +F (Mac) to search for a specific term or notation name. Enter the term in the search bar that opens and any terms that match are highlighted.
- Flow Control
- Interaction Control
- Media
- Resource Control
- Data Exchange
- Reusable
- Advanced Flow Control
- Flow Defaults - Settings
- Flow Defaults - Notations
Flow Control
| Element | Configuration |
|---|---|
|
Entry: Indicates the beginning of a flow.
|
N/A |
|
Resource Entry: Initiates a sub-process that is passed a resource. Use this event to initiate a separate flow that requires a resource to handle an interaction.
|
Condition: Optionally, enter a condition statement for this sup-process. Signal Name: This field contains a binding variable so that the signal being used to trigger this sub-process can be attached to another object. Resource: Enter the resource name. |
|
Timer: Indicates the amount of time allowed for processing a task. For example, you can est a timeout of 15 seconds before prompting a caller to enter a code or selection if they have not already done so.
|
Timeout: In the free entry text box, enter the number of seconds to wait for a response. |
|
Exit: Indicates the end of a portion of a flow or the entire flow. If this is a sub-flow, it returns to the main flow. If this is the last flow associated with an interaction, the interaction is completed and the customer is disconnected.
|
N/A |
|
Decision Branch: This gateway acts as a decision point and routes a participant to a specific destination or activity. For example, selecting an IVR menu option for a queue selection.
|
Branch objects do not have configuration details set within the object. Configuration details are applied to the connections stemming from the object to identify when to follow each branch. Refer to Configuring Connections for full details. |
|
Event Branch: This gateway requires catching events attached to different sides, and will follow the first event caught. When given the option between multiple events, this gateway moves forward with the first event that is ready.
|
Branch objects do not have configuration details set within the object. Configuration details are applied to the connections stemming from the object to identify when to follow each branch. Refer to Configuring Connections for full details. |
|
Parallel Branch: This gateway performs tasks in parallel. For example, simultaneously putting a caller into a queue and playing a message.
|
Branch objects do not have configuration details set within the object. Configuration details are applied to the connections stemming from the object. Parallel Branch connections do not require configuration details to identify when to follow each branch as all of the branches are followed simultaneously. A label can be added to each to have a name displayed. |


Return to top
Interaction Control
| Object | Configuration | ||||||
|---|---|---|---|---|---|---|---|
|
Assign: Allows you to define a variable to reference later in conditions within events and gateways in your flow.
|
Name *: Enter the variable name. Anytime that this is referred to in subsequent conditions, you must enter it exactly as it is entered here. Value *: Enter the corresponding value for the variable. If it is a string, surround the value in quotation marks. You might enter a value such as: true, false, a number, or a string, such as digits pressed. For example, consider a flow that has a Collect Digits activity for the caller to select their preferred language. If they press "1" and that should correspond with English, you can set an attribute named Language and the value "English". You can refer to the attribute later in the flow in a conditional expression, such as (= "English" Language). See Setting Attributes in a Flow. |
||||||
|
Assign Global: Allows you to define a global variable or attribute that is used within the main flow and all sub-flows.
|
Name *: Enter the attribute name. Anytime that this is referenced in subsequent conditions, you must enter it exactly as it is entered here. Value *: Enter the corresponding value for this variable. If it is a string, surround the value in quotation marks. |
||||||
| Check Business Hours: Sends a request to check for business hour rules. For example, this can be used to find out if a call is made during or outside of business hours. An exclusive gateway can then be used as a decision point to handle it appropriately.
|
Params
Bindings
|
||||||
|
Conference 3rd Party: Adds a third-party to an interaction. This allows you to access features available through your third-party providers and incorporate them into your tenant. If dialing a SIP endpoint, custom headers can be used to pass information to the third-party's platform. Information is sent back to CxEngage using REST API calls.
Third-party conferencing is intended to be used during the IVR or routing phase of a customer flow. For example, if you have access to an automatic voice recognition service you can design your flow to conference the service in, identify what the caller is looking for, and provide that information back to CxEngage for queue routing. |
To: Select the type of endpoint to dial and conference into the interaction. Each type selection provides an additional field to enter the specific value.
From: Enter the outbound ANI to use for the call. The default value is interaction/contact-point, which should be sufficient for most use cases. Dial Timeout (in seconds): The number of seconds to wait for the endpoint to answer the dial request before considering it as unanswered. If this timeout period is reached, a result of nil is received, and a signal called ivr-conference-dial-failed is thrown that can be caught for additional flow decision making. The default value is 18. Time to wait for result after disconnect: Select the time, in seconds, to wait for a result from the third-party after they have been disconnected at the end of the conference. If a result has not been received by the time of the third-party disconnecting, the flow will wait for this time period before moving on to the next step in the flow. The default value is 0 seconds. The other options to select from are 1 second, 3 seconds, 5 seconds, 10 seconds, 15 seconds, and Custom. If you select Custom, you then enter the number of seconds to wait. Custom data handling flow: Optionally, select a reusable flow that defines how data during the third-party conference is handled. This allows you to handle several different results from the third-party by having different scenarios included in your reusable flow design. If the custom reusable flow ends, the third-party is disconnected and the result is returned to the parent flow making the conference. Record: If enabled, records the conference. |
||||||
|
Conference Customer In: Adds the customer to an interaction with a resource, with an optional beep notification. This action also emits required signals when either the customer or all of the resources involved leave an interaction. Waiting music is used during these actions to bridge the gap for the conference to be completed, reducing potential latency issues.
|
Record: Click to enable to automatically record customer interactions. Beep: Click to enable a beep on entry and/or exit. When enabled, an audio tone indicates when the participant is added to a call, or removed from a conference. This is a multi-select option, allowing you to select any, both, or neither of the options.
Waiting Music: Select an audio file from the drop down menu. The menu is populated with the individual audio media files currently available on your tenant. TTS and media lists are excluded. This media is played once to the caller while they are being conferenced with an agent, until they are connected and able to speak. If the connection is instant, the media is not heard. Tips for Waiting Music:
|
||||||
|
Custom Reporting Attribute: Adds a custom attribute to an interaction and, optionally, a resource. The value of a custom attribute is stored and can be reported on using the Custom Interaction Attribute or Custom Interaction Attributes by Agent standard reports or with a custom report.
|
Attribute Name: Enter a name for the reporting attribute. This name is case sensitive and will become the unique identifier for this attribute across the tenant. If this attribute name does not currently exist, it creates the attribute within reporting. If this custom attribute name currently exists anywhere in your tenant, the values retrieved here will be added as values for the existing attribute. Attribute Value: Define the value for the attribute. This value can be entered in either a string format or as an expression that evaluates to a string. The value result that is stored in reporting is in string format. Associate with Resource: Optionally, choose to have this attribute associated with a specified resource.
|
||||||
|
Customer Satisfaction Score: Enables the collection of a customer satisfaction score for an interaction or agent. This requires a media prompt to ask the caller to identify their satisfaction levels by selecting a digit on their keypad.
|
Media: Select your media prompt that asks customers to rate their satisfaction levels with the agent or interaction. Max Score: Enter the maximum rating allowed for a valid entry. For example, if asking customers to rate their experience from 1 to 5, enter 5. Invalid Input Media: Select the media prompt to play if the caller makes an invalid section. Attempt Limit: Click to enable a limit to the number of times a customer can attempt to enter a CSAT score.
Allow Zero Score: Click to allow the customer to enter zero (0) as a CSAT score. CSAT Score: This field contains a binding variable so that the customer satisfaction (CSAT) data can be attached to another object. |
||||||
|
Disconnect: Removes a participant from the call.
|
Participant: Select the participant that is being removed.
|
||||||
|
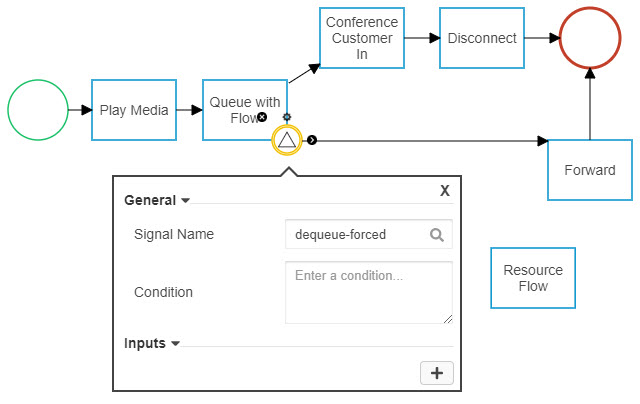
Exit Queue: Removes an interaction from queue. This notation is similar to the Dequeue After Timeout option within the queuing notations. Exit Queue is intended to be used with a reusable flow such as a media loop in Queue with Flow, but will work elsewhere as well. To properly use this notation, drag and drop an Intermediate Catch notation onto your queuing notation in the parent interaction flow to catch the dequeue-forced signal. Include a path to follow if the signal is received. For example, when dequeue-forced is received the interaction can be removed from queue, played a piece of media, and sent to an Exit event to disconnect.
In this example, the Exit Queue notation throwing the dequeue-forced signal is in a reusable flow that is invoked by the Queue with Flow notation. If the signal is received at any point during the queuing action, the interaction moves on to the Forward notation.
Exit Queue applies to enqueued interactions. It does not work for interactions that are being transferred or forwarded. |
N/A | ||||||
|
Forward: Forwards the assigned participant to a designated telephone number, or to an expression that evaluates which E.164 format number to forward the call to. For example, this object can be used to forward a caller to a voice mail number if they are calling outside of business hours.
Known Issue: If using Forward within a reusable flow for the Queue with Flow object, be aware that the interaction remains in queue in addition to being forwarded. |
Participant: Select the participant that is being forwarded. To: Select the type of destination to forward the participant to. Your selection will expand to a subsequent field to enter it's value.
From: The source that is forwarding the interaction. The default value is interaction/contact-point. Dial Timeout (in seconds): Enter the number of seconds to dial the forwarding destination before timing out. The default value is 18. Terminate Flow on Completion: If enabled, ends this portion of the flow once the forwarding action is complete. This is enabled by default. |
||||||
|
Invoke Reusable Flow: A generic activity that can represent any reusable flow that is defined as an input to this object.
|
Flow *: Select the reusable flow that you want to invoke at this point of your flow.
|
||||||
|
Queue Resource: Searches for a specific agent, and if the agent is not available after a defined period of time it then routes the work to another queue and triggers the search for an available resource there. With this activity, you specify a reusable flow to run while the caller is waiting for the resource. Use this object when you need something other than a single media file to be played to callers waiting in queue, and have a reusable flow with multiple media files that can be assigned.
|
Direction: Select the direction for this enqueuement.
Fallback Queue: Select the queue that the interaction will be routed to if the requested agent does not become available to accept the work offer within the time period defined in the Agent Timeout parameter. Media Flow: Select the reusable flow that will be triggered when the caller is waiting in queue for a resource, and the version that should be used. User ID: The unique identifier (UUID) for the requested agent, or a variable for a user ID from an API request.
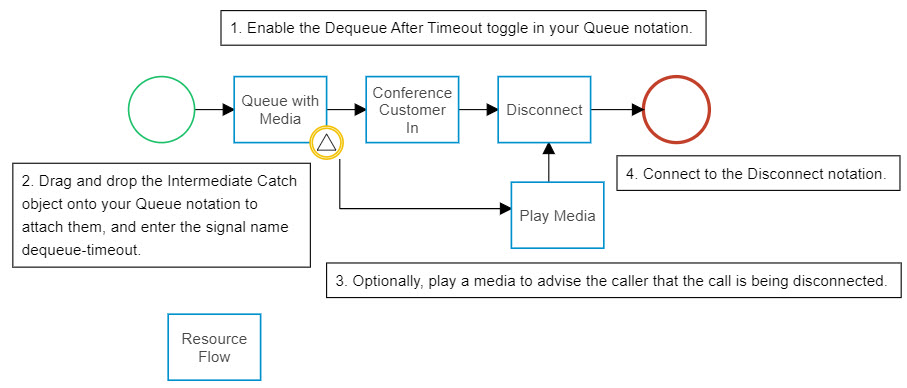
Agent Timeout (in seconds): Enter the length of time for the flow to wait for the initially requested agent to be available before moving on to the fallback queue for another resource. Dequeue After Timeout: If enabled, interactions wait in queue for a configurable amount of time and then move into a separate branch of the flow instead of continuing to wait in queue. To use this feature, drag and drop an Intermediate Catch notation onto Queue Resource to catch the dequeue-timeout signal. Include a path to follow if the signal is received. The Queue with Media notation used here can be replaced with Queue Resource.
Resource: Enter an identifier for the resource that the interaction is looking for. This should match any binding variables used within the flow for this resource. For example, you can use "agent" or "resource". |
||||||
|
Queue Resource with Media: Searches for a specific agent, and if the agent is not available after a defined period of time it then routes work to another queue and triggers the search for an available resource there, while also playing back an individual media file such as hold music to the caller. With this object, you can also enable a queue callback option where the customer can request a callback instead of waiting on the phone.
|
Fallback Queue: Select the queue that the interaction will be routed to if the requested agent does not become available to accept the work offer within the time period defined in the Agent Timeout parameter. Direction: Select the direction for this enqueuement.
Media: Select the media file to play to the caller while they are waiting for a resource. User ID: The unique identifier (UUID) for the requested agent, or a variable for a user ID from an API request.
Agent Timeout (in seconds): Enter the length of time for the flow to wait for the initially requested agent to be available before moving on to the fallback queue for another resource. Dequeue After Timeout: If enabled, interactions wait in queue for a configurable amount of time and then move into a separate branch of the flow instead of continuing to wait in queue. To use this feature, drag and drop an Intermediate Catch notation onto Queue Resource with Media to catch the dequeue-timeout signal. Include a path to follow if the signal is received. The Queue with Media notation used here can be replaced with Queue Resource with Media.
Resource: Enter an identifier for the resource that the interaction is looking for. This should match any binding variables used within the flow for this resource. For example, you can use "agent" or "resource". |
||||||
|
Queue with Flow: Puts the interaction in a queue which triggers the search for a resource. With this activity, you specify a secondary reusable flow to run while the caller is waiting for the resource. Use this object when you need something other than a single media file to be played to callers waiting in queue, and have a reusable flow that can be assigned.
Known Issue: If using a reusable flow that includes the Forward notation, be aware that the interaction remains in queue in addition to being forwarded. |
Queue: Select the appropriate queue that the interaction will be placed into. The list is populated with the available queues that were created in Queue Management. Direction: Select the direction for this enqueuement.
Media Flow: Select the reusable flow that will be triggered when the caller is waiting in queue for a resource.
Dequeue After Timeout: If enabled, interactions wait in queue for a configurable amount of time and then move into a separate branch of the flow instead of continuing to wait in queue. To use this feature, drag and drop an Intermediate Catch notation onto Queue with Flow to catch the dequeue-timeout signal. Include a path to follow if the signal is received. The Queue with Media notation used here can be replaced with Queue with Flow.
Resource: Enter an identifier for the resource that the interaction is looking for. This should match any binding variables used within the flow for this resource. For example, you can use "agent" or "resource". |
||||||
|
Queue with Media: Puts the interaction in a queue and triggers the search for an available resource while also playing back an identified media file as hold music to the customer. With this object, you can also enable a queue callback option where the customer can request a callback instead of waiting on the phone.
|
Queue: Select the appropriate queue that the interaction is being placed into. The list is populated with the available queues from Queue Management. Direction: Select the direction for this enqueuement.
Media: Select the media that plays to the participant who is being placed into the queue.
Callback Enabled: Click to enable the queue callback feature, where a caller may choose to receive a callback when they have reached the top of the queue instead of waiting on the phone. The remaining callback related parameters are only required if this is enabled. Callback Wait Time (in seconds): Enter the number of seconds that a caller will wait in queue before being offered the callback option. The default value is 120. Expire Callback After: Select an expiration time frame for queue callback requests. If a callback has not been initiated within this time period, the request expires and isn't sent to an agent. The options range from four hours to one week. The default value is 3 Days. Callback Offer Media: Select or enter the media prompt that provides callers with the option to request a queue callback instead of waiting on the phone. This field is populated with default values that you may keep or edit as desired to meet your needs.
Callback Queue: Select the queue that the callback is being made from. This usually matches the queue that the caller was initially waiting in when they were offered the callback, but can be different. Confirm Number Media: Select or enter the media prompt that confirms the telephone number that the callback will be placed to. This field is populated with default values. The default text contains a variable to retrieve the phone number that you may keep or edit as desired to meet your needs.
Change Number Media: Select or enter the media prompt that asks the callers who selected option 2 to change their callback number to now enter in the phone number that they wish to be called back on. This field is populated with default values that you may keep or edit as desired to meet your needs. The telephone number entered here must be in E.164 format. This media must make regional requirements clear to callers. For example, the message should indicate if the number needs to begin with the applicable country code.
Callback Exit Media: Select or enter the media prompt that confirms that the callback has been requested and advises callers that they may disconnect. This field is populated with default values that you may keep or edit as desired to meet your needs.
Callback Invalid Number Media: Select or enter the media prompt that will advise callers if the callback number entered is invalid. This field is populated with default values that you may keep or edit as desired to meet your needs.
Agent Callback Message: Select or enter the media prompt that the agent receiving the callback work offer hears. This message is played after the work offer is accepted and the toolbar initiates the outbound call. This field is populated with default values that you may keep or edit as desired to meet your needs.
AgentCallbackMedia: Select or enter the media that will play to agents while waiting for the outbound callback to be answered by the customer. Dequeue After Timeout: If enabled, interactions wait in queue for a configurable amount of time and then move into a separate branch of the flow instead of continuing to wait in queue. To use this feature, drag and drop an Intermediate Catch notation onto Queue with Media to catch the dequeue-timeout signal. Include a path to follow if the signal is received. Outbound Caller ANI: Enter an Outbound Caller ANI to use when calling a customer back. By default, the contact point (interaction/contact-point) is used as the outbound caller ANI. Enter custom Outbound Caller ANIs in E.164 format as an expression (for example, "+15065551234”).
Resource: Enter an identifier for the resource that the interaction is looking for. This should match any binding variables used within the flow for this resource. For example, you can use "agent" or "resource". |
||||||
|
Script: Sends a script to the agent and captures any applicable responses. The script is created within this object using an editor and design palette. The script options include free text, drop down selections, scale rating selections, images, check box selections, and links to external resources.
|
The Script element is configured by designing the desired agent script. It includes a script editor instead of standard parameters to complete as with other flow elements. For detailed instructions on configuring the script components, refer to Configuring Script Component Parameters. |
||||||
|
Search Email: Searches incoming emails for an item or term and provides a true (search matches) or false (no match) response. The notation includes a binding variable that you can use in other sections of the flow to make decisions. For example, you can search the From field of all incoming emails and route any from support@companyname.com to a specific queue. This notation is commonly used as the first flow action following the Entry, but can be used at any point in your flow where you want to search the contents of an email.
|
Search Fields*: Select the email field(s) that you want to search for a given search item or term. The searchable fields are:
Artifact ID *: The unique identifier, or identifying variable, of the email being searched. The default value is interaction/interaction.artifact-id, which should be sufficient for most use cases. Search Item*: Enter the item that you want to search the email for. You can search by a variable expression, or use quotation marks (") surrounding text to search for that exact string text within the selected field(s). Response: The search result, or response, is either a "true" or "false" one to identify if the search item is found in the selected fields (true) or not (false). This parameter is a binding tag so that you can use the response in another flow object, such as a decision branch. For example, you may want emails that reference an emergency in their subject or body to be routed to a specific queue. You can search for the text string "emergency", have the response tag emerg, and a decision branch with separate paths for (= emerg "true") and (= emerg "false"). |


Return to top
Media
| Object | Configuration |
|---|---|
|
Collect Digits: Collects the digits the caller enters on their keypad. With this activity, you can specify the media file to play such as presenting IVR options. The object also identifies the number of digits to collect, meaning how digits the customer should be entering. For example, requesting a one digit selection or a seven digit customer number.
|
Participant: Select the party that enters the digit, such as Customer. Media: Select the type of media being played. The list includes the media prompts available in your tenant's Media Management.
Number of digits to collect: The number of digits that the caller must enter. this can be, for example, a four digit access code or a one digit IVR prompt selection. The default is one. If necessary, change the number to the amount of individual digits that the participant must enter. For example, in the case of an IVR selection, the number of digits to collect is one. In the case of a seven digit customer number, the number of digits to collect is seven. The caller has a predetermined amount of time to enter the digits before the flow moves forward with a null selection. The flow should be designed in such a way that can handle an invalid or missing entry, such as repeating the selection. Timeout: Enter the length of time to wait for the participant to enter their selection before considering it as null or invalid. The default value is 10 Seconds. End on: Select an entry that identifies that the participant has finished entering their selection. You can select from special characters such as the pound (#) or asterisk (*) symbols, or select none. The default selection is #. Digits: This field contains a binding tag so that the digits collected can be attached to another object in the flow. For example, with an IVR selection, the digit entered needs to be bound to a decision branch so that the selection follows the appropriate path. This is a free entry text box. The data entered depends on what you are using the digits for and what decision points are impacted. Ensure that it matches any related conditional statements. |
|
Collect Message Response: Sends a message from the flow that a customer can respond to. The response is part of the interaction and can be used for additional actions such as a visual IVR. For example, you can send a message that asks the customer what they're looking for, and direct the interaction to the appropriate queue based on their response. You can also ask the customer to provide a case number, use a data exchange notation to bring up the case record, and respond with it's current status.
Collect Message Response is for native chat and Facebook messenger channels. SMS response data will be collected with a future notation. |
Message: Enter the text of the message that you want to send. This field also supports {{variables}} that are replaced in realtime with the applicable values. From: Enter the display name of the sender, in string format. This is what the recipient sees. This field also supports {{variables}} that are replaced in realtime with applicable values. Timeout (in seconds): The number of seconds to wait for a response. If a response isn't received by this time, the message will be sent again until the retry limit is reached. If the retry limit has been reached, the interaction moves on to the next step in the flow design. Retry: The number of times to send the message if a response hasn't been received by the timeout period. If a response isn't received after this limit has been reached, the interaction moves on to the next step in the flow design. Response: This field contains a binding tag for the customer's response message. Enter a variable name that can be used elsewhere in your flow to . |
|
Play Media: Plays a media file to a participant. This includes recorded audio, text (via text-to-speech), or a publicly accessible URL.
|
Participant *: The party to whom the media is played. Media: Select the type of media being played. The list includes the media prompts available in your tenant's Media Management.
Loop: When this is enabled, the media plays in a repetitive loop. |
|
Record Audio: Records a temporary audio file. The temporary audio can be played back to a participant elsewhere in the flow, or uploaded as an attachment to a Salesforce object. The audio file is deleted from CxEngage when the interaction ends.
|
Participant: Select the participant that is being recorded. The default selection is Customer. Play Beep: If enabled, plays an audible beep to the participant at the start of the recording. This is enabled by default. Minimum Length (seconds): The minimum number of seconds that a recording must be to be considered as successful. Recordings that are shorter than this value are automatically discarded. The default value is 0 seconds.
Maximum Length (in seconds): The maximum number of seconds for a recording. The recording will automatically end after this time has elapsed. The default value is 180 seconds (three minutes).
End of Recording Timeout (in seconds): The number of seconds of silence before considering the recording to be over. The recording will end after this time has elapsed. The default value is 5 seconds. Finish On Key: Enter the key(s) that immediately stop the recording when entered. Permitted values are any combination of digits (0 through 9), pound (#), and asterisk (*). For example, to allow any key to end the recording, the value would be 1234567890*#, which is the default value. Audio Format: Select the format for the temporary audio recording. The available options are mp3 (default) or wav formats. Recording: This field contains a binding tag for the recording response array. Enter a variable name that can be used elsewhere in your flow to reference the temporary recording, if necessary. |
|
Send Message: Sends a message from the flow using one of the messaging enabled integrations, such as web chat or Facebook.
You can use this notation to trigger an automatic response to a customer initiated message that is sent while a resource is being retrieved, if necessary. IMPORTANT NOTE: If you're implementing the chat widget included with the 2019 Q4 Feature release and want to use an existing flow that includes this notation, you must delete the notation, add a new one, and reconfigure it. This is a temporary measure that will be resolved in an upcoming release. |
Message: Enter the text of the message that you want to send. This field also supports {{variables}} that are replaced in realtime with the applicable values. From: Enter the display name of the sender. This is what the recipient sees. This field also supports {{variables}} that are replaced in realtime with applicable values. |
|
Send Rich Message: Sends a plain and/or rich text message from flow for any of the configured digital channels.
|
From Expression: Expression input for the sender of the message being sent by this flow. Default value is " ChatBot" Message Type: Select the type of rich message being sent.
Message Expression: This is a conditional field that adapts to the Message Type selected. Wait For Response: If enabled, tells the flow to wait for a response to the sent message and to send that response object back. Success: Enter a binding variable name to assign to a successful action, that can be used elsewhere in your flow to define behavior. Response: This field contains a binding tag for the output object. Enter a variable name that can be used elsewhere in your flow to use payload data. |
|
Send SMS: Sends an SMS message from the flow.
You can use this notation to trigger an automatic response to a customer initiated SMS that is sent while a resource is being retrieved, if necessary. |
To: The intended recipient of the SMS message. This parameter has a default value of interaction/customer, but can be changed to any valid E.164 telephone number if you want message a specific value. From: The number that the SMS message shows as being sent from. This parameter has a default value using the dispatch mapping for the interaction, interaction/contact-point, but can be changed to any valid E.164 telephone number. SMS Message: Enter the text of the message that you want to send. This field also supports {{variables}} that are replaced in realtime with the applicable values. |


Return to top
Resource Control
| Object | Configuration |
|---|---|
|
Check Resource Availability: Checks for the number of resources currently available for work in a specified queue before putting an interaction into it.
|
Queue: Select the queue that you want checked for resource availability. Include Allocatable *: When enabled, includes all resources that can be allocated for work in this queue. Include Busy *: When enabled, includes resources who are currently busy and fully allocated. These resources do not currently have capacity for additional work in this channel. Include Not Ready *: When enabled, includes resources who are online but currently set to Not Ready. Available resources: Enter a binding variable name for the number of available resources retrieved from this request. This should match any binding variable used within the flow that is looking for this information. For example, you may call this "free", and have a gateway condition to route an inbound call a certain way if there are 0 available agents. Your gateway condition statement would have to reference the same "free" term in order to connect the variables. |
|
Conference Resource: Adds the resource to a conversation with a customer, with an optional beep notification. Waiting music is used during included actions to bridge the gap for the conference to be completed, reducing potential latency issues.
|
Resource: Enter an identifier for the resource that is accepting the call and being added to the conversation. This should match any binding variables used within the flow for this resource. For example, you can use "agent" or "resource". Muted: If enabled, the resource is muted when they are added to the conversation. Beep: Click to enable a beep on entry and/or exit. When enabled, an audio tone indicates when the resource is added to a call, or removed from a conference. This is a multi-select option, allowing you to select any, both, or neither of the options.
Waiting Music: Select an audio from the drop down menu. The menu is populated with the individual audio media files currently available on your tenant. TTS and media lists are excluded. This media is played once to the agent while they are being conferenced with a caller, until they are connected and able to speak. If the connection is instant, the media is not heard. Tips for Waiting Music:
|
|
Free Resource: Disconnects the agent when the caller or the agent terminates the call. The agent returns to the pool to wait for another work offer.
|
Participant: Select the participant who is being removed from an interaction. The list is populated with any binding variables used for a resource within the flow. Set Presence: Select the state that the participant defaults to upon being removed from the contact, between Ready and Not Ready. Reason: Select first the presence reason list, and then the individual presence reason code to identify the reason for the presence that the resource is being put into. |
|
Resource Flow: A single object that can be used to both send the work offer and add the resource to the conversation with a customer, with an optional beep notification. Waiting music is used during these actions to bridge the gap for the conference to be completed, reducing potential latency issues. Use this as an independent object for any standard interaction resource sub-flow.
This object does not include the Script feature. If you are using an agent script, you must build the resource portion of your flow separately. |
Timeout (seconds): Enter the length of time that the agents phone will ring when they receive the work offer before the work is considered as rejected.
Disposition Codes: Select the Disposition Code list to use for interactions on this flow. The list includes the lists available through Disposition List menu. Force Disposition Select: Click to enable. When this is enabled, agents are required to select a disposition code before they can end their Wrap Up. This function requires Auto Wrap Up to be enabled.
If an agent doesn't select a disposition code before the maximum wrap up time elapses, they will stay in Wrap Up until they select a disposition code or their session is terminated and they become unable to select a disposition code. Auto Answer: Click to enable to have WebRTC voice work offers automatically accepted by the agent. If disabled, the agent must accept the work offer prior to handling the call. Auto Wrap Up: Click to enable to have agents automatically placed in Wrap Up mode after ending an interaction. Allow Wrap Up Update: Click to allow agents to manually turn automatic wrap up on or off from the Agent Toolbar. For example, Auto Wrap Up may be enabled however unnecessary for a particular interaction. The agent can turn the wrap up feature off during the interaction and immediately become Ready when it is completed. Target Wrap Up Time (seconds): Enter goal time frame, in seconds, for agents to complete their post interaction work. This is the maximum time in which an agent can be in Wrap Up and still be within target time frames. Maximum Wrap Up Time (seconds): Enter the maximum time frame, in seconds, for agents to complete their post interaction work in Wrap Up mode. Agents are automatically placed into a Ready state after this time frame. Auto Screen Pop: Automatically triggers your internal screen pop. You can disable to remove auto screen pops or to customize a different screen pop configuration with the Screen Pop notation on a parallel path. Beep: Click to enable a beep on entry and/or exit. When enabled, an audio tone indicates when the resource is added to a call, or removed from a conference. This is a multi-select option, allowing you to select any, both, or neither of the options.
Waiting Media: Select an audio from the drop down menu. The menu is populated with the individual audio media files currently available on your tenant. TTS and media lists are excluded. This media is played once to the agent while they are being conferenced with a caller, until they are connected and able to speak. If the connection is instant, the media is not heard. Tips for Waiting Music:
Outbound Caller ANI: Define the telephone number that outbound calls from the platform are being made from. For example, the platform dials a PSTN agent to send them a customer call. The Outbound Caller ANI is what is displayed to that PSTN agent.
Ready Resource On Work Rejected: Click to enable to have agents automatically placed in a Ready state after rejecting (not accepting) a work offer. If disabled, agents are placed in a Not Ready state after rejecting a work offer.
|
|
Screen Pop: Triggers a CRM window or other assigned URI to appear. The information displayed is determined by the screen pop mode or type selected and the parameter configurations. This object is the stand alone equivalent to the screen pop function that is included in the Work Offer Flow object. It can be inserted at any desired point within the flow to present a custom screen pop. If you are using this Screen Pop, ensure that the Auto Screen-pop toggle in your Resource Flow or Work Offer Flow notation is disabled.
Screen Pop is only for Agent Toolbar interactions. Interactions handled through the products require the Screen Pop for notation.
|
Pop type *: Select the type of screen pop that you want to trigger.
Pop URI: Enter the URI to identify the screen that you want to pop up. URI Params: Add parameters by clicking the "+" symbol and entering the requested details.
Search Term: Enter the term that you want a Search and Pop screen pop to search for. Search Fields: Add search fields by clicking the "+" symbol and entering the requested details.
Resource *: Enter the variable name for the resource receiving the pop up. |
|
Screen Pop for : Triggers a CRM window or other assigned URI to appear. The information displayed is determined by the screen pop mode or type selected and the parameter configurations. This object is the stand alone equivalent to the screen pop function that is included in the Work Offer Flow and Resource Flow objects. It can be inserted at any desired point within the flow to present a custom screen pop. If you are using this Screen Pop for , ensure that the Auto Screen-pop toggle in your Resource Flow or Work Offer Flow notation is disabled.
Screen Pop for is only for interactions handled through products. Agent Toolbar interactions require the Screen Pop notation.
|
Resource *: Enter the variable name for the resource receiving the pop up. This should match the resource name used in your Work Offer Flow. Pop Type *: Select the type of screen pop that you want to trigger. Subsequent configurable parameters are conditional based on the selection made here. Click to expand each type for it's details. Opens an internal record from your CRM, including Skylight Desktop.
Opens an external site, outside of your CRM.
Executes a query for a specific record within your CRM, including Skylight Desktop, and opens it. Select from a strict (and/or) or fuzzy (any) search. Strict searches are for a specific item in a defined area within your CRM. For example, you may search for the value of interaction/customer under a column in your CRM's tables called "name".
Fuzzy searches are for any of the provided items, in any section of your CRM. For example, you may search for any record that contains the email address of an incoming email interaction.
|
|
Timed Presence: Enables a resource to log in to the platform and become available for a configured amount of time using a PSTN telephone without being logged into an agent toolbar.
For more information, refer to Timed Presence. |
Collect Preset Hours Media: Select your media prompt that asks the agent to select an option of 1 to 4 to log on for a preset time period, press 9 to manually enter the number of hours, or press 0 to go offline.
Custom Hours Media: Select your media prompt that asks the agent to manually enter the number of hours that they are logging on for, between 1 and 9, or to press 0 to go offline. This media file is played after an agent selects 9 for the "Preset Hours Media" prompt to enter a number of hours instead of using a preset login time frame. Option 1 - Preset Hours: Enter the number of hours that an agent goes online for if selecting option 1. Option 2 - Preset Hours: Enter the number of hours that an agent goes online for if selecting option 2. Option 3 - Preset Hours: Enter the number of hours that an agent goes online for if selecting option 3. Option 4 - Preset Hours: Enter the number of hours that an agent goes online for if selecting option 4. Offline Media: Select a media prompt to advise the agent that they are offline. This is played after the agent enters 0 to log out before their configured time period ends. Welcome Media: Select a media prompt to welcome the resource calling in to the Timed Presence flow. Online Media: Select a media prompt to advise the resource that they are online and available to receive calls. This is played after the agent successfully enters the amount of hours that they are logging on for. Resource Lookup Error Media: Select a media prompt to play to a user calling from a telephone number other than the PSTN number configured on their user profile. Collect Digit Media: Select your media prompt that asks the agent to manually enter the number of hours that they are logging on for, between 1 and 9, or to press 0 to go offline. This media file is played after an agent selects 9 for the "Preset Hours Media" prompt to enter a number of hours instead of using a preset login time frame. Invalid Input Media: Select a media prompt to play if an invalid selection is made. |
|
Work Offer Flow: Sends the work offer to the Agent Toolbar, and dials or retrieves the resource. This flow object is used for work offers from any channel including voice, SMS, messaging, and email.
You only need to use this object if you are building out the resource portion of your customer flow. For example, if you want to include a Script option. Otherwise, you can use the Resource Flow object as an independent flow object that includes the entire resource sub-flow requirements. |
Resource: Enter an identifier for the resource that is receiving the work offer. This should match any binding variables used within the flow for this resource. For example, you can use "agent" or "resource". Timeout: Enter the length of time that the work offer will be presented for acceptance by the agent before it is considered rejected. This field was previously called Agent Work Offer Timeout.
Disposition Codes: Select the Disposition Code list to use for interactions on this flow. The list includes the lists available through Disposition List menu. Force Disposition Select: This field appears once a Disposition Code list is selected. Click to enable. When this is enabled, agents are required to select a disposition code before they can end their Wrap Up. This function requires Auto Wrap Up to be enabled.
If an agent doesn't select a disposition code before the maximum wrap up time elapses, they will stay in Wrap Up until they select a disposition code or their session is terminated and they become unable to select a disposition code. Auto Answer: Click to enable to have WebRTC voice work offers automatically accepted by the agent. If disabled, the agent must accept the work offer prior to handling the call. Target Wrap Up Time (seconds): Enter goal time frame, in seconds, for agents to complete their post interaction work. This is the maximum time in which an agent can be in Wrap Up and still be within target time frames. Max Wrap Up Time (seconds): Enter the maximum time frame, in seconds, for agents to complete their post interaction work in Wrap Up state. Agents are automatically placed into an available state after this time frame. Auto Wrap Up: Click to enable to have agents automatically placed in Wrap Up after leaving an interaction. Allow Wrap Up Update: Click to allow agents to manually turn automatic wrap up on or off from the Agent Toolbar. For example, Auto Wrap Up may be enabled however unnecessary for a particular interaction. The agent can turn the Wrap Up feature off while on the call and immediately become available upon disconnecting. Auto Screen-pop: Automatically triggers your internal screen pop. You can disable to remove auto screen pops or to customize a different screen pop configuration with the Screen Pop notation on a parallel path. Outbound Caller ANI: Select the telephone number that outbound calls from the platform are being made from. For example, the platform dials a PSTN agent to send them a customer call. The Outbound Caller ANI configured here is what is displayed to the PSTN agent.
Ready Resource On Work Rejected: Click to enable to have agents automatically placed in a Ready state after rejecting (not accepting) a work offer. If disabled, agents are placed in a Not Ready state after rejecting a work offer.
|


Return to top
Data Exchange
| Object | Configuration | ||
|---|---|---|---|
|
Assign Interaction Attribute: Assigns a value to a custom attribute in the interaction flow. The custom attributes must be created in the custom attribute's entity management page at Flows > Custom Attributes. This allows customers to attach custom information to their interaction data and view it in Realtime and/or Historical Reporting. Note: Currently only available in Realtime in the Interactions in Queue Table. In Historical Reporting it is available in the Custom Interaction Attribute or Custom Interaction Attributes by Agent reports.
|
By default, the toggle is green and enabled to By Entity. By Entity: Selects from a list of enabled Interaction Attributes on the tenant. The list includes both the identifier and the display label (if configured).
To update By Identifier click the By Entity toggle. The toggle turns grey when disabled. By Identifier:
|
||
|
CxEngage API Request: Makes an API request as part of the interaction flow. For example, a flow can be designed to make an API call to get business hour rule details. Those business hour details can then be used in a decision point to determine where to route an interaction.
|
Verb: Select the type of API request being made. The request can be to GET, POST, PUT, or DELETE. URI Template: Enter the base URI for the request. for example, /business-hours/{{business-hours-id}}. URI Params: Add parameters by clicking the "+" symbol and entering the requested details.
Response: This field contains a binding tag so that the response can be attached to another flow object. This is a free entry text box. The data entered depends on what you are using the API call for and what flow elements that it relates to. Ensure that it matches any related conditional statements. |
||
|
REST Request: Generic: Allows you to make GET, POST, PUT, and DELETE requests to third party REST APIs that support requests and responses in JSON format.
Before using this flow object, you must configure your rest integration in CxEngage through the API. |
Integration: Select the rest integration that you want to use for this API request. Verb: Select the type of API request being made. The request can be to GET, POST, PUT, or DELETE. URI Template: Enter the URI template following the base URIbase URI for the request. For example, /business-hours/{{business-hours-id}}. Body Template: Enter the template values to use for the request body. Headers Template: Enter template values to use for the request headers. Template Params: Add parameters by clicking the "+" symbol and entering the requested details. Response: This field contains a binding tag so that the response can be attached to another flow object. This is a free entry text box. The data entered depends on what you are using the API call for and what flow elements that it relates to. Ensure that it matches any related conditional statements. |
||
|
Realtime Stats: Allows you to pull a real time statistic into your flow to provide contextual information or to optimize flow routing. You identify the type of stat that you are pulling and enter the ID for the associated parameter.
|
Type: Select the type of statistic that you want to retrieve.
Stats: Enter the statistic that you are pulling. A list of realtime statistics for your tenant can be retrieved with a GET request.
Response: This field contains a binding tag so that the response can be attached to another flow object. This is a free entry text box. The data entered depends on what you are using the statistic for and what flow elements it relates to. Ensure that it matches any related conditional statements. |
||
|
SFDXE Create: Generates an object within Salesforce records using the parameters defined in the configuration details. For example, you can design a flow to generate a Salesforce case for every interaction received on a queue.
|
Salesforce Object *: Select the type of object that is being created in Salesforce. This flow element can be used to create cases, contacts, accounts, opportunities, leads, or users. Record: Add more records by clicking the "+" symbol and entering the required parameters.
CxEngage includes a default record to indicate a description of Created by CxEngage. This record can be edited or removed as needed.
|
||
|
SFDXE Delete: Deletes an object from the Salesforce records.
|
Salesforce Object *: Select the type of object that is being deleted from Salesforce such as a case, contact, account, opportunity, lead, or user. Id *: Enter the Salesforce ID for the object that is being deleted. |
||
|
SFDXE Fetch: Runs a queried search on Salesforce and gives back a response that includes an array for the designated object matching the query parameters entered.
|
Salesforce Object *: Select the type of object that is being queried. Available objects are cases, contacts, accounts, opportunities, or leads. Query Conditions: Add conditions by clicking the "+" symbol and entering the required parameters.
Fields: Enter the fields that you want to retrieve, such as an ID or name. Sort: Enter the expression to use to sort the query results. For example, enter name to sort by name or -name to sort by name in reverse order. Limit: Enter the maximum number of rows to retrieve per request. For example, entering a limit of 5 means that your response will include a maximum of 5 items, regardless of the number of items that match your query. Skip: Enter the number of query result rows to skip before providing the results in a response. For example, if you enter a limit of 5 and a skip value of 10, your response includes items numbered 10 through 15. Response: This field contains a binding tag so that the response array can be attached to another flow object. This is a free text entry box. The data entered depends on what you are using the data for and what flow elements it relates to. Ensure that it matches any related conditional statements.
|
||
|
SFDXE Get: Retrieves specific data from Salesforce for the object identified in the parameter configuration details.
|
Salesforce Object *: Select the type of object that is being retrieved from the Salesforce records. You can get cases, contacts, accounts, opportunities, or leads. Id *: Enter the Salesforce ID for the object that is being retrieved. Response: Add more parameters by clicking the "+" symbol. These response parameters are optional.
CxEngage includes two default response parameters that can be used, edited, or removed as needed.
|
||
|
SFDXE Update: Makes updates to an existing Salesforce object.
|
Salesforce Object: Select the type of object that is being modified in Salesforce. This flow element can be used to update cases, contacts, accounts, opportunities, or leads. Id: Enter the Salesforce ID for the object that is being retrieved. Record: Add more records by clicking the "+" symbol and entering the required parameters.
CxEngage includes a default record to indicate a description of Updated by CxEngage. This record can be edited or removed as needed.
|
||
|
SFDXE Upload Attachment: Uploads a file to a Salesforce object as an attachment. For example, a temporary audio recording can be attached to a lead or case.
|
Salesforce Integration: Enter the name of your Salesforce integration that the file is being uploaded to. URL: The URL to the file that is being uploaded. Content Type: The type of file being uploaded, entered as a string expression. For example, "audio/mp3" or "audio/x-wav". Filename (displayed in Salesforce): Enter the display name to be used as the file name in Salesforce. Description: Optionally, enter a description of the file being uploaded to be displayed in Salesforce. Parent Object ID: The ID of the Salesforce object that the attachment is being uploaded to. For example, the lead or case ID. Response: This field contains a binding tag for the response from Salesforce. Enter a variable name for the response that can be referenced elsewhere in your flow if needed, such as sf-upload.
|
||
|
Save Audio Artifact: Saves an audio file or recording to CxEngage as an artifact. This includes temporary recordings created with Record Audio.
|
Artifact Subtype: Enter the sub-type to use for this type of audio-recording artifact, as a string expression. The sub-type is used to separate and categorize different types of recordings. The recordings viewed in the configuration console are separated by these sub-types. The default value is "Custom". Create From: Select the type of audio being saved as an artifact. Each option has it's own set of additional parameters.
Filename (include file extension): The filename to save the audio recording artifact as. The supported extension types are .mp3 (mpeg) and .wav (x-wav). Reporting Label: Enter the label to display in the configuration console for this artifact. This label helps to identify the file's purpose, and can be particularly helpful if there are multiple artifacts of the same sub-type being created with this interaction. For example, you may have a series of questions requesting separate audio responses for the caller's name, their address, and their email address. You can use the Reporting Label to identify them in Historical Reporting. Artifact: This field contains a binding tag for the entire audio artifact object. |
||
|
Save Audio as Media: Creates a new media entity on your tenant, or updates the contents of an existing media. The audio can be from a temporary recorded generated with the Record Audio notation, a previously saved audio file, or a text-to-speech (TTS) string. For example, you may have a flow that you can call into to record a message that gets uploaded as a reusable media file that can be used in other interaction flows.
|
Target Media: Select to either create a new media, or edit an existing media object.
Media Description: Enter a brief description for this media file. If you're updating an existing media, this will update the existing description. Create from: Select the source for the audio that is being saved as a media object.
Media: Enter a binding variable for the entire media object. Response Code: This field is for an https status response code, as you would receive if you were calling the media API directly. |
||
|
Zendesk Create Ticket: Generates a ticket within Zendesk using the parameters defined in the object configuration details. For example, you can design your flow to generate a Zendesk ticket at a specific priority for every interaction received on a certain queue. You can populate the field(s) that you want for the new ticket with specific data or with the response(s) from other data exchange flow objects. You can also use the Assign flow object to define variables. The ticket is created with a status of "new".
All of these input parameters with the exception of Group ID should be populated with string data surrounded by quotation marks (").
|
Integration: Select the applicable Zendesk integration from the drop down menu. This is a required field. Subject: Enter the subject of the ticket that is being created surrounded by quotation marks, or a string response name from another flow object to use as the subject. Comment: Enter a mandatory comment surrounded by quotation marks (") that is attached to the ticket being created to describe the problem, incident, question, or task. This parameter is required in order for the ticket to be created. Requester Name: Enter the name or variable to use to identify who requested the new ticket. This is a required field that must be at least one character. Requester Email: Enter the email address or variable to use to populate the email address of the requester for the new ticket. Ticket Type: Enter the type of request being generated or a variable to retrieve the type. The available types are:
Ticket Priority: Enter the priority level to use for this ticket or a variable that retrieves the priority value from the flow. The permitted priorities are:
Group ID: Enter the numeric ID of the group that this ticket will be assigned to or a variable to retrieve the ID from the flow. Created Ticket: This field contains an optional binding tag so that the new ticket can be attached to another flow object. This is a free form text entry box. The data entered depends on what you are using the data for and what flow element(s) it relates to. Ensure that it matches any related variables or conditional statements being used. |
||
|
Zendesk Create User: Generates a new end user record within Zendesk using the parameters defined in the configuration details. For example, you may use Zendesk Search User to search for a caller's existing Zendesk record and use this Zendesk Create User object to create an account if one is not found. You can populate the field(s) that you want for this new user by using the response(s) from other data exchange flow objects that retrieve data from your CRM. For example:
|
Integration: Select the applicable Zendesk integration from the drop down menu. This is a required field. User Name: Enter the string data being used to create the mandatory contact user name for the new customer record. For example, this may be the binding variable used in the Response parameter of another flow object that retrieves data. This is a required field that must contain at least one character. Default value is "UNKNOWN". User Phone: Optionally, enter the string data being used to populate the new record's phone number. For example, this may be the binding variable used in the Response parameter of another flow object that retrieves data. As a best practice, you should use the phone and/or email field when creating a user. User Email: Optionally, enter the string data being used to populate the email address for the new account record. For example, this may be the binding variable used in the Response parameter of another flow object. A user's email address cannot be the same as an existing Zendesk user. As a best practice, you should use the email and/or phone field when creating a user. Created User: This field contains an optional binding tag so that the new user record can be attached to another flow object. This is a free form text entry box. The data entered depends on what you are using the data for and what flow elements it relates to. Ensure that it matches any related conditional statements being used. |
||
|
Zendesk Get Ticket: Retrieves a specific ticket identified in the parameter configuration details from Zendesk records.
|
Integration: Select the applicable Zendesk integration from the drop down menu. This is a required field. Ticket ID: Enter the numerical ID for the ticket being retrieved, or a variable used within the flow that identifies the ticket that you want. This is a required field. Response: This field contains an optional binding tag so that the retrieved ticket can be attached to another flow object. This is a free form text entry box. The data entered depends on what you are using the data for and what flow element(s) it relates to. Ensure that it matches any related variables or conditional statements being used. |
||
|
Zendesk Get User: Retrieves a user's details from Zendesk for the user specified in the parameter configuration details.
|
Integration: Select the applicable Zendesk integration from the drop down menu. This is a required field. User ID: Enter the numerical ID for the user being retrieved, or a variable used within the flow that identifies the user that you want. This is a required field. Response: This field contains an optional binding tag so that the retrieved user can be attached to another flow object. This is a free form text entry box. The data entered depends on what you are using the data for and what flow element(s) it relates to. Ensure that it matches any related variables or conditional statements being used. |
||
|
Zendesk Search User: Runs a queried search on Zendesk and gives back a response that includes a list of users that match the search query terms entered. For example, you may want to search Zendesk for a record matching the caller's telephone number and provide the user's details. If a record is not found, you can use the Zendesk Create User object to create one.
|
Integration: Select the applicable Zendesk integration from the drop down menu. This is a required field. Search Query: Enter the mandatory string query that you want to use to search for the user(s). For example, you could search for a specific user with an email address of "john@email.com" or "role:end-user email:". This is a required field.
Users: This field contains an optional binding tag so that the retrieved user(s) can be attached to another flow object. This is a free form text entry box. The data entered depends on what you are using the data for and what flow element(s) it relates to. Ensure that it matches any related variables or conditional statements being used. |
||
|
Zendesk Update Ticket: Updates an existing Zendesk ticket using the parameters defined in the object configuration details.
|
Integration: Select the applicable Zendesk integration from the drop down menu. This is a required field. Ticket ID: Enter the numerical ID for the ticket being updated, or a variable used within the flow that identifies the ticket that you want. This is a required field. Comment: Enter the comment to describe the problem, incident, question or task that is being updated. Comment Author ID: If you are updating the comment on this ticket, you can enter the user ID for the person updating the comment, or a variable used within the flow that identifies the author ID. Subject: Enter the subject for the ticket that is being updated, or the response name from another flow object to use as the subject. Requester ID: Enter the numerical ID of the user requesting the update to the ticket, or a variable used within the flow that identifies the Requester ID.
Requester Name: Enter the name of the user requesting the update to the ticket, or a variable used within the flow that identifies their name. This will create a new user and then change the ticket requester to that new user.
Requester Email: Enter the email address of the user requesting the update to the ticket, or variable used within the flow that identifies their email address.
Assignee ID: Enter the numeric ID of the agent to assign the ticket to, or a variable used within the flow that identifies their ID.
Assignee Email: Enter the email address of the existing agent to assign the ticket to, or a variable used within the flow that identifies their email address.
Group ID: Enter the numeric ID of the group that this ticket should be assigned to or a variable to retrieve the ID from the flow. Ticket Type: Enter type of request to assign to the updated ticket or a variable to retrieve the type. The available types are:
Ticket Priority: Enter the priority level to assign to the updated ticket or a variable that retrieves the priority value from the flow. The permitted priorities are:
Ticket Status: Enter the status to assign to the updated ticket. The permitted statuses are:
Updated Ticket: This field contains an optional binding tag so that the updated ticket can be attached to another flow object. This is a free form text entry box. The data entered depends on what you are using the data for and what flow element(s) it relates to. Ensure that it matches any related variables or conditional statements being used. |
||
|
Zendesk Update User: Updates an existing Zendesk user's details using the parameters defined in the object configuration details.
|
Integration: Select the applicable Zendesk integration from the drop down menu. . This is a required field. User ID: Enter the numerical ID for the user record that is being updated, or a variable used within the flow that identifies the user that you want. This is a required field. User Name: Enter the string data for a user name to apply to the updated Zendesk user record, or a variable used within the flow that retrieves the user name. User Email: Enter the string data for an email address to apply to the updated Zendesk user record, or a variable used within the flow that retrieves the email address. The email address cannot be a duplicate of another user's email address. User Phone: Enter the string data telephone number to apply to the updated Zendesk user record, or a variable used within the flow that retrieves the phone number. User Response: This field contains an optional binding tag so that the updated user can be attached to another flow object. This is a free form text entry box. The data entered depends on what you are using the data for and what flow element(s) it relates to. Ensure that it matches any related variables or conditional statements being used. |
||
|
Debug Log: Log a snapshot of your flow environment at the notations point in the flow design. The entire environment or specific variables can be logged at that time. The logs are then made available in the Flow Debug Logs page.
|
Event Name: Enter the name of the Debug Event you are creating. Include Entire Environment: Enabling this toggle will allow the notation to include all data in the flow design up to the point of this notation's placement. Leaving this toggle disabled will only capture the data of the specified variables in the next step. This is disabled by default. Specific Variables: Allows you to specify variables that you would like captured by the Debug Log notation at that point in the flow design. You would specify variables if not capturing the entire environment in the previous step. |


Return to top
Reusable
A reusable flow is a flow that includes multiple pieces of standard business logic combined into one activity selection. This section of the Flow Designer palette includes reusable flows that are:
- Created on a specific tenant for that tenant's use
- Created on a parent tenant and inherited by child tenants below it
For information on how to create a reusable flow, refer to Creating Flows.
Return to top
Advanced Flow Control
| Object | Configuration |
|---|---|
| Signal Entry: Indicates the beginning of a sub-process that is triggered when a signal from another flow section is received. Use this event to initiate a separate section of flow that is required for a part of the process of the parent flow.
|
Signal Name: Enter the name of the signal being used to trigger this sub-process. This is a binding variable field that looks for the exact signal name from another section of the flow. This defaults to customer-disconnect but can be edited. Condition: Optionally, enter a condition statement for this sup-process to define how this sub-process should behave in identified conditions. Inputs: Optionally, you can pass inputs that are defined elsewhere in your flow into this sub-process. Press the + or - buttons to add or remove the number of input values.
|
| Flow Error Catch: Enables a process to react to an error within the designed flow thrown by the Flow Error Throw notation. Use this notation when you need your flow to react to an error inside of the designed flow. For example, you have a path for invalid actions or errors thrown from a branch of your flow. Flow Error Catches include an escalation signal that, if received, terminate the flow branch.
|
Inputs: Optionally, you can pass inputs that are defined elsewhere in your flow into this sub-process. Press the + or - buttons to add or remove the number of input values.
Escalation Name: Enter the signal name that, if received, terminates this flow branch. |
| Intermediate Catch: Enables a process to react to a signal while it executes a sub-process. Use this object when you need your flow to wait for the signal to be caught before proceeding.
|
Signal Name: Enter the name of the signal being used to trigger this sub-process. This is a binding variable field that looks for the exact signal name from another section of the flow before it proceeds. This defaults to customer-disconnect but can be edited. Condition: Optionally, enter a condition statement for this sup-process to define how this sub-process should behave in identified conditions. Inputs: Optionally, you can pass inputs that are defined elsewhere in your flow into this sub-process. Press the + or - buttons to add or remove the number of input values.
|
| System Error Catch: Enables a process to react to a system error from outside of the designed flow. Use this object when you need for your flow to wait for the system error signal to be caught before it can proceed down this path.
|
Inputs: Optionally, you can pass inputs that are defined elsewhere in your flow into this sub-process. Press the + or - buttons to add or remove the number of input values.
|
| Flow Error Throw: Enables a process to send a flow error signal to the parent flow. Use this object to end a section of a flow and send a flow error signal that will be caught by a Flow Error Catch notation to initiate a sub-process. Flow Error Throws include an escalation signal that, if received, terminate the flow branch.
|
Outputs: Optionally, you can provide outputs that are used elsewhere in your flow as input values. Press the + or - buttons to add or remove the number of output values.
Escalation Name: Enter the signal name that, if received, terminates this flow branch. |
| Intermediate Throw: Enables a process to send a signal to the parent flow. For example, you can use this to send a signal to an Intermediate Catch notation to trigger a sub-process within the flow. Use this object when you need for your flow to wait for the signal to be thrown before it proceeds down this branch.
|
Outputs: Optionally, you can provide outputs that are used elsewhere in your flow as input values. Press the + or - buttons to add or remove the number of output values.
Signal Name: Enter the name of the signal being thrown. |
|
Decline Callback: Cancels out the Start Callback notation for customized queue callbacks. This reverts the interaction and flow behavior to the settings prior to Start Callback being initiated. Callers will be placed back into queue at the same priority level that they had.
|
N/A |
|
Register Callback: Generates a customized queue callback request.
This notation should be preceded by the Start Callback notation. |
Callback Number: Define the telephone number to call the customer back at. The default value is interaction/customer, which translates to the number that the customer is calling in from. Callback Queue: Select the queue for the outbound call request. Outbound Caller ANI: Select the telephone number that the outbound call shows as being made from. This number will be displayed as the caller's ID on the recipient's telephone, if applicable.
Precallback Media: Select a media that plays to the agent before the customer being called back is dialed.
Callback Ringing Media: Select a media file from your tenant that plays to the agent while the customer is being dialed. Expire Callback After: Select an expiration time frame for queue callback requests. If a callback has not been initiated within this time period, the request expires and isn't sent to an agent. The options range from four hours to one week. The default value is 3 Days. |
|
Start Callback: Removes a caller from queue and gets the platform ready for a potential customized queue callback request.
This notation should precede the Register Callback and Decline Callback notations. |
N/A |
|
Start Secure DTMF Collection: Triggers the connection between CxEngage and a third party for secured payment collection by suppressing DTMF collection and storage, so customers can enter their credit card data over the phone securely. The customer is forwarded to the third party service using a TwiML dial to their SIP endpoint. The third party processes the call with their DTMF suppression technology and immediately forwards the now secured call back to the CxEngage agent.
This notation should be followed in your flow design by a Script notation that embeds the third party application within an iFrame component, and then the Stop Secure DTMF Collection notation to disconnect from the third party. For more information, refer to Designing a Payment Collection Flow. |
Secure SIP Endpoint: The third party platform's SIP endpoint that the call is sent to, processed for DTMF suppression, and forwarded back to the agent from. DTMF Suppressed SIP Endpoint: The CxEngage SIP endpoint that the third party forwards the call back to after DTMF has been suppressed Custom Headers: Optionally, enter additional custom headers to send in the call to the third party SIP endpoint.
Outbound ANI: Enter the source for the call to the third party SIP endpoint. The default value is interaction/contact-point. Dial Timeout (in seconds): The number of seconds to wait for the third party to pick up the call before being considered as unanswered. The default value is 18. Record: If enabled, records the secure collection process. This setting overrides any other flow recording settings during the secure collection process. This is enabled by default. Prevent Agent Recording Control: If enabled, any agents involved in the conference will have their ability to pause or resume recording disabled during the secure collection process. This parameter is enabled by default. If disabled, agents will have the ability to pause or resume recording during the secure collection process if Recording Update Allowed is enabled in the flow default settings. Conference When Finished: If enabled and the third party is disconnected for any reason, the customer will be forwarded back to the agent. This is enabled by default. If disabled and the third party is disconnected before the secure collection process is complete, the customer will not automatically be forwarded to the agent. We recommend leaving this parameter enabled unless you are handling this logic differently. Beep On Entry: If enabled, a beep will sound when the customer and the third party are conferenced back with the agent, indicating that the agent is able to speak to the customer again. The beep will also sound after the secure collection process is complete, the third party is removed, and the customer is back with the agent. This is enabled by default. Connected: Enter a binding variable name to assign the connection response. A successful connection will send a true response, while an unsuccessful one is false. For example, you can name the response success, and then later check for a successful connection with (= success true). |
| Start Recording: Sends a signal to start recording the interaction. This is the in-flow equivalent to an agent using the toolbar to begin recording and sends the same signal to the rest of the flow.
|
N/A |
|
Stop Secure DTMF Collection: Ends the secured payment collection connection that was initiated with the Start Secure DTMF Collection notation. The third party portion of the conference is disconnected and the customer is forwarded back into conference with the CxEngage agent.
This notation should be preceded by a Start Secure DTMF Collection notation to trigger the connection, and a Script notation that embeds the third party application within an iFrame component. |
Beep on Entry: If enabled, a beep will sound when the customer is added back into conference with the agent after the third party has been disconnected. This is enabled by default. Record: If enabled, records the interaction after the third party has been disconnected. This value overrides any other flow recording settings during the secure collection process. This is enabled by default. |
| Stop Recording: Sends a signal to stop or pause recording of the interaction. This is the in-flow equivalent to an agent using the toolbar to pause recording and sends the same signal to the rest of the flow.
|
N/A |


Return to top
Flow Defaults - Settings
There are some basic flow functions that are required for every customer flow. These functions are configured through mandatory flow settings. If you try to publish a customer flow without configuring the mandatory settings, an alert will remind you to complete the flow defaults prior to publishing.
Access the Flow Defaults by clicking on the Flow Settings icon ( ) next to the Publish button. On the Flow Defaults tab, enter the values for the functions that apply to your flow.
- Hold Media: Select the media file that is played to callers who are placed on hold during the interaction or who are transferred from this flow.
- Transfer Timeout: Enter the number of seconds to wait for a transfer to connect to the new resource before considering the request as failed.
- Transfer Dispositions: Select the disposition code list that should be included with a transferred work offer.
- Transfer Force Disposition Select: Click to enable to have agents receiving a transfer forced to select a disposition for the interaction.
- Transfer Auto Wrap-up: Click to enable to have agents receiving a transfer automatically placed in Wrap-Up mode after being disconnected from the transferred call. This is enabled by default.
- Transfer Wrap-up Update Allowed: Click to allow the agent receiving a transfer to manually turn automatic wrap up on or off from their toolbar. This is enabled by default.
- Transfer Target Wrap-up Time: Enter goal time frame, in seconds, for agents to complete their post call work following a transferred work offer. This is the maximum time in which an agent can be in Wrap-Up and still be within target time frames.
- Transfer Maximum Wrap-up Time: Enter the maximum time frame, in seconds, for agents to complete their post call work in Wrap-Up mode following a transferred work offer.
- Transfer Auto Answer: Click to enable to have transferred interactions automatically accepted by the agent it is transferred to.
- Transfer ANI: Define the telephone number that transferred calls from the platform are being made from. For example, the platform dials a PSTN agent to send them a customer call. The Transfer ANI is what is displayed to that PSTN agent.
Customer ANI: Uses the customer's telephone number.
Contact Point: Uses the contact point value mapped to the interaction flow. This is the default selection.
Custom: Enter a custom ANI in E.164 format or an expression that translates to an E.164 telephone number associated to your tenant.
- 3rd Party Conference Recorder: Click to enable to use a third party recorder, including CxQM, for your interactions instead of an integrated service such as Twilio. Enabling this setting does not automatically force recording of interactions. Recordings triggered by enabling the "Record" parameter in applicable flow notations such as Conference Customer In. Enabling this 3rd Party Recorder setting tells CxEngage, when recording occurs, to use a specifically configured recorder.
- Mute Recorder: Click to mute any incoming audio from a third party recorder if one is enabled for your tenant. This is enabled by default.
- Recorder Endpoint: Enter the endpoint address for your third party recorder if one is enabled for your tenant.
- Dial From: Enter the number or path that makes the API calls to your third party recorder. This field has a default value of interaction/contact-point that is an appropriate source for most use cases. If your API calls to your recorder are coming from a source other than a contact point from your dispatch mappings, you can enter that source here.
- Custom SIP Headers: You can choose to add customized SIP headers in API calls to your third party recorder if one is enabled.
- Recording Update Allowed: Click to provide agents with the ability to pause and resume the recording of their interactions. For example, there may be sensitive information being provided such as a credit card number that you may not want recorded. The agent can pause the recording before obtaining the data and then resume when ready. This is enabled by default.
- Timed Presence pause time after unanswered call (in seconds): Enter the length of time in which a Timed Presence agent remains Not Ready after not answering a call. If set to 0, the agent is made Ready immediately. The default value is 300 seconds, or 5 minutes.
- Enable Silent Monitoring: Enable the silent monitoring of calls on this flow. This is enabled by default.
- Transfer Reset Enqueue Time:If the toggle is disabled, enqueue time is measured with the original queue entry time. This overrides any queue escalation settings on the queue being transferred to. If the toggle is enabled, the enqueue time is reset when an interaction is transferred to a new queue. This is disabled by default.
- Record Agents: If this toggle is enabled, then additional call participant legs through this flow will be recorded. For example, if an agent places a caller on hold and places a conference call to a 3rd party, or Supervisor. Enabling Record Agents will record the conference call made by the agent. If this toggle is disabled, call recordings will include just the customer leg as they did previously. This is disabled by default.
- Scheduled Callback Enabled: If this toggle is enabled, agents can see the Schedule Callback button in . The Schedule Callback button allows agents to schedule a customer callback for a specifc date and time during the initial interaction. If this toggle is disabled, the Schedule Callback button is not displayed in . This is disabled by default.
Return to top
Flow Defaults - Notations
In earlier versions of CxEngage all of your flow details were configured through individual flow objects or notations. Now, you can use the Flow Default settings for basic functions that are required for every flow instead of using individual flow objects. This list indicates how to configure the flow notations that you may still use and point out the ones that you no longer need.

|
If you are using a version of a flow that includes flow objects identified below and find that you are experiencing issues, try publishing a new version of the flow using the flow default settings instead. |
| Object | Configuration | ||||||||||||||||||
|---|---|---|---|---|---|---|---|---|---|---|---|---|---|---|---|---|---|---|---|
|
Audio Recording: This flow object should not be used. Configure this feature through the flow default settings.
|
|||||||||||||||||||
|
Auto Wrap-Up: This flow object should not be used. Configure this feature through the flow default settings.
|
|||||||||||||||||||
|
Click To Dial: Enables the functionality to click on a contact in your CRM and have the number dialed, and to make outbound calls using the Dial Pad. This flow notation also enables customer requested calls. Click to Dial is also used to configure outbound SMS, if your tenant is configured for SMS. Use this object as part of a basic flow specifically for the click to dial function. It only requires start and end events attached to it in order to function.
For more information on this flow design, refer to the instructions to create a click to dial flow. |
Outbound (To) Endpoint: Select the type of endpoint being dialed. The default value for any of these selections is interaction/customer. You can edit the value as needed, or take the value from interaction/customer to help build your required endpoint.
Outbound Ring Time (seconds): The length of time in which the phone will ring before the outbound call is considered unanswered. The default value is 30. Previously referred to as Customer Timeout. Outbound Caller ANI: Enter the E.164 telephone number that the outbound call is being made from, or an expression that translates to the telephone number to use. This number will be displayed as the caller's ID on the recipient's telephone, if applicable. This number must be associated to your tenant with your telephony provider, but does not need to be currently mapped to a specific flow. If you're entering the specific telephone number instead of a variable, it must be surrounded by quotation marks ("). For example, "+12345678910". Previously referred to as Outbound ANI. Record Call: Click to enable if you want the outbound calls made from this flow to be recorded. Previously referred to as Call Record. Resource Direction: The direction that the agent must be in to be offered the interaction.
Work Offer Timeout (seconds): The length of time in which the platform will offer the work offer and dial the agent, if Auto Answer is disabled. The default value is 30. Previously referred to as Resource Timeout. Auto Answer: Click to enable to have the outbound WebRTC work offer automatically accepted by the agent and the contact dialed. If disabled, the agent must accept the work offer prior to the contact being dialed. Auto Screen-pop: Automatically triggers your internal screen pop. You can disable to remove auto screen pops or to customize a different screen pop configuration with the Screen Pop notation on a parallel path. Disposition Codes: Select the disposition list to use for interactions on this flow. The list includes the enabled lists available through the Disposition List menu.
Auto Wrap Up: If enabled, automatically places agents into Wrap Up mode after being disconnected from callers. This is enabled by default. Resource Wrap-up Toggle: If enabled, provides agents with the ability to manually turn automatic wrap up on or off from the Agent Toolbar. For example, Auto Wrap Up may be enabled however unnecessary for a particular interaction. The agent can turn the Wrap Up feature off while on the call and immediately become Ready upon disconnecting. This is enabled by default. Previously referred to as Allow Wrap Up Update. Target Wrap Up Time (seconds): Enter goal time frame, in seconds, for agents to complete their post call work. This is the maximum time in which an agent can be in Wrap Up and still be within target time frames. The default value is 30. Max Wrap Up Time (seconds): Enter the maximum time frame, in seconds, for agents to complete their post call work in Wrap Up mode. Agents are automatically placed into a Ready state after this time frame. The default value is 45. Previously referred to as Wrap Up Time (seconds). Fallback to Queue (if resource is specified): This parameter is ignored if the interaction was not initiated for a specific resource ID.
Fallback Queue: This parameter shows if the Fallback to Queue (if resource is specified) parameter is enabled. Select the queue that the interaction is routed to if the specific agent doesn’t either cancel or become available to accept the work offer within the amount of time entered in the Fallback Timeout parameter. Fallback Timeout: This parameter shows if the Fallback to Queue (if resource is specified) parameter is enabled. The Fallback Timeout is length of time to wait for the specific agent to either cancel or become available before the interaction is placed into the Fallback Queue for another agent. In the first input, select the unit of time (Seconds, Minutes, Hours). In the second input, enter the number of seconds, minutes, or hours or an expression that evaluates to a positive integer value at runtime. Expressions that result in values that can’t be parsed or values less than 10 seconds cause a default 30 seconds to apply. Fallback Resource Direction: Select the work mode direction the available agents must be in when enqueuing to the Fallback Queue.
Route to Queue (if no resource is specified): Optionally, select a default queue for the outbound call request when an agent isn't already identified to work with the interaction. Interactions that are initiated by an agent (for example, clicking on a contact in a CRM) have the agent's resource attached to the request. However, interactions initiated by a customer (for example, filling out a web form requesting a callback) would not be attached to a resource ID and can be routed to this queue instead. Previously referred to as Default Queue. Leave Customer Connected: Click to enable if you want the contact to remain on the line once the agent is disconnected from the call. For example, you may want to include a Customer Satisfaction Score action in your flow and leave the contact connected to participate in the survey. Previously referred to as Customer Connected. Beep: Click to enable a beep on entry and/or exit. When enabled, an audio tone indicates when the resource is added to a call, or removed from a conference. This is a multi-select option, allowing you to select any, both, or neither of the options.
Enable Early Media When enabled, agents hear the ringtone and any system messages provided by the telephony carrier. When the dialed participant answers, they are immediately conferenced with the agent. This allows the agent to hear the full "hello" greeting when the dialed participant answers the call. Dequeue After Timeout: If enabled, the interaction waits in the queue for the configured length of time and then the interaction is removed from the queue.
This setting does not apply when enqueued to a specific agent. The Dequeue Timeout timer starts when enqueued to the Fallback Queue or Route to Queue (if no resource is specified). Dequeue Timeout:This parameter shows if Dequeue After Timeout is enabled. Dequeue Timeout is the length of time to wait in queue before removing the interaction from the queue and existing Click to Dial. In the first input, select the unit of time (Seconds, Minutes, Hours). In the second input, enter the number of seconds, minutes, or hours or an expression that evaluates to a positive integer value at runtime.
Generic Flow Escalation: When enabled, Click to Dial throws flow a generic escalation named
The Generic Flow Escalation parameter is optional and disabled by default.
Binding Outbound Result: The outcome of dialing the customer phone number or sending an outbound SMS message. The possible values are:
Customer Still Connected: True if the customer is connected after exiting the Click to Dial notation. Otherwise, false (either the customer was disconnected prior to exiting or the customer was never connected in the first place). |
||||||||||||||||||
|
Click to Email: Enables the functionality to click a contact's email address in Skylight Desktop and have an outgoing email message to the contact's address initiated.
Use this object as part of a basic flow specifically for the Click to Email function. It only requires Start and End events attached to it in order to function. For example:
|
From: The email address that displays in the From section of the email. The default From email address is set by the value for the interaction/contact-point. Important: When a From email address is added in the Click to Email flow, all send and reply emails will have this From address. To ensure the Send Mail function works properly, the From address in this field should be the SMTP-User email address found in the Email Integration or any active Listener. Auto Answer: Click to enable. When it is enabled, the email work offer is automatically accepted by the agent and the new email message opens. If disabled, the agent must accept the work offer prior for the new outgoing email message to open. Resource Timeout: The number of seconds in which the platform will offer the work offer to the agent, if Auto Answer is disabled. Auto Wrap Up: Click to enable. When it is enabled, agents are automatically placed in Wrap Up mode after ending the email interaction. Wrap Up Time (seconds): Enter the maximum time frame, in seconds, for agents to complete their post interaction work in Wrap Up mode. Agents are automatically placed into a Ready state after this time. Target Wrap Up Time (seconds): Enter the goal time frame, in seconds, for agents to complete their post interaction work. This is the maximum time frame in which an agent can be in Wrap Up and still be within target time frames. Allow Wrap Up Update: Click to allow agents to manually turn automatic wrap up on or off from their toolbar controls. For example, auto wrap up may be enabled; however, it may be unnecessary for a particular interaction. The agent can turn the Wrap Up feature off while working on the interaction and immediately become Ready when it is completed. Disposition Codes: Select the Disposition List to use for emails on this flow. The list includes the enabled lists available through the Disposition List menu. Force Disposition Select: Click to enable. When this is enabled, agents are required to select a disposition code before they can end their Wrap Up. This function requires Auto Wrap Up to be enabled. If an agent doesn't select a disposition code before the maximum wrap up time elapses, they will stay in Wrap Up until they select a disposition code. Default Queue: Optionally, select a default queue for the outbound email request when an agent isn't already identified to work with the interaction. Interactions that are initiated by an agent (for example, clicking a contact's email address in Skylight Desktop) have the agent's resource attached to the request. However, interactions initiated by a customer (for example, filling out a webform requesting an email response) would not be attached to a resource ID and can be routed to this queue instead. |
||||||||||||||||||
|
Hold/Resume: This flow object should not be used. Configure this feature through the flow default settings.
|
|||||||||||||||||||
|
Offer Queue Callback: Provides callers with the option to request a callback from an agent instead of waiting in the queue. When the request reaches the top of the queue, a callback work offer is placed to an available agent in the specified queue. Once the agent accepts the work offer, an outbound call is placed to the customer. The callback can be made to the number that the customer called from, or to one entered by the customer. These parameters are also included in the Queue with Media and Queue Resource with Media actions. Use this Offer Queue Callback object when you are designing a reusable flow to insert into a Queue with Flow or Queue Resource with Flow actions.
|
Callback Queue: Select the queue that the callback is being made from. This usually matches the queue that the caller was initially waiting in when they were offered the callback but it can be different. Callback Offer Media: Enter a TTS string or select a media file that provides callers with the option to request a queue callback instead of waiting on the phone. This field is populated with default values that you may keep or edit as desired to meet your needs.
Confirm Number Media: Select or enter the media prompt that confirms the telephone number that the callback will be placed to. This field is populated with default values. The default text contains a variable to retrieve the phone number that you may keep or edit as desired to meet your needs.
Change Number Media: Select or enter the media prompt that asks the callers who selected option 2 to change their callback number to now enter in the phone number that they wish to be called back on. This field is populated with default values that you may keep or edit as desired to meet your needs. The telephone number entered here must be in E.164 format. This media must make regional requirements clear to callers. For example, the message should indicate if the number needs to begin with an applicable country code.
Callback Exit Media: Select or enter the media prompt that confirms that the callback has been requested and advises callers that they may disconnect. This field is populated with default values that you may keep or edit as desired to meet your needs.
Callback Invalid Number Media: Select or enter the media prompt that will advise callers if the callback number entered is invalid. This field is populated with default values that you may keep or edit as desired to meet your needs.
Agent Callback Message: Select or enter the media prompt that the agent receiving the callback work offer hears. This message is played after the work offer is accepted while the toolbar initiates the outbound call. This field is populated with default values that you may keep or edit as desired to meet your needs.
Agent Callback Media: Select or enter the media that will play to agents while waiting for the outbound callback to be answered by the customer. Outbound Caller ANI: Enter an Outbound Caller ANI to use when calling a customer back. By default, the contact point (interaction/contact-point) is used as the outbound caller ANI. Enter custom Outbound Caller ANIs in E.164 format as an expression (for example, "+15065551234”).
|
||||||||||||||||||
|
Platform Defaults: This flow object should not be used. Configure this feature through the flow default settings.
|
|||||||||||||||||||
| Silent Monitoring: This flow object should not be used. Configure this feature through the flow default settings.
|
|||||||||||||||||||
|
Transfer: This flow object should not be used. Configure this feature through the flow default settings.
|
|||||||||||||||||||